Thank Your For Stopping By

Thank you so much for stopping by to visit my blog... it is changing as I change and learn more things... I hope after Christmas to get an opportunity to make some more CARDS. I am loving Loom Knitting now... and have lots to do before Christmas....I don't mind sharing how I do things and if you have questions you can E-MAIL me @ winacard@gmail.com and I will be happy to answer any questions that I have.


Showing posts with label Winter Woodland. Show all posts

Friday, October 1, 2010

Fall Scarf and Boggin with Needle Felted Leaf and Acrons

Designed by Jeannie Phillips ~ Southside, Al
I am so excited about this scarf and hat!!...it is my favorite yet...I am learning... I learned how to do the knit stitch on my !!looms for my patches... and I am so excited... now if I just get better at felting them before I put the design on them.... I used my Gyspy and Cricut for templates for my Needle Felting and am so excited about how it turned out!!... thank you so much for looking... now to find something to do with these hats and scarfs that I am making!

Gypsy and Cricut
Gypsy Wandering
Leaf cut @ w 2.20 x h 2 27.. with the hide contour feature used to hide the lines in the leaf....I cut this leaf  inside a square from George... (to create the template) ...the square is cut @ w 3.15 x h 3.15... on the Cricut I would cut the leaf @ 2 1/4 inches and the square @ 3 1/4 inches.
Winter Woodland
Acorn cut @ w 0.94 x h 4.52  (this is not too large I promise)... I cut this inside a square from George that was cut @ w 1.59 x h 1.40...on the Cricut I would cut the acorn @ 4 1/2 inchs and the square @ 1 1/2 inches.

I am really enjoying the Needle felting it is just so much fun... I used a light brown on the bottom of the acorn..and a dark brown for the top and the steam...... and a burn orange color for the leaf...and the same dark brown for the veins and steam on the leaf.. these are just super easy to do.





Friday, December 4, 2009

Designed by Jeannie Phillips - Southside, AL
Click on any picture to enlarge.
I am so excited it is supposed to snow tomorrow!!!...Remember this is Alabama... so snow is rare!!! ... and there is no telling if we will get it... but at least there is a chance!!... and I am so excited... so I celebrated with a snowman card... I love the Winter Woodland snowmen... I just love them... they make me just plain happy!!... happy!!... happy!! ... happy!.. thanks so much for looking and I cherish your comments! Hugs, Jeannie
CRICUT & GYPSY
Winter Woodland
Snowman, his shadow and layers all cut @ h 3.24.
If you set the height on these the width will be right on all cuts.
On the Cricut I would cut these @ 3 1/4 inches.
When It's Cold Outside
Snowflake and its shadow cut @ h 3.36.
If you set the height on both the width will be right.
I welded the shadows of the snowmen to the snowflake and the snowflake shadow.
On the Cricut I would cut these @ 3 1/2 inches... you wouldn't have to weld the shadows you could just adhere them directly to the snowflake cuts and get the same effect.

Thursday, December 3, 2009

A Moment in Time

Designed by Jeannie Phillips - Southside, AL
Click on any picture to enlarge.


I have been looking at this little pine cone branch for a while now trying to figure out how to use it... finally I came up with this... hope you like it... all the delegate cuts I trusted only to Basicgrey paper.... it always cuts out so pretty... so the words and that delegate little branch is from a Basicgrey paper pack... the other beautiful paper is from My Minds Eye- A Signature Christmas- Holiday Glitter Pack I am crazy about this paper...its just amazingly beautiful. I hope you like my card! Merry Christmas! .. Hugs, Jeannie

If you are using your Cricut cut these cuts I am doing my best to get the best measurements... I have done this by trial and error...so bare with me while I work out my mistakes..I think I have all the cuts right on this card for the Cricut~ Thanks Jeannie
CRICUT & GYPSY
Joys of the Season
Pine Branch Cut cut @ w 2.28 x h 2.03
Layer feature of this cut the pine cones cut @ w.1.39 x h 2.03.
When you set the height you will get the width.
On the Cricut I would cut both of these at 2 inches.
"Merry Christmas" cut @ w 1.78 x h 1.14.
On the Cricut I would cut this at 1 1/4 inches.
Winter WoodlandBold
Cardinal cut @ w 1.77 x h 1.89.
The layer feature of this cut the black on the bird cut @ w 0.09 x h 1.89.
When you set the height for the layer feature you will get the right width.
On the Cricut I would cut this @ 2 inches... maybe 1 3/4 you could cut one of each and put the one you don't use on the front on the inside of your card.
Mini Monogram
Scalloped Circles cut @ w 3.90 x h 4.31 and w 3.33 x h 3.69.
On the Cricut I would cut these at 3 3/4 inches and 3 1/4 inches.
Circle cut @ w 2.70 x h 3.83.
On the Cricut I would cut this @ 2 3/4 inches.

Friday, November 20, 2009

Christmas With the Cricut - Advanced Card

I have been waiting all week to post this card... its been finished like 2 months...and it just kills me not to get to post something!!...lol... to make this card you start with my Simple Card Monday - Card... just click here to see that card and its instructions! ...and finish off with the instructions below... I forgot to get a picture of my new cuts...so please forgive... I did try to make really good instructions!! I hope you like it!!! ... I had a blast turning my Simple Card Monday card into an Advanced card... be sure and Check out Christmas With the Cricut!!! and visit Susan's blog from there and comment on her card... She had done such beautiful work this week! Hugs, Jeannie

Advanced Card
Winter Woodland Cartridge
I started with the finished simple card from Monday’s card.
Then I cut a second tree @ 5 ½ inches... and 4 more snow layers at 5 ½ inches.
I cut 3 more birds ...on the flipped feature.
I cut several more snowflakes...of each kind.
I cut the snowman @ 2 3/4 inches... 2 times in white and 2 times in red on the shift feature and once in yellow on the layer feature and once in yellow on the shift-layer feature.
I trimmed three branches from my new tree...added the snow to different branches than before and bent out the limbs... popped this tree from the fist tree with pop-dots.
I then inked the ground snow layers and glued two ground snow layers together as wide as the blue background paper... I did this twice.
I attached the first new layer of snow to the popped tree base..then I added the white showman inked in blue ink to the snow base with glue and popped the top part of the snowman from the background paper.
I then popped the last layer of ground snow with pop-dots.
I assembled the second snowman... adding his inked scarf and buttons directly to him...along with one of the red hats... I used a sharpie for his eyes...and pink chalk applied with a make-up q-tip to his cheeks..then I added a dot of white gel ink to each cheek.
I added the yellow strip to the second hat...inking both the strip of yellow and the hat in brown..I popped this hat up from the first hat with pop-dots... then I glued the snowman bottom to the top snow layer and pop-dotted the top of the snowman to the snowman below.
I added the extra birds..glueing them to the popped layers only at their feet.
I used leftover branch snow on the inside of the card for the pile of snow the inside bird is laying on...and added a snowflake.
All snow parts are inked in blue ink...all other parts are inked in brown.


Thursday, November 19, 2009

Christmas With the Cricut - Scrapbook Page

I have to tell you that this Christmas With the Cricut project terrified me!!!... and I am not kidding at all!!!.. it is the one project that made me almost turn this opportunity down!!... I am not kidding one bit... my mat shot was just confusing because I used the layering of pages feature on my Gypsy... so I am just going to tell you the cut sizes... I so hope that you like my scrapbook page!!!.... just posting it now gives me a tummy ache... thank you so much for looking... be sure and check out the other projects at Christmas With the Cricut...and to visit Susan's blog when you do!...everything has been so great this week!
CRICUT & GYPSY
Winter Woodland
I love these letters.
All the letters shadows cut @ h 3.21 inches the with will be right when you set the height.
Large snowflake cut @ w 11.84 x h 13.95.Align Center
I welded the shadow letters to the large snowflake.
These were the layers on my first page.
On the second page I cut the following.
Winter Woodland
All letters cut @ h 3.21...the width will be right when you set the height.
George
Largest Square for picture cut @ w 5.81 x h 5.42.
On the third page I laid out the following.
George
Smaller square for picture cut @ w 4.57 x h 4.26.
Winter Woodland
Larger small snowflake cut @ w 4.96 x h 7.11.
Smallest snowflake cut @ w 3.20 x h 4.16
On the forth page I cut the following.
All the letter from "our" cut @ h 1.11 inches the with will be right when you set the height.
"1" cut @ w 1.13 x h 2.89
"st" cut @ h 1.21... width will be right when you set the height.

Wednesday, November 18, 2009

Snowbird

Designed by Jeannie Phillips - Southside, AL
Click on any picture to enlarge.

I don't know if I am going to get to make another card this week.. Dr appointment's 2 for mom ..one for me.... and our Thanksgiving is this weekend.... so I am going to be very busy.... and am missing making cards already... I did get my When Its Cold Outside cartridge today!!!... so I just had to make this card.....it is a card that should have been easy but then I had a dull blade...then a too sticky mat... and it just got hard!!...but when I did get the cuts to cut out I was really really happy with the results... I hope that you like it too... thank you so much for looking!
hugs, Jeannie
CRICUT & GYPSY
When It's Cold Outside
Top left snowflake is a shadow cut @ w 1.86 x h 2.05 - on the Cricut I would cut this @ 2 inches.
Bottom left snowflake cut @ w 2.43 x h 2.24 - on the Cricut I would cut this @ 2 1/4 inches.
Large snowflake is a shadow cut @ w 3.81 x h 3.51 -on the Cricut I would cut this @ 3 1/2 inches.
For the top two I added a George octagon cut @ w 1.64 x h 152 - you would not need this cut without the Gypsy.
Winter Woodland
Cut allCardinal cuts @ h 2.19..the widths will be right if you set the just the heights.
CUTTLEBUG
Snowflake Folder

Christmas With the Cricut - Christmas Gift Tags

I enjoyed doing these tags for Christmas With the Cricut... I got to make my own embossing folder...now that was fun fun fun.... Since it was my first embossing folder and a small tag I wanted to start out simple... I really like the idea of combining the cut with the embossing... hope that you like it too... be sure and check out the other designs at Christmas With the Cricut...and when you are there hop on over to Susans blog and leave her a comment about her beautiful work!!..Don't forget to leave a comment on the Christmas With the Cricut blog for a chance to win!! Hugs, Jeannie
GIFT TAGS

For my gift tags I wanted to try my new Cricut Cuttables to emboss my tags.... I was so excited when this worked out just the way I wanted it to!
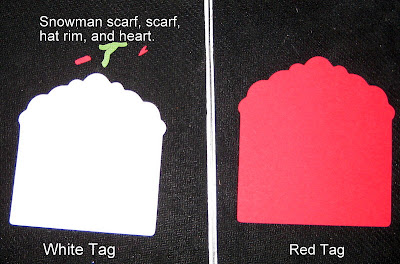
1. I cut the Snowman (page 47) of the Winter Woodland cartridge...I cut him on blackout into the Cricut Cuttables sheet.
2. I cut out my tag (page 33) form the Winter Woodland cartridge once in white @ 3 inches on real dial size and once in red @ 3 1/4 inches on real dial size.
3. I cut snowman layers on the shift feature in green and on the layer feature in red all on 2 inches.
4. I embossed the white tag with the snowman Cricut Cuttables embossing folder.
5. I added the scarf, hat and heart to the snow man. I then inked the tags with brwon ink around the edges and assambled the tag and added the ribbon.

Tuesday, November 17, 2009

Christmas With the Cricut - Home Decor Project

This is my Tuesday Project for Christmas With the Cricut...I can't wait to see the other projects... especially Susan's...I know that she is really excited so be sure and check hers out... I really love doing the glass etching...its really quick... and dresses up an in-expensive item and makes it really special!... hope you like my Home Decor Project... thank you so much for looking!... Hugs, Jeannie
Etched Votive Cup
Materials
In First Picture.
2 pieces of 8 1/x x 11 white card stock
1 Zyron Machine
1 Stylus
1 votive cut bought at Hobby Lobby
In Second Picture
Etching Cream
Foam Brush
Not Pictured
Cricut
Gypsy
Winter Woodland Cartridge
I cut 4 sets of trees from the Winter Woodland Cartridge w 2 ½ x h 2 ½ inches.
I trimmed around these at ½ inches out from each side...making the square 3 inches x 3 inches (pictured).
I ran each square through my Zyron (pictured).
I used the stylus to trace around the inside of the image and the outside of the square... and then I ran the side of the stylus across the whole image several times... this was to insure that all the sticky stuck good to the paper.
I then pealed away the Zyron papers... attached to my votive cup... and added the Etching Cream (pictured).. Let that set for 5 minutes...or by the instructions of your brand of Etching Cream... rinse off well with warm water ... this will ruin the paper but not the glass... and that is ok.
Clean your glass... (better than I did).

Monday, November 16, 2009

Christmas With the Cricut - Simple Card

I was lucky enough to get picked to do a week of designs over at Christmas With the Cricut I was just blown away.... the first day we do a simple card... a beginner typ card... and later in the week we do a more advanced card...what I chose to do was to start with the simple card...and show you later in the week how to layer this card up and make it more interesting... so check back each day with me and with Christmas With the Cricut and see what all is going on... and you must see Susan's beautiful work too!!.. Hugs, Jeannie

Simple Card
I used only the Winter Woodland Cartridge on this card.
First I cut out all the pieces as follows
Tree cut @ 5 ½ inches including the snow layers.
Bird cut @ 1 ½ inches... all of the layer cuts cut too.
Snowflakes cut @ 3 inches... 1 of each kind.
There is a picture of these cuts.
Second I inked all my pieces.
The snowflakes in blue.
All other cuts, including the card base the inside white framed piece in brown ink.
I use wedgies make-up sponges to apply my ink.
Third I assembled the card.
These are the pieced I cut out for my card.


Thursday, November 12, 2009

The Snowflake

Designed by Jeannie Phillips - Southside, AL
Click on any picture to enlarge.
Donna has just got me going...between her and the card I made for The-Gypsy Spot for Monday I have a new kind of card addiction!!!!... and I am having a blast... I saved my first one for Monday since we are learning together at The-Gypsy Spot that seemed only fair.... I hope that you like this card...I had fun making it... still learning this shape/layer thing... so there are some mistakes... but getting better!... Hope you like it... let me know what you think.... Hugs, Jeannie
CRICUT & GYPSY
Gypsy Wanderings
Large snowflakes and shadows cut @ h 4.47 the with will follow the height so just set the height.
Small snowflakes and their shadows cut @ h 2.47 the width will follow the height.
Winter Woodland
Snowman and his shadows cut @ h 4.30 the width will follow the height.
Alphalicious
HI and its shadow cut @ h 1.53 the width will follow.
Each screen shot is a separate file that I saved.
Everything in red is welded.
If you have any questions I will be glad to answer them.

Winter Word Card!!

Designed by Jeannie Phillips - Southside, Al
Click on any picture to enlarge!
This card was so inspired by Donna Mundinger!!...thank you Donna... I want to tell you Donna is brilliant...I knew that but after making this card I must tell you she is even more brilliant than you even know... this card could use more bling but I was just too exhausted to keep going!!!... I made a word card for The Gypsy Spot for this coming Monday... this one is an improvement!!... you will have to wait to see that one!!!... but I may never ever do another one ever!! ... so when Donna does one be sure and give her extra hugs!!... and ooohhhh and ahhhhh lots and lots and lots!!!!... the instructions are at the bottom of the post on the mat shots... to easier explain!!!... click on the picture to see a larger picture!... hugs everybody! Jeannie

Blog Widget by LinkWithin
Thank you so much for signing my Guestbook... I have no idea how to reply to people who do sign in... but I so love it when you do!!... So thank you so much!... if you ever have any questions you can email me @ winacard@gmail.com. I will be happy to answer any questions you might have.

Thank you again for signing my Guestbook~
Jeannie

Please Sign In