Thank Your For Stopping By

Thank you so much for stopping by to visit my blog... it is changing as I change and learn more things... I hope after Christmas to get an opportunity to make some more CARDS. I am loving Loom Knitting now... and have lots to do before Christmas....I don't mind sharing how I do things and if you have questions you can E-MAIL me @ winacard@gmail.com and I will be happy to answer any questions that I have.


Showing posts with label Christmas With the Cricut. Show all posts

Tuesday, June 22, 2010

A Sea Monster B'day Wish

Designed by Jeannie Phillips ~ Southside, Al
Click on any picture to enlarge.
Oops on the video this time... I thought I had my camera off... it was on... thought I had it on... it was off... so no video...I messed it all up... a lesson in paying closer attention!!... smile!

The Gypsy File is available for this card by email. Just copy and paste this email to your personal email account winacard@gmail.com and let me know which Gypsy file that you are wanting.

This is my daughter's birthday card... she and her dad are in PC Florida this week...they go together ever year... (I can't get in the sun because of my Lupus and my son is at camp all summer).. they love the beach... my son and I go to Gatlinburg ever spring break...we love the mountains.  Anyway they are at the beach and Robby said Madison had been talking about sea monsters...I imagine that talk all got started because of the oil spill.. Madison's birthday is June 30th... so I knew just what kind of card I was making her this year...I so hope that she loves it!! Thank you so much for looking!  Hugs, Jeannie

CRICUT & GYPSY
Mini Monster
Sea Monster and all its layers cut @ h 2.06 set the height and the width will be right... on the Cricut I would cut this @ 2 inches.
Life is a Beach
Wave borders (3) cut @ w 3.50 x h 0.69 on real dial size!  each of these borders are welded to different height rectangle cuts.... on the Cricut I would cut these @ 3/4 and inch...I would trim this do to the width I need... you may have to cut two per layer and overlap them...glue them together and trim to a width of 3 1/2 inches.
George (unlink you width and height for these cuts)
Wave Rectangles...all are cut @ w 3.50.. here are the heights for each tall wave rectangle h 2.82, medium wave rectangle h 2.61 and small wave rectangle h 2.34... cut all these cuts on real dial size.... these are each welded to the wave cuts listed above ...see mat shot... using the Cricut I would cut these with a paper trimmer... I would cut the all the rectangles at 3 1/2 inches wide... then the heights at 2 3/4, 2 1/2 and 2 inches.
George (unlink your width and height for these cuts)
Sand cut two  welded oval  cut @ w 1.67 x h 2.20...non welded oval cut @ w 1.40 x h 2.10.  Rectangle cut @ w 3.50 x h 1.60... small rectangle on the side...not welded cut @ 3 0.30 x h 1.0  ... Using the Cricut I would cut a rectangle 3 1/2 inches x 4 inches...then I would use a wave cuter to cut the wave across the top of the cut.
Create a Critter
Happy Birthday cut @ w 2.69 x h 1.35...make sure that real dial size is not set and that your link button is yellow for this cut... on the Cricut I would cut this at 1 1/4 inch.

The bottom wave is adhered directly to the background piece...then the sea monster's tail is adhered to that... pop dot the middle wave from that...and the top wave is pop dotted from the middle wave... adhere the sand (after you have added the happy birthday, and glitter) to the top wave... adhere the sea monster's head to the water above the wave.

Card base is 4 ¼ x 5 ½, Frame Piece 4 x 5 ¼ , Background piece 3 ½ x 4 ¾… these cuts are on the inside and outsides of my cards… Sentiment piece 2 ¾ x 4 inside only….. I cut all of these with my paper trimmer.


There is now a link at the bottom of each post where you can show off your recreation of my cards… with a link back to your card on your blog, or the Cricut Message Board or a photo storage place like Photo Bucket…. I would love it if you share your recreations with me! It just makes me happy!! Thank you so, so much! Hugs

I love sharing the instructions and files for my cards but I do ask that if you use my instructions or files to recreate my card and place it on your blog or somebody else’s blog that you give me the credit for the original design. I also ask that you do not submit my designs for publication, profit or for any contest. Thank you!





Monday, April 26, 2010

Happy B Day ~ BBTB DT Challenge

Designed by Jeannie Phillips ~ Southside, AL
Click on any picture to enlarge.

More pictures below the instructions..and a mat shot!

Gypsy file available by email...just copy and paste the email address into your persona email account... winacard@gmail.com.

I was so excited when Donna Mundinger picked this cut for the Bitten By the Bug 2  Design Team cut for this weeks challenge.....  I absoutly love it... then I drew a blank for a day or two ...and then there it was in my head the idea for this card...and I had so much fun making it... this is the first time I have added doodles to this bee and I was tickeld to death with how they turned out... I hope that you like my card!!... be sure to visit the Bitten By the Bug 2 and see what Bee-u-tiful things the other Design Teams members have created!...thank you for looking!... Hugs, Jeannie

CRICUT & GYPSY
Sentimentals
Bee (2) and its  shadow cuts... one in yellow two in velum cut @ h 2.48 set the height and the width will be right on all cuts...I was thinking that the stripes on the bees back were cut out... so I cut a yellow shadow to go behind this...instead you can cut yellow stripes on one of the layer features and leave out the yellow shadow cut... I trimmed the antennas off all the cuts but the black cuts.... on the Cricut I would cut these @ 2 1/2 inches.
Give A Hoot
Tag and its solid shadow cut @ h 3.41...on the Cricut I would cut these at either 3 1/2 inches.
Flower cut to place on top of tag and its layers cut @ h 2.73 ...set the width and the height will be right... I cut an extra green and orange part of this cut for the inside..I am not sure at all what size to do this on the Cricut I am guessing  2 3/4 inches will work...this is totally a guess.
Graphically Speaking
Swirls cut @ W 2.86 x h 0.80... you will need to unlink the width and height for this... one of these is welded to the shadow cut of the tag....on the Cricut I would cut this at 3/4 and inch.
Song Bird
(loving this cartridge for welded letters!)
"B-day" cut @ h 0.77 set the height and the width will be right...scoot these letters together and weld them...on the Cricut I would cut these at 3/4 and inch...and overlap them when I placed them on the card.
"happy" cut @ 0.77 set the height and the width will be right... scoot together and weld....I placed this on the tag where I wanted it... then I duplicated it so I could cut one in a different color to place on top of the welded "happy"..this duplicating it after I got it just right was the easy way to get everything exactly the same.... on the Cricut I would cut these @ 3/4 and inch..I would adhere the swirl directly to the paper..then place the happy on top of that...you will get almost the same effect.
I popped the tag from the background...then the layer is popped from the background tag cut...the bee is popped from the background paper too.


Wednesday, February 17, 2010

Searching for Honey

Designed by Jeannie Phillips ~ Southside, Al
Click on any picture to enlarge.
I made this card last night... while cooking dinner.... it needs something... but I just couldn't figure out what... but I still like it ... I just love this Tulip Cut from Gypsy Font...I am going to use it again for sure... just have to figure out exactly how I want to use it...thank you for looking!!! Hugs ~ Jeannie

CRICUT & GYPSY
Not including Cricut cuts because of the Gypsy Font cartridge.
Gypsy Font
Tulip cut @ w 2.89 x h 2.50.
Tulip Shadows cut @ w 2.87 x h 2.36.
I cut one in black with the stretch heart shape welded to it for the stamen.
I adhered one of the pink shadow cuts to the black shadow cut...I popped this from the background paper...and popped the pink shadow with the tulip outline cut from that.
Accent Essentials
Outline Heart cut @ w 3.56 x h 1.49...to get this size you will have to unlink the width and height.
I welded this to the black flower outline.
Pooh & Friends
Bee and its and layers  cut @ w 1.67 x h 2.02.
*The shadows I cut in velum (2)... these need to be moved on the screen....... also you need one extra bee piece in yellow and one in black.... you will trim the antenna's cut from the yellow piece...and the wings cut from all but the velum pieces.
You will need one layer cut in black.
Layer these from the bottom up like this...the black bee cut with the antenna's but without the wings...then the two velum pieces without antenna....then the yellow bee cut without the antenna's and wings.
George
Circles for stamen cut @ w 0.41 x h 0.38.


Monday, January 18, 2010

The Spa Treatment

Designed by Jeannie Phillips - Southside, AL
Click on any picture to enlarge.

This card was inspired by the children's book illustrator Caroline Jayne Church.... I love her artwork so much that my future daughter-in-law Robin got one of her books for me for Christmas.... her artwork is so inspiring!!!...I even sent her an e-mail telling her her sketches would make wonderful stamps!!!!.... I hope she hears me!!... I hope that you like this card...I was beyond excited when I got finished!!.. thank you so much for looking! ~~ Hugs, Jeannie

CRICUT & GYPSY
New Arrival
Bathtubs cut @ w 3.56 x h 3.57... I trimmed the legs and shower pipe off  of the second tub..this I pop dotted on top of the first tub and then I trimmed the rim off the third tub which is popped off the second tub...On the Cricut I would cut this @ 3 1/2 inches.
Ducks cut @ w 0.85 x h 0.86...I ended up not using the layer cut...I just used an orange Sharpie to color the beak .... on the Cricut I would cut these 2 3/4 an inch.
Paper Pups
Dogs cut @ w 1.94 x h 2.68...I popped the second one from the first one... on the Cricut I would cut this at 2 3/4 inches.
Everyday Paper Dolls
Water Splashes cut @ w 1.04 x h 4.16..and skewed them 0.06 degrees...I did one..then duplicated and flipped side to side... on the Cricut I would cut these @ 1 1/4 inches on real dial size!
A Child's Year
Tear Drops cut @ w 0.22 x h 0.47..on the Cricut I would cut these @ 1/2 inch....maybe even 1/4 inch.


Saturday, November 21, 2009

Christmas With the Cricut - Crafty Gift

At our house we like Christmas to last forever... a tradition started by my Grandmother... and one we all embraced on my mom's side of the family!!... my husband seems to like it too... but we all get each other several gifts... one regular gift then several small gifts...so each person has lots to open..then we each take a turn opening gifts one at a time until all the gifts are gone... saving the biggest gifts for last... so when I was to make a crafty gift I thought of this as a wonderful treat for one of the small gifts... I hope that you like it!!!... I have loved loved my stint as guest designer at Christmas With the Cricut and feel so honored to be included in that with somebody as talented as Susan!! ... Be sure and hop over to Christmas With the Cricut and see the other wonderful crafty gifts!!... and go from there to Susan's blog and leave her a comment too! Hugs! Jeannie

CRICUT
From My Kitchen
Rooster cut @ 1 3/4 inches.
I cut him once in brown and once in red for each square...cut away the red parts I needed and added them to the brown rooster cut.
Click on picture below to get the other instructions, they were much clearer instructions if I put them in the picture.

Friday, November 20, 2009

Christmas With the Cricut - Advanced Card

I have been waiting all week to post this card... its been finished like 2 months...and it just kills me not to get to post something!!...lol... to make this card you start with my Simple Card Monday - Card... just click here to see that card and its instructions! ...and finish off with the instructions below... I forgot to get a picture of my new cuts...so please forgive... I did try to make really good instructions!! I hope you like it!!! ... I had a blast turning my Simple Card Monday card into an Advanced card... be sure and Check out Christmas With the Cricut!!! and visit Susan's blog from there and comment on her card... She had done such beautiful work this week! Hugs, Jeannie

Advanced Card
Winter Woodland Cartridge
I started with the finished simple card from Monday’s card.
Then I cut a second tree @ 5 ½ inches... and 4 more snow layers at 5 ½ inches.
I cut 3 more birds ...on the flipped feature.
I cut several more snowflakes...of each kind.
I cut the snowman @ 2 3/4 inches... 2 times in white and 2 times in red on the shift feature and once in yellow on the layer feature and once in yellow on the shift-layer feature.
I trimmed three branches from my new tree...added the snow to different branches than before and bent out the limbs... popped this tree from the fist tree with pop-dots.
I then inked the ground snow layers and glued two ground snow layers together as wide as the blue background paper... I did this twice.
I attached the first new layer of snow to the popped tree base..then I added the white showman inked in blue ink to the snow base with glue and popped the top part of the snowman from the background paper.
I then popped the last layer of ground snow with pop-dots.
I assembled the second snowman... adding his inked scarf and buttons directly to him...along with one of the red hats... I used a sharpie for his eyes...and pink chalk applied with a make-up q-tip to his cheeks..then I added a dot of white gel ink to each cheek.
I added the yellow strip to the second hat...inking both the strip of yellow and the hat in brown..I popped this hat up from the first hat with pop-dots... then I glued the snowman bottom to the top snow layer and pop-dotted the top of the snowman to the snowman below.
I added the extra birds..glueing them to the popped layers only at their feet.
I used leftover branch snow on the inside of the card for the pile of snow the inside bird is laying on...and added a snowflake.
All snow parts are inked in blue ink...all other parts are inked in brown.


Wednesday, November 18, 2009

Christmas With the Cricut - Christmas Gift Tags

I enjoyed doing these tags for Christmas With the Cricut... I got to make my own embossing folder...now that was fun fun fun.... Since it was my first embossing folder and a small tag I wanted to start out simple... I really like the idea of combining the cut with the embossing... hope that you like it too... be sure and check out the other designs at Christmas With the Cricut...and when you are there hop on over to Susans blog and leave her a comment about her beautiful work!!..Don't forget to leave a comment on the Christmas With the Cricut blog for a chance to win!! Hugs, Jeannie
GIFT TAGS

For my gift tags I wanted to try my new Cricut Cuttables to emboss my tags.... I was so excited when this worked out just the way I wanted it to!
1. I cut the Snowman (page 47) of the Winter Woodland cartridge...I cut him on blackout into the Cricut Cuttables sheet.
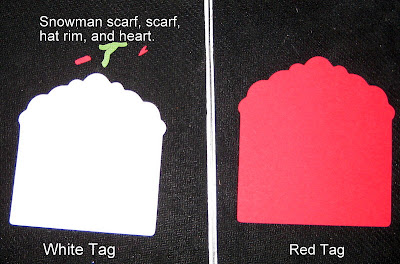
2. I cut out my tag (page 33) form the Winter Woodland cartridge once in white @ 3 inches on real dial size and once in red @ 3 1/4 inches on real dial size.
3. I cut snowman layers on the shift feature in green and on the layer feature in red all on 2 inches.
4. I embossed the white tag with the snowman Cricut Cuttables embossing folder.
5. I added the scarf, hat and heart to the snow man. I then inked the tags with brwon ink around the edges and assambled the tag and added the ribbon.

Monday, November 16, 2009

Christmas With the Cricut - Simple Card

I was lucky enough to get picked to do a week of designs over at Christmas With the Cricut I was just blown away.... the first day we do a simple card... a beginner typ card... and later in the week we do a more advanced card...what I chose to do was to start with the simple card...and show you later in the week how to layer this card up and make it more interesting... so check back each day with me and with Christmas With the Cricut and see what all is going on... and you must see Susan's beautiful work too!!.. Hugs, Jeannie

Simple Card
I used only the Winter Woodland Cartridge on this card.
First I cut out all the pieces as follows
Tree cut @ 5 ½ inches including the snow layers.
Bird cut @ 1 ½ inches... all of the layer cuts cut too.
Snowflakes cut @ 3 inches... 1 of each kind.
There is a picture of these cuts.
Second I inked all my pieces.
The snowflakes in blue.
All other cuts, including the card base the inside white framed piece in brown ink.
I use wedgies make-up sponges to apply my ink.
Third I assembled the card.
These are the pieced I cut out for my card.


Blog Widget by LinkWithin
Thank you so much for signing my Guestbook... I have no idea how to reply to people who do sign in... but I so love it when you do!!... So thank you so much!... if you ever have any questions you can email me @ winacard@gmail.com. I will be happy to answer any questions you might have.

Thank you again for signing my Guestbook~
Jeannie

Please Sign In