Thank Your For Stopping By

Thank you so much for stopping by to visit my blog... it is changing as I change and learn more things... I hope after Christmas to get an opportunity to make some more CARDS. I am loving Loom Knitting now... and have lots to do before Christmas....I don't mind sharing how I do things and if you have questions you can E-MAIL me @ winacard@gmail.com and I will be happy to answer any questions that I have.


Showing posts with label Songbird. Show all posts

Monday, July 12, 2010

Dare to be Different ... BBTB2 Design Team Challenge

Designed by Jeannie Phillips ~ Southside, Al
Click on any picture to enlarge.
The Gypsy File is available for this card by email. Just copy and paste this email to your personal email account winacard@gmail.com and let me know which Gypsy file that you are wanting.

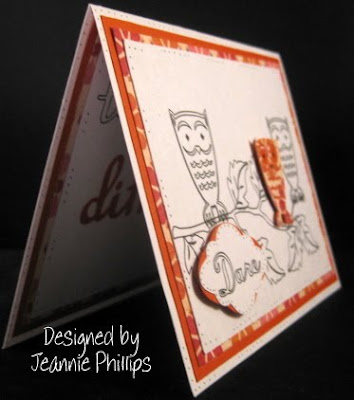
This is my BBTB2 DT card for this week… we were to use the owl on Storybook… and I have been playing with my Cri-Kits pens A LOT lately…this is what I came up with… it was one of those cards that I wasn’t sure I liked when I first finished it…and looked at it the next morning and went “wow! I think I really like this one!”… I hope that you like it too… its going to the CHA Show with the folks at Cri-Kits… they liked it… thank goodness!!… I didn’t have time to do a video on this card… If you watch the video on Café Anniversary (see right side of my blog) it will explain how to do the pens on layers. I hope everybody has a wonderful day!… be sure and check out all the other wonderful cards over at BBTB2. Hugs!


CRICUT, GYPSY & CRI-KITS PENS
(There are no Cricut instructions for this card…I didn’t know how to get the drawn objects in the right place without a Gypsy.)
Layer 1 (the ink layer) Cut/draw this layer first.
You will need your Cri-Kits pen housing and a black Cri-Kits pen for this layer.
Songbird
“to be” cut/drawn @ h 0.91 set the height and the width will right.
“Dare” cut/drawn @ h 0.63 set the height and the width will be right.
You will have to overlap and weld and group these words together.
Storybook
Owls cut/drawn @ w 0.93 x h 1.35.…I put the regular cut on top of the shadow cut to cut /draw the Shadow is cut/drawn @ w 0.99 x h 1.36
Dreams Come True
Leaves cut/drawn @ w 0.74 x h 0.75 and w 0.57 x h 0.58 and w 0.63 x h 0.65...I just eyed these sizes and changed them with the button that make objects smaller or larger.
Home Décor
Branch cut/drawn @ w 3.87 c h 2.41

After you draw this layer … choose add to design.. Do NOT choose unload mat…. Slip a scrap piece of paper under your pen housing when you remove it… put in your blade housing… choose Layer 2 on your mat then cut Layer 2.

Layer 2 (cut layer)
George rectangles for background pieces cut @ w 4.75 x h 3.50 .. You will have to unlink the width and height and set real dial size to get the right dimensions for this cut… be sure and re-link your width and height and deselect your real dial size for the rest of the cut pieces.
Once Upon a Princess (tag feature)
Rectangle top tag piece and the scalloped rectangle tag piece cut @ h 1.12..set the height and the width will be right…. Place your word “Dare” over the rectangle piece.
Storybook
Owl cut @ w 0.93 x h 1.35... I added circles from George around its eyes… they are cut @ 2 0.28 x h 0.26..do NOT weld these in so they will cut out.
Owl’s shadow cut @ w 0.96 x h 1.31.
Songbird
Different cut @ h 1.10...set the height on the letters and the width will be right…you will have to overlap these and weld and group them together.
Card base is 4 ¼ x 5 ½, Frame Piece 4 x 5 ¼ , Background piece 3 ½ x 4 ¾… these cuts are on the inside and outsides of my cards.

There is now a link at the bottom of each post where you can show off your recreation of my cards… with a link back to your card on your blog, or the Cricut Message Board or a photo storage place like Photo Bucket…. I would love it if you share your recreations with me! It just makes me happy!! Thank you so, so much! Hugs


I love sharing the instructions and files for my cards but I do ask that if you use my instructions or files to recreate my card and place it on your blog or somebody else’s blog that you give me the credit for the original design. I also ask that you do not submit my designs for publication, profit or for any contest. Thank you!

Friday, June 4, 2010

Worlds Best Dad

Designed by Jeannie Phillips ~ Southside, Al
Click on any picture to enlarge.
There is a instructional VIDEO at the bottom of this post.
The Gypsy File is available for this card by email. Just copy and paste this email to your personal email account winacard@gmail.com.
I was asked to make a Father’s Day card for someone yesterday and realized how behind I actually am!… I have been busy, my son has been home from Auburn, my daughter has visited from Memphis a couple of times lately, and my mom has had several doctor’s appointments… not to mention I am hooked on Grey’s Anatomy reruns… How did I miss that show!?! Here is my first Father’s Day card… I made two of these and still have to make one for my dear husband. My video on this card has lots of info about welding…and a picture of the paper I used for this card… thank you so much for stopping by my blog!! I love your comments, they are dear to my heart. Hugs, Jeannie

CRICUT & GYPSY
I will not have Cricut instructions on this card because of all the welding it can’t be duplicated without a Gypsy or Design Studio.

Songbird
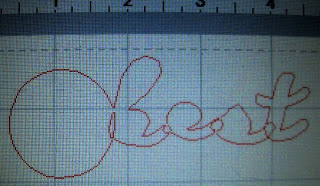
Letters for “best” and the shadow blackout letters cut @ h 1.28 set the height and the width will be right on all letters.
Globe and it’s shadow blackout cut @ h 1.41... Set the height and the width will be right on both cuts.
Beyond Birthdays
DAD and its shadow cut @ h 3.40 set the height and the width will be right.
George
Rectangle cut on real dial size @ w 4.75 x h 3.50

Sentiment piece is cut on my paper trimmer at 4 ½ x 3 inches.


There is lots of welding in this ... I explain this well in my video located at the bottom of this post.


the following code and paste it in your blog content while in HTML view


Monday, May 17, 2010

Ready to Rock w/ Video Tutioral

Designed by Jeannie Phillips ~ Southside, AL
Click on any picture to enlarge.

How to VIDEO for this card at the bottom of this post!
Gypsy files available for this card by email… just copy and paste the email to your personal email account winacard@gmail.com

This is my BBTB2 Design Team card for today!!.. We had to use the cut Ready 2 Rock from Hanna Montana… I didn’t have that cartridge this week so I created the same look with a square from George and letters from Learning Curve…. I wanted to come up with something different… and this is what it was…this card so suits my son, John-Robert… I think I will send it to him later… on the VIDEO for this card I did try and show a little of what I do with my Gypsy….I think of you full screen the video you will be able to see …. Be sure and check out all the other projects the BBTB Design Team created this week...they are great.....  Thank you so much for your support!! And your comments it all just means so much to me… I am so grateful to God for my internet people!!… Hugs, Jeannie

CRICUT & GYPSY
*I did not include Cricut instructions for this card because of the welding needed on the main part of the card.
George
Square welded to the Ready 2 Rock shadow letters and the 2 square on the upper left of the mat cut @ w 2.42 x h 1.73... You will have to unlink the width and height to get this size.
Square for frame for Jesus cut @ w 2.22 x h 1.59 you will have to unlink the width and height to get this size.
Songbird
On Jesus I welded it all together…and grouped it…then I changed set the measurements to w 1.96 x h 1.68... You will have to unlink the width and height to get this size.
Learning Curve
“Ready” and “Rock!” cut @ h 0.77 set the height and the width will be right…for some reason the height on the shadows had to be cut @ 0.79 for the letters to fit right… set the height and the width will be right.
“4” cut @ w 1.70 x h 2.49... You will have to unlink the width and height to get this size.
Card base 4 ¼ x 5 ½, Frame piece 4 x 5 ¼, Background piece 3 ½ x 4 ¾ and the Sentiment piece 2 ¾ x 4...all of this I cut with my paper trimmer.


Monday, April 26, 2010

Happy B Day ~ BBTB DT Challenge

Designed by Jeannie Phillips ~ Southside, AL
Click on any picture to enlarge.

More pictures below the instructions..and a mat shot!

Gypsy file available by email...just copy and paste the email address into your persona email account... winacard@gmail.com.

I was so excited when Donna Mundinger picked this cut for the Bitten By the Bug 2  Design Team cut for this weeks challenge.....  I absoutly love it... then I drew a blank for a day or two ...and then there it was in my head the idea for this card...and I had so much fun making it... this is the first time I have added doodles to this bee and I was tickeld to death with how they turned out... I hope that you like my card!!... be sure to visit the Bitten By the Bug 2 and see what Bee-u-tiful things the other Design Teams members have created!...thank you for looking!... Hugs, Jeannie

CRICUT & GYPSY
Sentimentals
Bee (2) and its  shadow cuts... one in yellow two in velum cut @ h 2.48 set the height and the width will be right on all cuts...I was thinking that the stripes on the bees back were cut out... so I cut a yellow shadow to go behind this...instead you can cut yellow stripes on one of the layer features and leave out the yellow shadow cut... I trimmed the antennas off all the cuts but the black cuts.... on the Cricut I would cut these @ 2 1/2 inches.
Give A Hoot
Tag and its solid shadow cut @ h 3.41...on the Cricut I would cut these at either 3 1/2 inches.
Flower cut to place on top of tag and its layers cut @ h 2.73 ...set the width and the height will be right... I cut an extra green and orange part of this cut for the inside..I am not sure at all what size to do this on the Cricut I am guessing  2 3/4 inches will work...this is totally a guess.
Graphically Speaking
Swirls cut @ W 2.86 x h 0.80... you will need to unlink the width and height for this... one of these is welded to the shadow cut of the tag....on the Cricut I would cut this at 3/4 and inch.
Song Bird
(loving this cartridge for welded letters!)
"B-day" cut @ h 0.77 set the height and the width will be right...scoot these letters together and weld them...on the Cricut I would cut these at 3/4 and inch...and overlap them when I placed them on the card.
"happy" cut @ 0.77 set the height and the width will be right... scoot together and weld....I placed this on the tag where I wanted it... then I duplicated it so I could cut one in a different color to place on top of the welded "happy"..this duplicating it after I got it just right was the easy way to get everything exactly the same.... on the Cricut I would cut these @ 3/4 and inch..I would adhere the swirl directly to the paper..then place the happy on top of that...you will get almost the same effect.
I popped the tag from the background...then the layer is popped from the background tag cut...the bee is popped from the background paper too.


Monday, April 19, 2010

Happy Birthday Birdie

Designed by Jeannie Phillips ~ Southside, AL
Click on any picture to enlarge.
I am happy to share my Gypsy file by email...just copy and paste this email address into your own email account... winacard@gmail.com

I realized that I needed a couple of b'day cards that I need to make and send...they may be late...this is one of them... I saw this cut from Gypsy Wanderings with the music notes in it and the card grew from there...I just loved this cut!!... this was not one of those cards where I felt I knew just what it was going to look like when I finished....I was so excited when I finished and was so tickled with the outcome.... thank you so much for looking... I thrive on your comments!!... have a wonderful day... Hugs, Jeannie
CRICUT & GYPSY
*No Cricut cuts included on the card because of all the welding.*
Gypsy Wanderings
Bookplate cut with notes in it cut @ w 3.48 x h 4.45
Bookplate shadow blackout cuts for the shaped card (in red welded to the rectangles) cut @ w 3.95 x h 4.45... I placed one on the mat and welded a square from George @ w 3.42 x h 1.0..you have to unlink the width and height to get this size...
weld and group these two shapes
Bookplate background cut...that goes behind the Bookplate note cut cut @ w 3.95 x h 4.45.
Frame Bookplate for inside of card cut @ w 3.37 x h 3.80.
Top Bookplate cut for inside of card cut @ w 2.97 x h 3.35.
Zooballoos
Branch and its layer cut @ w 3.79 x h 1.37.
I cut two extra layers in green so I would have the extra leaves... I welded one of  regular branch cuts  onto the Bookplate Note cut to have a good place to pop dot the branch from.
Home Decor
Bird and its shadow cut @ h 1.63 ...set the height and the width will be right...I placed an extra shadow from the bird on the Bookplate Note cut and welded it there so have a good place to pop dot the assembled bird and its shadow to...the other bird is on the inside of the card.
Songbird
All letters cut @ h 0.77 set the height and the width will be right...overlap the letters for each word and weld together.
There are two mat shots because I had to lay this out on two mats ...I did this best by  putting all the cuts on one mat...then I named the file and saved it... then I deleted the items I wanted on the second page...and saved it with a -1 added to the end of the file name... then I opend the file with all the cuts... removed the cuts alread on page one...and saved this file with a -2 at the end of the file name.


Monday, April 5, 2010

A Light in My World

Designed by Jeannie Phillips - Southside, AL
Click on any picture to enlarge.
This card came to me today when I was reading my daily Bible reading... the verse was Luke 11:34 "Your eye is a lamp that provides light for you body. When your eye is good, your whole body is filled with light. But when it is bad, your body is filled with darkness..."... I had the world and the lantern in my head but just couldn't figure out how to lay it out on my card... then I took a nap...and as many or you know a nap is when cards come together in my head... and when I say the background cuts in my head I woke up!!... and couldn't wait to get my card on paper... this is a very easy quick card!... I so hope that you like it!!.. I love your comments they mean the world to me!!... more than you could imagine... Hugs, Jeannie

Gypsy file available by e-mail at winacard@gmail.com
Just copy and paste the e-mail address into your own e-mail account.

CRICUT & GYPSY
Give A Hoot
Heart shaped globe and its layer cut @ w 2.75 x h 2.36... I welded the lantern shadow blackout to the globe cut and to both cuts of the globe..... on the Cricut I would cut these @ 2 1/4 inches...On the Circut I would cut two extra shadow blackout globes in the color of each piece and glue them onto the globe.
Campin Out
Lanterns and lantern layers cut @ w 0.83 x h 1.64... I went back and cut an extra for the inside... you could add these before you cut with the duplicate feature... on the Cricut I would cut these @ 1 1/2 inches.
Songbird
Frame behind the globe large one cut @ w 3.36 x h 3.18, smaller one cut @ w 3.08 x h 2.19...on the Cricut I would cut these at 2 1/4 inches and 3 1/4 inches... you will turn it sideways to put on your page.
"T" cut @ w 0.40 x h 0.70... you will have to unlink the width and height for this cut...on the Cricut I would cut this at 3/4 an inch.
Fabulous Finds
Bookplate found on the first row third purple button down and its shadow found on the second row and the third purple button down cut @ w 2.46 x h 1.0 ....on the Cricut I would cut this at
1 inch.


Wednesday, March 24, 2010

Sympathy Card

Designed by Jeannie Phillips ~ Southside, AL
Click on any picture to enlarge.

I woke up this morning... like at 2:30 this morning and picked up my Gypsy... and there it was in my head this card... so I laid it out to make today... then I work up again this morning at 7:30... and about an hour later I found out that this dear lady I know lost her mom... so this card is for her and her family... As many of you know I often pray for my cards.... and I have been praying each morning for a card... and I feel so much like my cards are a Gift from God... well this one... I especially feel that way about.... I hope that it brings this sweet lady a touch of comfort...thank you so much for looking!  Hugs, Jeannie

CRICUT & GYPSY
Songbird
Bookplate (small) cut @ w 2.84 x h 2.53 I popped this from the larger bookplate... on the Cricut I would cut this at 2 1/2 inches.
Bookplate (large) cut @ w 3.16 x h 2.81... I popped this from the background paper.....on the Cricut I would cut this at 2 3/4 inches.
Tie the Knot
Doves cut @ w 1.02 x h 0.80... on the front I layered one bird directly on top of the other to make it thicker...for a better effect.....on the Cricut I would cut these @ 3/4 an inch.
Easter 2010
Crosses (2) they are the shadow cut... cut  @ w 1.45 x h 1.78 ...I pop-dotted one the second one... the first one is behind that adhered directly to the paper...on the Cricut I would cut these @ 1 3/4 inches.
Heritage
Flourishes cut @ small w 1.74 x h 0.58..I cut two of these...one I trimmed some of it away for the flourish on the book plate....medium cut @ w 2.75 x h 0.92...large cut @ w 3.61 x h 1.21.... on the Cricut I would cut the small flourish @ 1/2 an inch... medium one at 1 inch.. and the large one @ 1 1/4 inches.
Christmas Solutions
Bows cut @ w 1.48 x h 1.36...these bows cut in twos..one a mirror image of the other...I cut 2 sets and trimmed the bow from the tails on one set...and popped the bow part from the second cut for the front...and on the inside I adhered the bow directly on top of the second cut.


Friday, March 19, 2010

50th Anniversary

Designed by Jeannie Phillips ~ Southside, Al
Click on any picture to enlarge.

My dad called and said that he needed a 50th Anniversary card for my Uncle George and Aunt Carol... I wanted it to be special... I hope that this one is!!... My Uncle George was really there for me and my brother last year when my daddy was in ICU and almost died... he will always be special to my heart for that!!... than you so much for looking!

CRICUT & GYPSY
Songbird.. these letters weld wonderfully.
George
Warning: don't forget to choose don't save if you delete most the images off your mat to re-cut one of your images...or you will loose your file. 
Sorry!


The Bird Sings.....

Designed by Jeannie Phillips ~ Southside, AL

Click on any picture to enlarge.

Oh I was so excited about this card!!... I have been in a creative slump...and said to myself... "Jeannie no wonder you haven't prayed for a card!!".... I so said my prayer... then my "Thank you God for a card." to show my faith...and  this is what I got to make!!... its easier to see in person... there is a whole behind the birdcage... then a square of the same paper the birdcage is on... to the bird looks like he is inside the cage...not just behind it... I was so excited about this effect!!!... I hope that you like it too!!... I love your comments... they encourage me to create more!!...so thank you so much in advance for inspiring my spirit!... Hugs, Jeannie

CRICUT & GYPSY
Songbird
Large Decorative Square cut @ w 3.88 x h 3.24... on the Cricut I would cut this @ 3 1/4 inches.
Medium Decorative Square cut @ w 3.69 x h 3.0 inches ...on the Cricut I would cut this @ 3 inches.
Small Decorative Square ..the one with the square in it ... cut @ w 3.21 x h 2.86  this I rotated to make the taller side go vertically... on the Cricut I would cut this @ 2 3/4 inches.
Serenade
Birdcage and its layer cut @ w 1.53 x h 2.56...on the Cricut I would cut this @ 1 1/2 inches.
Birds and their wing layer cut @ h 0.75... set the height and the width will be right...on the Cricut I would cut this @ 3/4 an inch.
George
Large Square.. the one I used behind the bird cut @ w 1.67 x h 1.27 you will have to unlink the width and height to get this measurement... using the Cricut I would cut this at 1 3/4 inches by 1 1/4 inches on a paper trimmer.
Smaller Square .. the one that makes the hole in the decorative square.. do no weld this.... cut @ w 1.25 x h 0.95 inches.... using the Cricut I would lay your birdcage on the back of the decorative square cut and mark the square the bird in using the inside lines of the cage... then use an exacto knife to cut your square tiny bit larger thank you marks.


Blog Widget by LinkWithin
Thank you so much for signing my Guestbook... I have no idea how to reply to people who do sign in... but I so love it when you do!!... So thank you so much!... if you ever have any questions you can email me @ winacard@gmail.com. I will be happy to answer any questions you might have.

Thank you again for signing my Guestbook~
Jeannie

Please Sign In