Thank Your For Stopping By

Thank you so much for stopping by to visit my blog... it is changing as I change and learn more things... I hope after Christmas to get an opportunity to make some more CARDS. I am loving Loom Knitting now... and have lots to do before Christmas....I don't mind sharing how I do things and if you have questions you can E-MAIL me @ winacard@gmail.com and I will be happy to answer any questions that I have.


Showing posts with label Give A Hoot. Show all posts

Monday, July 26, 2010

Who Thanks You

Designed by Jeannie Phillips ~ Southside, Al
Click on any picture to enlarge.
The Gypsy File is available for this card by email. Just copy and paste this email to your personal email account winacard@gmail.com and let me know which Gypsy file that you are wanting.

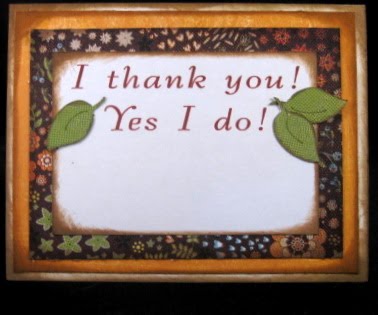
I have several cards that I need to make… I had a really special birthday and I have some people to thank!… this is the first of my thank you cards…. I won’t mention who its for so maybe they will be a bit surprised when it arrives!… I got to try out my new Sugar and Spice cartridge on this card… and the tags feature on the Once Upon a Princess is priceless… that cartridge is now my go to when I need a place to put text!!… if you haven’t noticed it has a tag feature…then you hit sift and these two pieced work together to make a beautiful tag… I duplicated the circle that was the center of this cut and tapped the circle on my Gypsy, the one that makes images larger, a couple of times so I could add a little more color. I sure hope that you like this… I hope that my sweet friend… oops I almost said it… likes it too….

I have discovered when you have made over 500 cards that you are going to have to not worry any more if you start repeating some ideas...its just going to happen!! Thank you so much for looking. ~ Hugs, Jeannie

Sugar and Spice
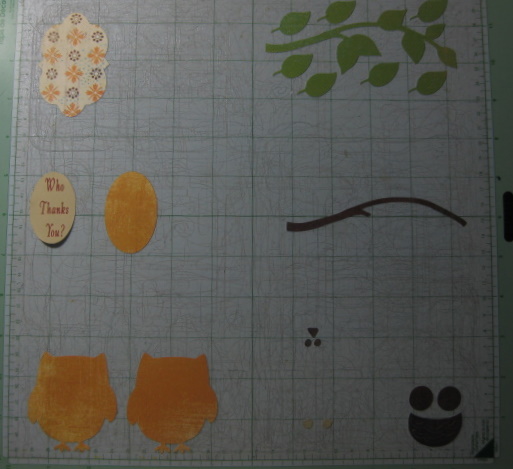
Owl and its layers cut @ h 2.48.. Set the height and the width will be right on all the cuts… I didn’t use the shift cut… but I cut two of the owl so I could pop the owl twice from the background… on the Cricut I would cut this at 2 1 /2 inches.
Once Upon a Princess
Tag and its layer cut @ h 1.89... Set the height and the width will be right on both cuts… I duplicated the oval and cut the duplicated oval @ w 2.13 x h 2 12...on the Cricut I would cut the tag at its oval @ 1 ¾ inches and leave out the extra oval.
ZooBaloo
Branch and its layer cut @ h 1.81 set the height and the widths will be right…on the Cricut I would cut these @ 1 ¾ inches.
Give a Hoot
Extra leaves cut @ w 1.09 x h 0.69... On the Cricut I would cut these at 1 inch.
George
Circles cut @ 0.20... I cut these for the inside of the eyes on the owl… I would use a hole punch for these if I were cutting this using the Cricut.
Triangle for nose cut @ w 0.32 x h 0.25 inches… using the Cricut I would just hand cut this piece.

Card base is 4 ¼ x 5 ½, Frame Piece 4 x 5 ¼ , Background piece 3 ½ x 4 ¾… these cuts are on the inside and outsides of my cards… Sentiment piece 2 ¾ x 4 inside only….. I cut all of these with my paper trimmer.


I love sharing the instructions and files for my cards but I do ask that if you use my instructions or files to recreate my card and place it on your blog or somebody else’s blog that you give me the credit for the original design. I also ask that you do not submit my designs for publication, profit or for any contest. Thank you!

Monday, July 19, 2010

Happy Birthday Super Hero

Designed by Jeannie Phillips ~ Southside, Al
Click on any picture to enlarge.
The Gypsy File is available for this card by email. Just copy and paste this email to your personal email account winacard@gmail.com and let me know which Gypsy file that you are wanting.

I received B is for Boy for my birthday from my sweet friend, Alice! THANK YOU ALICE!  I just couldn't’t wait to use it… My son’s birthday is Wednesday the 23rd… just 10 days after mine… when I saw the little boy on this cart… I could so see my John-Robert when he was all little again running around in his super hero capes… he loved being a super hero… I knew if I could figure out how to add the cape exactly what this card was going to look like. John-Robert will be 23 and did grow up to be a super hero for God… he loves spending his time with kids and youth teaching them all about how much God loves them.. In the summer he is Camp Director at RA Camp ( a church camp). And he loves it!!.. Any time through out the year that he gets a chance to share God with a group of kids he is off and running… so this card is super fitting!!.

I read recently in a poll done that more people liked picture tutorials.. I will have to prefect that… that is what I am switching to for now… unless I get lots of request for the videos again or unless a card just needs a video to explain it!!… just let me know how you feel. Hugs, Jeannie

CRICUT & GYPSY
B is for Boy
Boy and its layers cut @ h 2.28.… set the height and the widths will be right…on the Cricut I would cut these @ 2 ¼ inches.
George
Circle (quarter of a circle at corner of card) cut @ h w 4.32 x 4.40... I put a but a rectangle on the mat the size of my background piece or paper, placed it in the bottom corner and then placed the circle on that.. I deleted the rectangle before I cut… you will have to use an exacto knife to finish cutting the circle to the edge of the paper…..using the Cricut I would cut this circle @ 4 1.2 inches… I would lay my background piece of paper over this and mark it and trim off the part that didn’t cut using the Gypsy.
Rounded off Triangle for the cape cut @ w 1.32 x h 1.06... I place a circle cut @ w 0.61 x h 0.57 on top of the triangle to make the neck of the cape… do not weld these two pieces together…. On the Cricut I would cut this at 1 ½ inches…and trim out the neck with scissors.
All Mixed Up
“Super Hero” cut @ h 0.85.. Set the height and the width will be right on all the letters… I did use the button with the circles to make the e’s smaller… then I scooted the letter together…and use the twisty button to turn the letter the way that I needed them to be welded…the easiest way to do this is to place them in the inside edge of the circle as you work then move them after you group and weld them just like you want them…. On the Cricut I would cut these at ¾ an inch.. You might cut the e’s at 1 /2 and inch.
Give A Hoot
Ties for the cape cut @ w 1.47 x h 0.39 …on the Cricut I would try ½ and inch.
There are several bows you could use on different carts.

I grouped all the things by color before I cut them out. The circle is moved to the edge so that it will cut the sides off...I did have to take an exacto knife to cut the circle to the edge just a pinch on the top and bottom.. to get the circle the right size I added a rectangle the size of my background piece to the bottom edge of the mat...then I placed the circle where I wanted it and deleted the rectangle.

Super Hero is welded and grouped together... the circles are placed on the rounded triangles so that there will be a scoop for the neck in the "cape".. do not weld these pieces you want the circle to cut into the triangle.

Here is what all the pieced look like cut out.

I made the Happy Birthday background paper on my computer... and created the sentiment on my computer.

I drew the face on the boy with a fine tip black marker (.005).. I added brown around the blacks of his eyes with brown sharpie... and added freckles... I used pink chalk for his cheeks...and added a white dot to the cheeks and eyes with a white gel pen....I used a brown sharpie to add to the hair...and a white gel pen to add stitches to the pants.


I love sharing the instructions and files for my cards but I do ask that if you use my instructions or files to recreate my card and place it on your blog or somebody else’s blog that you give me the credit for the original design. I also ask that you do not submit my designs for publication, profit or for any contest. Thank you!

Friday, July 9, 2010

SOS - Handmade Cards by Jeannie Phillips - How to Video

Designed by Jeannie Phillips ~ Southside, Al
Click on any picture to enlarge.
There is a instructional VIDEO at the bottom of this post.
The Gypsy File is available for this card by email. Just copy and paste this email to your personal email account winacard@gmail.com and let me know which Gypsy file that you are wanting.

I am so, so, so excited about this card… I have played with my Cri-Kits enough to be able to incorporate them into my kind of designs… so this card was so fun to make… I use by Cri-Kits pens for the background and for the flag… I am so excited about how this turned out…and it gives the illusion of even more depth. I so hope that you like it too!!… I will be sending this to Dru at Cri-Kits to take with them to the CHA Show in Chicago… how fun is that… too bad I can’t fold myself up in the card… I cherish your comments and thank you so much for looking!

CRICUT, GYPSY & CRI-KITS Pens
(Sorry, There are no Cricut instructions for this card.)
Layer 1 (all cut pieces) Cut this layer out last.
Give a Hoot
Boat and all it’s layers cut @ h 2.95.…set the height and the widths will be right.
Life is a Beach
Waves cut @ w 4.78 x h 1.25.. To get this size unlink the width and height…. Cut three of these…two you will weld to rectangles from George…
George
Rectangles for the waves.. Shorter one w 4.75 x h 1.20.. Unlink the width and height and set real dial size for these cuts …. Taller rectangle w 4.75 x h 1.23... You will weld these rectangles to two of the waves.

Rectangle for background piece cut @ w 4.75 x h 3.50... You will unlink the width and height for these cuts and set real dial size.
Layer 2 (using the black Cri-Kits pen) cut/draw this layer first. Be sure and re-link the width and height and turn the real dial size off.
Indy Art
Skull and Cross bones cut @ w 0.50 x h 0.38
All Mixed Up
“S” cut @ w 0.28 x h 0.50
“O” cut @ w 0.29 x h 0.50
“S” cut @ w 0.20 x h 0.36
* When this layer finishes cutting/drawing choose add to design …do NOT choose unload mat… change pens to blue.
Layer 3 (using blue Cri-Kits Pen)
Create a Critter
Layer 4  (Using Yellow Cri-Kits Pen)
Cloud cut @ w 1.98 x h 1.13
* When this layer finishes cutting/drawing choose add to design …do NOT choose unload mat… change pens to yellow.
Gypsy Wanderings
Sun cut @ w 2.08 x h 2.27

* When this layer finishes cutting/drawing choose add to design …do NOT choose unload mat… change pen housing to blade housing… cut layer one.

*Important put a piece of paper under the housing each time you change it… and before you put the pens in scribble on a scrap piece of paper to get ink flowing.

Card base is 4 ¼ x 5 ½, Frame Piece 4 x 5 ¼ , Background piece 3 ½ x 4 ¾… these cuts are on the inside and outsides of my cards… Sentiment piece 2 ¾ x 4 inside only….. I cut all of these with my paper trimmer.

There is now a link at the bottom of each post where you can show off your recreation of my cards… with a link back to your card on your blog, or the Cricut Message Board or a photo storage place like Photo Bucket…. I would love it if you share your recreations with me! It just makes me happy!! Thank you so, so much! Hugs


I love sharing the instructions and files for my cards but I do ask that if you use my instructions or files to recreate my card and place it on your blog or somebody else’s blog that you give me the credit for the original design. I also ask that you do not submit my designs for publication, profit or for any contest. Thank you.

Wednesday, May 5, 2010

Be the Impossible Part 1 Card by Jeannie Phillips

Handmade by Jeannie Phillips - Southside, AL
Click on any picture to enlarge.
How to VIDEO on this card at bottom of this post.
Gypsy file available by email .. Just copy and paste this email into your own personal email account winacard@gmail.com

I needed a graduation card for a dear friend of mine Brittney… and NannaDonna from the Cricut Message board ask me to join her sketch challenge this week… sketch challenges are really hard for me .. So I was excited when I made this one work out… I so hope Donna is proud of this!!…thank you so so much for looking!!… I love your comments they mean the world to me… Hugs, Jeannie

CRICUT & GYPSY
Walk in My Garden
Flowers (I cut 2 per flower and layered them.. See video) cut @ w 1.11 x h 1.07 … I cut 16 of these total… on the Cricut I would cut these @ 1 ¼ inches.
Give a Hoot
Leaves cut @ w 1.09 x h .69 .. I didn’t use them all … on the Cricut I would cut these @ ¾ an inch.
Pooh and Friends
Bee and its layers cut @ w 1.51 x h 1.43...on the Cricut I would cut these at 1 ½ inches.
George
Tag cut @ w 2 10 x h 3.93.. You will have to unlink the width and height to get this size….using the Cricut I would hand cut this @ a tad bit larger than 2 inches wide and then I would cut it at 4 inches tall.
Circles for flower centers cut @ w o.36 x h 0.32.…on the Cricut I would cut these 1/4 and inch… I also put one of these circles in the tag to make the hole… Do not weld this to the tag just group.
Rectangle for pocket of card cut @ w 0.36 x h 1.39... You will have to unlink the width and height for this shape....using the Cricut I would cut this with my paper cutter 3 1/2 inches wide and just between 2 1/4 and 2 1/2 inches tall and use a hole punch for the whole in the tag.
Storybook
Flourish cut @ w 3.74 x h 1.39.. You will have to ungroup the width and height for this cut… I cut two of these…one I welded to the rectangle…..using the Cricut I would have to guess at this cut… I worked with it on my Gypsy and I think you can cut it at 1 inch and that will work.


Monday, April 26, 2010

Happy B Day ~ BBTB DT Challenge

Designed by Jeannie Phillips ~ Southside, AL
Click on any picture to enlarge.

More pictures below the instructions..and a mat shot!

Gypsy file available by email...just copy and paste the email address into your persona email account... winacard@gmail.com.

I was so excited when Donna Mundinger picked this cut for the Bitten By the Bug 2  Design Team cut for this weeks challenge.....  I absoutly love it... then I drew a blank for a day or two ...and then there it was in my head the idea for this card...and I had so much fun making it... this is the first time I have added doodles to this bee and I was tickeld to death with how they turned out... I hope that you like my card!!... be sure to visit the Bitten By the Bug 2 and see what Bee-u-tiful things the other Design Teams members have created!...thank you for looking!... Hugs, Jeannie

CRICUT & GYPSY
Sentimentals
Bee (2) and its  shadow cuts... one in yellow two in velum cut @ h 2.48 set the height and the width will be right on all cuts...I was thinking that the stripes on the bees back were cut out... so I cut a yellow shadow to go behind this...instead you can cut yellow stripes on one of the layer features and leave out the yellow shadow cut... I trimmed the antennas off all the cuts but the black cuts.... on the Cricut I would cut these @ 2 1/2 inches.
Give A Hoot
Tag and its solid shadow cut @ h 3.41...on the Cricut I would cut these at either 3 1/2 inches.
Flower cut to place on top of tag and its layers cut @ h 2.73 ...set the width and the height will be right... I cut an extra green and orange part of this cut for the inside..I am not sure at all what size to do this on the Cricut I am guessing  2 3/4 inches will work...this is totally a guess.
Graphically Speaking
Swirls cut @ W 2.86 x h 0.80... you will need to unlink the width and height for this... one of these is welded to the shadow cut of the tag....on the Cricut I would cut this at 3/4 and inch.
Song Bird
(loving this cartridge for welded letters!)
"B-day" cut @ h 0.77 set the height and the width will be right...scoot these letters together and weld them...on the Cricut I would cut these at 3/4 and inch...and overlap them when I placed them on the card.
"happy" cut @ 0.77 set the height and the width will be right... scoot together and weld....I placed this on the tag where I wanted it... then I duplicated it so I could cut one in a different color to place on top of the welded "happy"..this duplicating it after I got it just right was the easy way to get everything exactly the same.... on the Cricut I would cut these @ 3/4 and inch..I would adhere the swirl directly to the paper..then place the happy on top of that...you will get almost the same effect.
I popped the tag from the background...then the layer is popped from the background tag cut...the bee is popped from the background paper too.


Wednesday, April 14, 2010

Keep Your Lamp Burning

Designed by Jeannie Phillips ~ Southside, AL
Click on any picture to enlarge.

The file for this card is available by email... just copy and paste the following email into your own email account.

CRICUT & GYPSY
Sentimental
Lamp its shadows and all 4 or its layers cut @ h 3.56... set the height and the widths will be right... the lamp shadow that isn't in red isn't welded to that small rectangle...its there to cut the right shape out in the rectangle to make the lamp layers sit right...I also liked the effect better.... on the Cricut I would cut these @ 4 inches... I wouldn't worry about the un-welded shadow cut.
Stamp shaped cuts cut @ w 1.46 x h 1.74... on the Cricut I would cut these at 1 3/4 inches.
Give A Hoot
Flourishes cut @ w 2.01 x h 0.65 ... on the Cricut I would cut these at 1/2 an inch.
Forever Young
Lady Silhouettes cut @ w 0.66 c h 1.40.. do not weld this cut to the rectangle behind it...so it will be cut out of the center.... on the Cricut I would cut these @ 1 1/4 inch in black and glue on top of the square.
George
All the rectangles are actually squares cuts with the height and width off to get the sizes I needed.
Squares welded to the lamp shadows and grouped then cut @ w 0.66 x h 1.40...lay out one of these then duplicate so they will be exactly the same... pop the first one from the background... then pop the other from that... using the Cricut I would cut these on my paper trimmer at width 3.5 x h 1 3/4 an inch and then glue the shadow into place.
Smaller Square for the sentiment cut @ w 3.41 x h 1.52...place the lamp shadow over this... in the right place... but do not weld so you get the round cut in the corner...see picture.... to line this up right I placed it over the welded pieced... the grouped and moved...using the Cricut I would cut this on the paper cutter at a little little more than 3 inches x 1 1/2 inches.
Square with the silhouette cut out cut @ w 1.19 x 1.46 ...using the Cricut would cut these with the paper cutter 1/4 inch wider and taller than your stamp cut.

*The lamp shadow that is not welded is placed off the paper some because you don't need that  lamp except for what it does to the square.


Monday, April 5, 2010

A Light in My World

Designed by Jeannie Phillips - Southside, AL
Click on any picture to enlarge.
This card came to me today when I was reading my daily Bible reading... the verse was Luke 11:34 "Your eye is a lamp that provides light for you body. When your eye is good, your whole body is filled with light. But when it is bad, your body is filled with darkness..."... I had the world and the lantern in my head but just couldn't figure out how to lay it out on my card... then I took a nap...and as many or you know a nap is when cards come together in my head... and when I say the background cuts in my head I woke up!!... and couldn't wait to get my card on paper... this is a very easy quick card!... I so hope that you like it!!.. I love your comments they mean the world to me!!... more than you could imagine... Hugs, Jeannie

Gypsy file available by e-mail at winacard@gmail.com
Just copy and paste the e-mail address into your own e-mail account.

CRICUT & GYPSY
Give A Hoot
Heart shaped globe and its layer cut @ w 2.75 x h 2.36... I welded the lantern shadow blackout to the globe cut and to both cuts of the globe..... on the Cricut I would cut these @ 2 1/4 inches...On the Circut I would cut two extra shadow blackout globes in the color of each piece and glue them onto the globe.
Campin Out
Lanterns and lantern layers cut @ w 0.83 x h 1.64... I went back and cut an extra for the inside... you could add these before you cut with the duplicate feature... on the Cricut I would cut these @ 1 1/2 inches.
Songbird
Frame behind the globe large one cut @ w 3.36 x h 3.18, smaller one cut @ w 3.08 x h 2.19...on the Cricut I would cut these at 2 1/4 inches and 3 1/4 inches... you will turn it sideways to put on your page.
"T" cut @ w 0.40 x h 0.70... you will have to unlink the width and height for this cut...on the Cricut I would cut this at 3/4 an inch.
Fabulous Finds
Bookplate found on the first row third purple button down and its shadow found on the second row and the third purple button down cut @ w 2.46 x h 1.0 ....on the Cricut I would cut this at
1 inch.


Sunday, April 4, 2010

Two Little Sparrows

Designed by Jeannie Phillips - Southside,AL
Click on any picture to enlarge.

I was doing my daily Bible reading this morning and this card came to me... this was not one of my scriptures today... but this card all the sudden was in my head... I couldn't wait to make it!!... I think it will make a wonderful card of encouragement for somebody... what do you think??... thank you so much for looking and being an inspiration to me each and every day!... Hugs, Jeannie

Gypsy File available by e-mail @ winacard@gmail.com
Just copy and paste the e-mail address into the "to" of your own
 e-mail account.

CRICUT & GYPSY
Give A Hoot
Branch and it layers cut @ w 2.86 x h 2.0... I flipped one of the branches from top to bottom and welded them together... so be sure and flip a set of your layer... you need two layers per branch cut...one in the color of your leaves and one in the color of your flowers....I glued the end of the branch to the background paper and popped the branch where the flowers and leaves are.....on the Cricut I would cut these at 2 inches.
Create A Critter
Nest (2) cut @ 2.55 x h 1.14 inches...I cut two and popped one from the other...I popped the first one from the background at the top and adhered the bottom to the background paper... on the Cricut I would cut these @ 1 1/4 inches and overlap the end of the branches when I put them on the paper.
Home Decor
Bird and its layers (2) cut @ w 1.93 x h 1.21... on the Cricut I would cut these @ 1 1/4 inches.
Easter 2010
Cross cut @ w 1.07 x h 1.32... on the Cricut I would cut this @ 1 1/2 inches.


Blog Widget by LinkWithin
Thank you so much for signing my Guestbook... I have no idea how to reply to people who do sign in... but I so love it when you do!!... So thank you so much!... if you ever have any questions you can email me @ winacard@gmail.com. I will be happy to answer any questions you might have.

Thank you again for signing my Guestbook~
Jeannie

Please Sign In