Thank Your For Stopping By

Thank you so much for stopping by to visit my blog... it is changing as I change and learn more things... I hope after Christmas to get an opportunity to make some more CARDS. I am loving Loom Knitting now... and have lots to do before Christmas....I don't mind sharing how I do things and if you have questions you can E-MAIL me @ winacard@gmail.com and I will be happy to answer any questions that I have.


Showing posts with label BBTB2. Show all posts

Monday, July 12, 2010

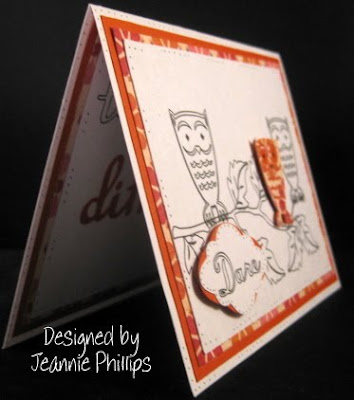
Dare to be Different ... BBTB2 Design Team Challenge

Designed by Jeannie Phillips ~ Southside, Al
Click on any picture to enlarge.
The Gypsy File is available for this card by email. Just copy and paste this email to your personal email account winacard@gmail.com and let me know which Gypsy file that you are wanting.

This is my BBTB2 DT card for this week… we were to use the owl on Storybook… and I have been playing with my Cri-Kits pens A LOT lately…this is what I came up with… it was one of those cards that I wasn’t sure I liked when I first finished it…and looked at it the next morning and went “wow! I think I really like this one!”… I hope that you like it too… its going to the CHA Show with the folks at Cri-Kits… they liked it… thank goodness!!… I didn’t have time to do a video on this card… If you watch the video on Café Anniversary (see right side of my blog) it will explain how to do the pens on layers. I hope everybody has a wonderful day!… be sure and check out all the other wonderful cards over at BBTB2. Hugs!


CRICUT, GYPSY & CRI-KITS PENS
(There are no Cricut instructions for this card…I didn’t know how to get the drawn objects in the right place without a Gypsy.)
Layer 1 (the ink layer) Cut/draw this layer first.
You will need your Cri-Kits pen housing and a black Cri-Kits pen for this layer.
Songbird
“to be” cut/drawn @ h 0.91 set the height and the width will right.
“Dare” cut/drawn @ h 0.63 set the height and the width will be right.
You will have to overlap and weld and group these words together.
Storybook
Owls cut/drawn @ w 0.93 x h 1.35.…I put the regular cut on top of the shadow cut to cut /draw the Shadow is cut/drawn @ w 0.99 x h 1.36
Dreams Come True
Leaves cut/drawn @ w 0.74 x h 0.75 and w 0.57 x h 0.58 and w 0.63 x h 0.65...I just eyed these sizes and changed them with the button that make objects smaller or larger.
Home Décor
Branch cut/drawn @ w 3.87 c h 2.41

After you draw this layer … choose add to design.. Do NOT choose unload mat…. Slip a scrap piece of paper under your pen housing when you remove it… put in your blade housing… choose Layer 2 on your mat then cut Layer 2.

Layer 2 (cut layer)
George rectangles for background pieces cut @ w 4.75 x h 3.50 .. You will have to unlink the width and height and set real dial size to get the right dimensions for this cut… be sure and re-link your width and height and deselect your real dial size for the rest of the cut pieces.
Once Upon a Princess (tag feature)
Rectangle top tag piece and the scalloped rectangle tag piece cut @ h 1.12..set the height and the width will be right…. Place your word “Dare” over the rectangle piece.
Storybook
Owl cut @ w 0.93 x h 1.35... I added circles from George around its eyes… they are cut @ 2 0.28 x h 0.26..do NOT weld these in so they will cut out.
Owl’s shadow cut @ w 0.96 x h 1.31.
Songbird
Different cut @ h 1.10...set the height on the letters and the width will be right…you will have to overlap these and weld and group them together.
Card base is 4 ¼ x 5 ½, Frame Piece 4 x 5 ¼ , Background piece 3 ½ x 4 ¾… these cuts are on the inside and outsides of my cards.

There is now a link at the bottom of each post where you can show off your recreation of my cards… with a link back to your card on your blog, or the Cricut Message Board or a photo storage place like Photo Bucket…. I would love it if you share your recreations with me! It just makes me happy!! Thank you so, so much! Hugs


I love sharing the instructions and files for my cards but I do ask that if you use my instructions or files to recreate my card and place it on your blog or somebody else’s blog that you give me the credit for the original design. I also ask that you do not submit my designs for publication, profit or for any contest. Thank you!

Monday, May 31, 2010

God Bless This Next ~ BBTB2 DT Challenge ~ Blog Hop Blog Candy Give-A-Way


Designed by Jeannie Phillips ~ Southside, Al
Click on any picture to enlarge.
There is a instructional VIDEO at the bottom of this post.
The Gypsy File is available for this card by email. Just copy and paste this email to your personal email account winacard@gmail.com.

I HAVE BLOG CANDY THIS WEEK

We are having a blog hop over at the BBTB2  this week… if you hop through everybody’s blogs you will have a chance to win lots of prizes… from my blog you can hop to Teresa’s blog by clicking here! To win my blog candy (pictured at the bottom of this post) watch my video on how to make this card and leave comment… I will draw on Sunday afternoon for the winner! I will post the winners name on my blog…and if you have a blog I will leave you a comment on you blog if you win… you have 3 days to send me an email @ winacard@gmail.com.(copy and paste this email address to your own email account). When I get your address I will put your prize in the mail! Good Luck!!

Our cut for this week at BBTB2 was “Bless this Nest” from the Sweethearts cartridge… I always try to do my second idea because I think my first idea might just be everybody’s first thought… this is what I came up with this week…I hope that you like it…be sure and stop by the BBTB2 and see all the other wonderful projects the other Design Team member have come up with… they have done just a beautiful job… Thank you so much for looking at my project. Hugs, Jeannie

CRICUT & GYPSY
Sweethearts
“Bless Your Nest” cut @ w 2.18 x h 2.26 … on the Cricut I would cut this @ 2 1.4 inches.
Base Camp
“God” and its shadow cut @ h 0.70... Set the height and the width will be right....I welded the shadow “God” to the top of Bless from “Bless this Nest”…. . On the Cricut I would cut this @ ¾ and inch…. You can adhere this to the paper without welding it if you use your Cricut.
Stretch Your Imagination
Birdhouse its shadow blackout and its layers cut @ h 3.44...set the heights and the widths will be right… on the Cricut I would cut these @ 3 ½ inches.
Home Décor
Birds and their shadows cut @ h 0.93 set the height and the width will be right… on the Cricut I would cut these @ 1 inch.
Pooh and Friends
Branches cut @ w 3.65 x h 5.86 … I used the hide contour feature on the extra piece by the branch so that it wouldn’t cut… on the Cricut I would cut these @ 5 ¾ inches.
George
Hearts cut @ w 0.57 x h 0..45... You will only need 7 hearts… I cut out extras to put in the envelope with the card… on the Cricut I would cut these at ½ an inch.
Card base is 4 ¼ x 5 ½, Frame Piece 4 x 5 ¼ , Background piece 3 ½ x 4 ¾… this cuts are on the inside and outsides of my cards… Sentiment piece 2 ¾ x 4 inside only….. I cut all of these with my paper trimmer.


BLOG CANDY…DON’T FORGET TO WATCH THE VIDEO AND LEAVE A COMMENT!

Monday, May 24, 2010

Those Were the Days

Designed by Jeannie Phillips ~ Southside, Al
Click on any picture to enlarge.
There is a instructional VIDEO at the bottom of this post.
The Gypsy File is available for this card by email. Just copy and paste this email to your personal email account winacard@gmail.com.


First and most importantly thank you all so much for your prayers this past week! … They mean so so much to me!… Hugs to you all!!

This is my BBTB2 Design Team card for this week ….. We were to use the dress form cut from Forever Young… and this is what I came up with… the paper I used did all the work on this card… so the layout is very simple… the paper is from Tim Holtz and there is a picture of the paper pack on my video…. Be sure and check out the other beautiful projects the design team made over at BBTB2... Thank you so much for stopping by to see my card!… Hugs, Jeannie

CRICUT & GYPSY
Forever Young
Dress Form and its layer… I cut two of the top layer cut @ w 1.58 x h 4.30 … on the Cricut I would cut these @ 4 ¼ inches.

I used my paper trimmer to cut the frames piece for the pictures…the pictures came from the paper pack… and were perfect for this card… I could just see these ladies making their pretty dresses using a dress form… the pictures were 1 x 1 ¼ inches…so I cut the frames ¼ an inch wider and taller at 1 ¼ x 1 ½..

Card base is 4 ¼ x 5 ½, Frame Piece 4 x 5 ¼ , Background piece 3 ½ x 4 ¾… these cuts are on the inside and outsides of my cards… Sentiment piece 2 ¾ x 4 inside only….. I cut all of these with my paper trimmer.


The large square and the smaller square were placed on the mat as a guide for me so I would know if the pictures once framed were going to fit on the page....and if the dress form would fit beside them...I deleted these before cutting. 

Monday, May 3, 2010

Thoughts of Summer

Designed by Jeannie Phillips ~ Southside, Al
Click on any picture to enlarge.

VIDEO INSTRUCTIONS
at the bottom of the post!!
Gypsy file available by email.... just copy and paste this email into your own email account

This is my BBTB2 DT card for this week… we were to use Leaf 1 from Life is a Beach… to be honest I was at a loss at what to do with this cut.. Then my daughter called and Katie a co worker of hers wanted me to make a Mother’s Day card for her mom… and her mom loves bright colors and flip flops… and a few other things…well this card came to me when I started working with the leaf and the flip flops… and then this idea came to me…I was excited and nervous at the same time…then when I finished the card I was just too excited at how everything turned out…. I hope that Katie and her mom loves it and I hope the visitors at BBTB2 like it too!!!…. Be sure and visit BBTB2 and see all the DT projects… thank you so much for looking!… and I hope that you enjoy the video!… Hugs, Jeannie

CRICUT & GYPSY
Waves
Life’s a Beach
Wave Borders cut @ w 4.75 x h 1.10 ….. On the Cricut I would cut these at 1 ¼ inch.
George
Squares welded to the waves the taller one is cut @ w 4.75 c h 2.46 .. Shorter square cut @ w 4.75 x h 2.03... Using the Cricut I would cut these with a paper trimmer…both 4 ¾ inches wide and the taller one 2 ½ inches tall the shorter one 2 inches tall…. Then I would adhere these to the waves.
George
Squares(3) cut @ w 1.49 x h 1.39 inches…using the Cricut I would use a paper trimmer to cut these squares all @ 1 ½ inches tall and wide.
Doodle Charms
Sun cut @ 3.61 x h 1.93 inches…you will have to unlink the width and height to get this size… on the Cricut I would cut this @ 2 inches… but it will not be as wide.
Life is a Beach
Leaf 1 and its layer cut @ h 1.20.. Set the height and the width will be right… on the Cricut I would cut this @ 1 ½ inches.
Flip Flops and their layers cut @ h 1.20 set the height and the width will be right …on the Cricut I would cut these at 1 ¼ inches
Paper Doll (Everyday)
Fish cut @w 1.08 x h 1.26...on the Cricut I would cut these @ 1 1/4 inches.


Monday, April 26, 2010

Happy B Day ~ BBTB DT Challenge

Designed by Jeannie Phillips ~ Southside, AL
Click on any picture to enlarge.

More pictures below the instructions..and a mat shot!

Gypsy file available by email...just copy and paste the email address into your persona email account... winacard@gmail.com.

I was so excited when Donna Mundinger picked this cut for the Bitten By the Bug 2  Design Team cut for this weeks challenge.....  I absoutly love it... then I drew a blank for a day or two ...and then there it was in my head the idea for this card...and I had so much fun making it... this is the first time I have added doodles to this bee and I was tickeld to death with how they turned out... I hope that you like my card!!... be sure to visit the Bitten By the Bug 2 and see what Bee-u-tiful things the other Design Teams members have created!...thank you for looking!... Hugs, Jeannie

CRICUT & GYPSY
Sentimentals
Bee (2) and its  shadow cuts... one in yellow two in velum cut @ h 2.48 set the height and the width will be right on all cuts...I was thinking that the stripes on the bees back were cut out... so I cut a yellow shadow to go behind this...instead you can cut yellow stripes on one of the layer features and leave out the yellow shadow cut... I trimmed the antennas off all the cuts but the black cuts.... on the Cricut I would cut these @ 2 1/2 inches.
Give A Hoot
Tag and its solid shadow cut @ h 3.41...on the Cricut I would cut these at either 3 1/2 inches.
Flower cut to place on top of tag and its layers cut @ h 2.73 ...set the width and the height will be right... I cut an extra green and orange part of this cut for the inside..I am not sure at all what size to do this on the Cricut I am guessing  2 3/4 inches will work...this is totally a guess.
Graphically Speaking
Swirls cut @ W 2.86 x h 0.80... you will need to unlink the width and height for this... one of these is welded to the shadow cut of the tag....on the Cricut I would cut this at 3/4 and inch.
Song Bird
(loving this cartridge for welded letters!)
"B-day" cut @ h 0.77 set the height and the width will be right...scoot these letters together and weld them...on the Cricut I would cut these at 3/4 and inch...and overlap them when I placed them on the card.
"happy" cut @ 0.77 set the height and the width will be right... scoot together and weld....I placed this on the tag where I wanted it... then I duplicated it so I could cut one in a different color to place on top of the welded "happy"..this duplicating it after I got it just right was the easy way to get everything exactly the same.... on the Cricut I would cut these @ 3/4 and inch..I would adhere the swirl directly to the paper..then place the happy on top of that...you will get almost the same effect.
I popped the tag from the background...then the layer is popped from the background tag cut...the bee is popped from the background paper too.


Sunday, April 18, 2010

Take it SLOW and get well soon! BBTB2 DT Challenge

Designed by Jeannie Phillips ~ Southside, AL
Click on any picture to enlarge.
More picture including Gypsy screen shots below the instructions!

I am so excite to be a member of the BBTB2 Design Team.... It has long been a dream of mine to be on the BBTB design team.... and here I am!!.... this weeks challenge was to use the the Card Cut on From My Kitchen... to find it use the shift key and function key 3rd down on second row ... its the card feature and then shift... then its on the forth row down and the second row over...that is the cut in the challenge...I must admit that I thought oh my goodness what in the world am I going to do with this cut!!... and then it came to me... I altered the cut on my Gypsy... screen shots and instructions below... Be sure and stop by the BBTB2 and see what the other Design Team members created!!

Gypsy files for this card are available by e-mail... just copy and paste the following e-mail address into your own e-mail ... winacard@gmail.com ... and I will be glad to send you the file.

*Because of all the welding I wasn't able to include Cricut cuts for this card.*

CRICUT & GYPSY
From My Kitchen
Card cut (choose the shift button and the coffee cup feature key) cut @ w 3.65 x h 2.38...
Larger card cut for the inside cut @ w 3.65 x h 2.38... for this cut you will need to unlink the w & h.
George
Rectangle for behind card cut @ w 2.36 x h 3.57... for this cut you will need to unlink the w & h.
Larger sentiment rectangle cut @ w 2.19 x h 0.88 for this cut you will need to unlink the w & h.
Smaller sentiment rectangle cut @ w3.97 x h 0.63 for this cut you will need to unlink the w & h.
The sentiment is computer generated.
Triangle that creates the corners inside the card cut  cut @ w 0.90 x h 0.40 for this cut you will need to unlink the w & h.
Circle that creates the corners inside the card cut cut @ w 0.42 x h 0.32 for this cut you will need to unlink the w & h.
Weld these two shapes together...then duplicate and use the flip features for each corner...for the larger inside peace you will need to change the size of the grouped triangle and circle to w 1/17 x h 0.67 for this cut you will need to unlink the w & h.... you can duplicate this for each corner and flip each piece to  fit in the corners.
Walk in My Garden
Snail and its layer and shadow cut @ h 0.93 ...set the height on each and the width will be right...be sure to relink your w & h when you do this.
Easter 2010
Grass cut @ w 1.46 x h 1.0 ... place two on the mat and weld together for the length you need for inside your window.... before you weld these to the window duplicate and add a rectangle cut @ w 2.50 x h 0.21  from George to the bottom.. weld these three pieces together then duplicate.

The easiest way to get everything to line up on each layer is this....Place your card on the mat... then weld your grass to it...then weld the snail shadow to the grass...then weld 2 corners to the top.... group all of this together... duplicate... then delete the snail shadow... duplicate this and delete  your grass .... now for the tricky part... on the piece where you have deleted your grass and your snail click on this then click on your weld key.... click on the triangle to un-group just the triangle ...then click on the circle inside the triangle to un-group that... click on your group button again... now click on any clear space on your mat... then click your group button and click on your un-grouped triangle and your un-grouped circle... this will group just these two items together so you can duplicate them and make corners for the bottom of your top square...see mat.... after you get all your corners placed group everything together and make sure everything is welded.


Blog Widget by LinkWithin
Thank you so much for signing my Guestbook... I have no idea how to reply to people who do sign in... but I so love it when you do!!... So thank you so much!... if you ever have any questions you can email me @ winacard@gmail.com. I will be happy to answer any questions you might have.

Thank you again for signing my Guestbook~
Jeannie

Please Sign In