Thank Your For Stopping By

Thank you so much for stopping by to visit my blog... it is changing as I change and learn more things... I hope after Christmas to get an opportunity to make some more CARDS. I am loving Loom Knitting now... and have lots to do before Christmas....I don't mind sharing how I do things and if you have questions you can E-MAIL me @ winacard@gmail.com and I will be happy to answer any questions that I have.


Showing posts with label Storybook Cartridge. Show all posts

Monday, July 12, 2010

Dare to be Different ... BBTB2 Design Team Challenge

Designed by Jeannie Phillips ~ Southside, Al
Click on any picture to enlarge.
The Gypsy File is available for this card by email. Just copy and paste this email to your personal email account winacard@gmail.com and let me know which Gypsy file that you are wanting.

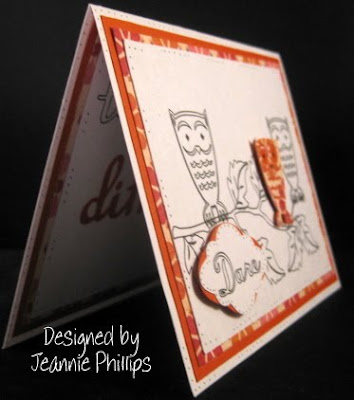
This is my BBTB2 DT card for this week… we were to use the owl on Storybook… and I have been playing with my Cri-Kits pens A LOT lately…this is what I came up with… it was one of those cards that I wasn’t sure I liked when I first finished it…and looked at it the next morning and went “wow! I think I really like this one!”… I hope that you like it too… its going to the CHA Show with the folks at Cri-Kits… they liked it… thank goodness!!… I didn’t have time to do a video on this card… If you watch the video on Café Anniversary (see right side of my blog) it will explain how to do the pens on layers. I hope everybody has a wonderful day!… be sure and check out all the other wonderful cards over at BBTB2. Hugs!


CRICUT, GYPSY & CRI-KITS PENS
(There are no Cricut instructions for this card…I didn’t know how to get the drawn objects in the right place without a Gypsy.)
Layer 1 (the ink layer) Cut/draw this layer first.
You will need your Cri-Kits pen housing and a black Cri-Kits pen for this layer.
Songbird
“to be” cut/drawn @ h 0.91 set the height and the width will right.
“Dare” cut/drawn @ h 0.63 set the height and the width will be right.
You will have to overlap and weld and group these words together.
Storybook
Owls cut/drawn @ w 0.93 x h 1.35.…I put the regular cut on top of the shadow cut to cut /draw the Shadow is cut/drawn @ w 0.99 x h 1.36
Dreams Come True
Leaves cut/drawn @ w 0.74 x h 0.75 and w 0.57 x h 0.58 and w 0.63 x h 0.65...I just eyed these sizes and changed them with the button that make objects smaller or larger.
Home Décor
Branch cut/drawn @ w 3.87 c h 2.41

After you draw this layer … choose add to design.. Do NOT choose unload mat…. Slip a scrap piece of paper under your pen housing when you remove it… put in your blade housing… choose Layer 2 on your mat then cut Layer 2.

Layer 2 (cut layer)
George rectangles for background pieces cut @ w 4.75 x h 3.50 .. You will have to unlink the width and height and set real dial size to get the right dimensions for this cut… be sure and re-link your width and height and deselect your real dial size for the rest of the cut pieces.
Once Upon a Princess (tag feature)
Rectangle top tag piece and the scalloped rectangle tag piece cut @ h 1.12..set the height and the width will be right…. Place your word “Dare” over the rectangle piece.
Storybook
Owl cut @ w 0.93 x h 1.35... I added circles from George around its eyes… they are cut @ 2 0.28 x h 0.26..do NOT weld these in so they will cut out.
Owl’s shadow cut @ w 0.96 x h 1.31.
Songbird
Different cut @ h 1.10...set the height on the letters and the width will be right…you will have to overlap these and weld and group them together.
Card base is 4 ¼ x 5 ½, Frame Piece 4 x 5 ¼ , Background piece 3 ½ x 4 ¾… these cuts are on the inside and outsides of my cards.

There is now a link at the bottom of each post where you can show off your recreation of my cards… with a link back to your card on your blog, or the Cricut Message Board or a photo storage place like Photo Bucket…. I would love it if you share your recreations with me! It just makes me happy!! Thank you so, so much! Hugs


I love sharing the instructions and files for my cards but I do ask that if you use my instructions or files to recreate my card and place it on your blog or somebody else’s blog that you give me the credit for the original design. I also ask that you do not submit my designs for publication, profit or for any contest. Thank you!

Wednesday, May 5, 2010

Be the Impossible Part 1 Card by Jeannie Phillips

Handmade by Jeannie Phillips - Southside, AL
Click on any picture to enlarge.
How to VIDEO on this card at bottom of this post.
Gypsy file available by email .. Just copy and paste this email into your own personal email account winacard@gmail.com

I needed a graduation card for a dear friend of mine Brittney… and NannaDonna from the Cricut Message board ask me to join her sketch challenge this week… sketch challenges are really hard for me .. So I was excited when I made this one work out… I so hope Donna is proud of this!!…thank you so so much for looking!!… I love your comments they mean the world to me… Hugs, Jeannie

CRICUT & GYPSY
Walk in My Garden
Flowers (I cut 2 per flower and layered them.. See video) cut @ w 1.11 x h 1.07 … I cut 16 of these total… on the Cricut I would cut these @ 1 ¼ inches.
Give a Hoot
Leaves cut @ w 1.09 x h .69 .. I didn’t use them all … on the Cricut I would cut these @ ¾ an inch.
Pooh and Friends
Bee and its layers cut @ w 1.51 x h 1.43...on the Cricut I would cut these at 1 ½ inches.
George
Tag cut @ w 2 10 x h 3.93.. You will have to unlink the width and height to get this size….using the Cricut I would hand cut this @ a tad bit larger than 2 inches wide and then I would cut it at 4 inches tall.
Circles for flower centers cut @ w o.36 x h 0.32.…on the Cricut I would cut these 1/4 and inch… I also put one of these circles in the tag to make the hole… Do not weld this to the tag just group.
Rectangle for pocket of card cut @ w 0.36 x h 1.39... You will have to unlink the width and height for this shape....using the Cricut I would cut this with my paper cutter 3 1/2 inches wide and just between 2 1/4 and 2 1/2 inches tall and use a hole punch for the whole in the tag.
Storybook
Flourish cut @ w 3.74 x h 1.39.. You will have to ungroup the width and height for this cut… I cut two of these…one I welded to the rectangle…..using the Cricut I would have to guess at this cut… I worked with it on my Gypsy and I think you can cut it at 1 inch and that will work.


Friday, January 8, 2010

Wanted Your Love

Degned by Jeannie Phillips
Click on any picture to enlarge.

I was pleased with this card when I finished... I said a prayer for a pretty card today.... and this is what I got. I was so excited when the shadow of the heart welded right in the swirly square... the sentiment came about because of the paper choice... the paper is what inspired the card.

CRICUT & GYPSY
Home Decor
Larger heart and its shadow...(welded to the swirly square) cut @ h 2.72 the height will be right when you set the width... on the Cricut I would cut these at 2.75 inches and you could glue it directly to the top of the swirly square.
Smaller Heart cut @ w 1.42 x h 2.09...on the Cricut I would cut this at 2 1/4 inches.
Storybook
Swirly Square cut @ w 2.42 x h 2.88...on the Cricut I would cut this at 2.75 inches.
Alphalicious
"Wanted" cut @ h 0.82 ...on the Cricut I would cut this at 3.4 an inch.
"Your Love" cut @ h 0.70 inches...on the Cricut I would cut this at  3/4 inch.
George
Smaller Square cut @ w 2.84 x h 2.61
Larger Square cut @ w 3.05 x h 2.80
On the Cricut I would cut these on my paper trimmer making each a bit larger than the other.


Tuesday, December 22, 2009

Christmas Elf

Designed by Jeannie Phillips - Southside, AL
Click on any picture to enlarge. Southside, Al


I was at Wanda's the other day...she had instructions on how to make this adorable little elf with punches from Stampin-Up... they were just adorable... but you know me... I am a Cricut person through and through!!..so I had to get out my Gypsy and make one on the same principal but with my Cricut cartridges... I was excited with how it turned out... if I make it again I will weld the collar piece to the "card" card piece so it will stand up right... I hope you like it... thank you so much for looking.   Hugs and Merry Christmas, Jeannie

CRICUT  & GYPSY
Storybook
Bookplate Shapes cut @ w2.80 x h 4.o ...On the Cricut I would cut this at 4 inches.
I also cut an extra bookplate shape for the inside of the card...this is cut @ w 2.43 x h 3.47 ...on the Cricut I would cut this piece at 3 3/4 inches.
Pooh &Friends
Santa Hat and its layers cut @  h 3.o the width will be right if you set the height...on the Cricut I would cut this @ 3 inches (I think).
Paper Doll Dress Up
Hair cut @ w 3.27 x h 4.54... you will have to unlink the width and height to get the size.... On the Cricut I am not sure what to cut this at because I stretched it both way on my Gypsy.
George
Triangles for collar cut @ w 2.32 x h 0.81..I again unlinked the width and height to get this shape and welded the shapes together... using the Cricut you could use 2 ovals for the collar.
Ovals for eyes cut @ w 0.59 x h 1.11 I cut the skin colored one in half...on the Cricut I would cut these @ 1 inch or maybe 1 1/4 inches.
Circles for eyes (which look like diamonds in the picture) cut @ w o.54 x h 0.51... on the Cricut I would cute these at 1/2 inch.
Circle for nose cut @ w ).49 x h 0.45 ... on the Cricut I would cut this @ 3/4 and inch.
Hearts for ears cut @ w 1.66 x h 1.30 and welded to the Bookplate shape ... on the Cricut I would cut the hearts @ 1 1/4 inch you will just need one cut in half and glued from the back.
For the card shape I welded the hearts to the book plate cut then grouped and duplicated this and flipped the duplicated piece up and placed it just overlapping to make the card.
If using the Cricut I would cut an extra bookplate and score it 1/2 inch from the top..and only adhear it above the score line to make a card.


All images in red are welded.


Sunday, November 22, 2009

Vase of Joy

Designed by Jeannie Phillips - Southside, AL
Click on any picture to enlarge.
I was going through my cartridges on my Gypsy and found this JOY with a flower on it.... and just loved the joy...but didn't want the flower so I decided to weld the vase to the joy over the top of the flower... and then the rest of the card just evolved from that... the Shadow Joy and Vase is cut in a green/snowflake print... the Joy and Vase without the shadow cut in red and then just the vase is cut in beige...in the red cut the circle of the flower still cuts out.... it just didn't weld right there...but it was going to be covered by the beige vase so it didn't matter... welding is shown in the screen shot at the bottom of the page... all red items are welded.... thank you so much for looking... Hugs, Jeannie
CRICUT & GYPSY
Gypsy Wanderings
Joy cut @ w 3.51 x h 3.37 - On the Cricut I would cut his at 3 1/2 inches.
Joy Shadow cut @ w 3.70 x h 3.37 - on the Cricut I would cut this @ 3 1.2 inches.
Walk In My Garden
Vase and vase shadows cut @ h 2.93..when you set the height the width will be right - on the Cricut I would cut these @ 3 inches.
Joys of the Season
Poinsettias cut @ w 1.81 x h 1.85 - on the Cricut I would cut these at 1 3/4 inches.
Stretch Your Imagination
Flourish in Square cut @ w 1.71 x h 1.64 I used the square on the inside of the card with a red square behind it and the flourish in the vase - on the Cricut I would cut this @ 1. 3/4 inches.
Storybook
Flourish cut @ w 2.75 x h 0.59 - on the Cricut I would cut this at 3/4 inch because I stretched it on my Gypsy.
Flourish (second florish on second row on mat shot) cut @ w 1.93 x h 1.86 - on the Cricut I would cut this @ 3/4 inch.
*I guess at the Cricut sizes based on the height sizes of my Gypsy cuts... these are the sizes I would have tired first when not using my Gypsy.

Monday, October 19, 2009

Friends are like....

Designed by Jeannie Phillips Southside, AL
Click on any picture to enlarge.
I really needed to create today.... it was a must... but I couldn't really concentrate... still have all the funeral things to do... but this doll reminded me of my MawMaw... so I decided even though this was a pretty simple card that I would do it in honor of her... Thank you for all the prayers...and for looking at my card. Hugs, Jeannie

CRICUT & GYPSY
Christmas Solutions
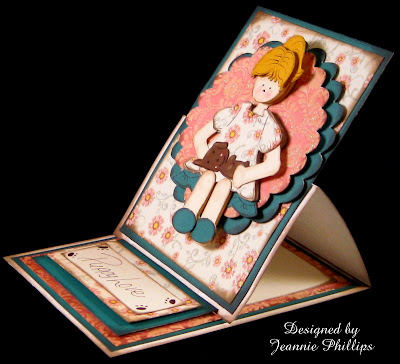
Doll cut @ w 2.42 x 2.50.
I cut her 6 times so I could paper piece her..and she doesn't come in layers... there are two cuts in yellow for the layers of hair... 2 cuts in red for the dress and bow.... one in off white for the skin...and once in brown for the belt and the shoes... some of her peices are pop-dotted and some are just layered one on top of the other.
Storybook
Frames cut @ w 3.0 x h 2.0 and 3.25 x h 2.26.
I just duplicated the smaller one and tapped the enlarge button 3 times.
All other cuts are made with my paper trimmer.
Lots of brown in and chalk.Below is how my Gypsy screen looked just before I printed...I did delete my notes at the bottom left.... the square in the middles is saved and opened as a template so I can lay my images out in it for sizing... it is the size of an A2 card and does not print when opened as a template.

I have had lots of positive feedback from these shots...but a negative one or two comments also... so if they are helpful to you please let me know and I will keep posting them.

Tuesday, October 13, 2009

Georgie Girl

Designed by Jeannie Phillips Southside, AL
Click on any picture to enlarge.
I am really proud of this one... has a few mistakes... but I am still learning... "Georgie" is made with circles and rectangles from the George and Basic Shapes cartridge... thus the name Georgie.. I am really proud of her...hope to improve upon her in the future... I hope that you like her too.... thank you so much for looking!! I love your comments... I actually thrive on them... so thank you in advance for any comment that you leave...and hugs to you for those! Jeannie
CRICUT & GYPSY
All cuts give with real dial size on.
George
Legs
Top circles cut @ w 0.42 x h 0.42.
Rectangle cut @ w o.42 x h 0.91.
Oval for the foot cut @ w 0.46 x h 0.69.
The oval cut was duplicated for the shoe.
Arms
Top rectangle cut @ w 0.35 x h 0.52.
Circle at elbow cut @ w o.32 x 0.32.
Bottom Rectangle cut @ w o.30 x h 0.89.
Oval for hands cut @ w 0.32 x h 0.48.
I cut out two sets of arms only needed one... but did use both sets of legs.
Head
Circles cut @ w 0.91 x h 0.91.
Bottom circle was go give George a body for the neck to come from.
Rectangle for neck cut @ w 0.27 x h 0.91.
Extra Circles for head cut @ w 0.91 x h 0.91.
Paper Doll Dress Up
Hair cut @ w 1.34 x h 1.13.
Dresses cut @ w 2.65 x h 1.95.
Paper Pups
Puppy cut @ w 1.7 x h 0.62.
Storybook
Scalloped circle was the scalloped oval just cut @ w 4.0 x h 4.04 and w 3.58 x h 3.62.
I got my smaller circle and duplicated it and the tapped the enlarge button 3 times.
The rectangles in the middle were opened as a template and didn't cut...I just used them as a guide... I do still have to cut the welded items (in red) separate from the un-welded items.

My first pedestal card!
This is what my file looked like when I cut it.This is the file where I created the look I wanted.

Monday, October 5, 2009

Hope

Designed by Jeannie Phillips - Southside, AL
Click on any picture to enlarge.
This is my Cuttlebug Spot Design Team card for the week and I am really excited about it...I used my Gypsy on it..the first card I designed with my Gypsy....I will be using it all the time now!!...I am loving it!! Our assignment was to make something for breast cancer using only pink and white or cream... this is what I came up with...had to use my brown ink!... Check out other the other great projects the DT created HERE! Thanks so much for looking! Hugs Jeannie

CRICUT
George
Top rectangle cut @ w 3.83 x h 5.10
Bottom rectangle cut @ w 4.10 x h 5.26
Storybook
Top center scallop cut @ w 2.06 x h 1.87.
Top outer scallop cut @ 2.86 x h 2.59
Bottom scallop cut @ w 2.62 x h 2.38.
Plantin Schoolbook
"hope" cut @ w 2.59 x h 1.33...
I kerned these letters and welded them together.
Stand and Salute
Large ribbon cut @ w 1.11 x 1.74
Smaller ribbons cut @ w 0.91 x h 1.42. Here is what the Gypsy screen looked like when I finished...the extra words are notes for later like what color paper to use and what carts I used..to cut all you do is delete these words and then when it ask you to save changes you say no and you won't loose the deleted words.

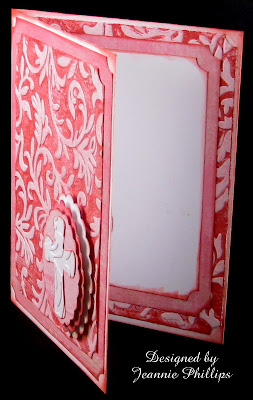
Monday, September 21, 2009

A Cross on Scallops

Designed by Jeannie Phillips - Southside, AL
Click on any picture to enlarge.
This is my this weeks Cuttlebug Spot Design Team card and my other card for my dear friend Lisa... she needed a card for another friend at work who loves Crosses... and this worked wonderfully well with my assignment for the week... We had to ink an embossing folder... so I used dark pink in on light pink paper and the Victoria embossing folder... I am really pleased with how it turned out... its a really simple card... since it was so busy it needed to be simple I felt... I hope the Cuttlebug Spot visitors and Lisa are happy with this card! ... be sure and check out The Cuttlebug Spot this week and see what the other Design Team members have come up with!... have a wonderful week! ~~Hugs, Jeannie
CRICUT
Storybook
Scallops cut @ 2, 2 1/4, and 2 1/2 inches.
Wedding Solutions
Crosses cut @ 1 3/4 inches on shadow blackout.
CUTTLEBUG
Victoria Embossing Folder
I used this on the embossed piece of paper with the dark pink ink and on the crosses.

Monday, September 14, 2009

Welcome Back (From the Swine Flu)

Designed by Jeannie Phillips
Click on any picture to enlarge.
We spent the weekend with Madison (DD) and Cory (DSIL) this weekend... Madison needed a welcome back card for a friend of hers at work who is out with the Swine Flu... so this is what I came up with... hope they like it!!!..the pig is clip art.
We spent Sunday at The Germantown Craft Festival and this wonderful lady, Sarah Mullins made these beautiful Angles... I thought they were crosses.... so you can see mine as you wish... I had to try my hand at one...but Sarah's are much more beautiful and she sells them...so check out her website here and tell her I sent you!.. because she is such a sweetheart!
CRICUT
Storybook
Scalloped Oval cut @ 3 inches and 3 1/4 inches.
Oval cut with my CREATIVE MEMORIES Oval Cutter
Home Decor
Swirls cut @ 1 1/4 inches,
Pig is clip art printed 3 times then cut apart to pop.
Lots of Brown ink and some Daisy Flowers.
Wire for the pigs tail..and in the button.

Saturday, September 5, 2009

Wishing You A Happily Ever After

Designed by Jeannie Phillips - Southside, AL
Click on any picture to enlarge.
Ever have ONE-OF-THOSE-CARDS! ... you know the ones where everything that could go wrong did!!!...well this is one of those!!.... first I was wanting a wonderful idea...something very special for Vicki's wedding card... that just never came to me... today she is getting married so I had to be sure and make her this one ... and if another one comes to me she will have two... the cut I wanted to use would not cut out of the black paper that I have...the kind that is more like construction paper than cardstock... I wish I could find some wonderful black paper!!.. so I had to decide on something completely different... then I printed the names...not quite centered.. then I embossed the second try and the paper slipped and I had to reprint and then re-emboss.....then I left words out of my circle text...didn't notice until card was completely put together...in fixing it I smudged the stickles..had to remove the bells and do those over not to mention some of the other things that went wrong!!...good thing the wedding was too far for me to attend there is no telling what I would have done to mess that up... Vicki's dress is red so I wanted the red accents!!!.... I hope her day has been perfect all it has done here is rain!
CRICUT
Wedding Solutions
Hearts cut @ 1 inch.
Wedding Bells cut @ 1 inch.
Storybook
Scalloped circle cut @ 2 inches in red.
Scalloped circle w/ flourishes cut @ 2 1/4 inches.
This cut is the shadow blackout of a flower.
Both inside flourishes cut @ 3/4 inch.
CUTTLEBUG
D'vine Swirls
All text computer generated.
Blog Widget by LinkWithin
Thank you so much for signing my Guestbook... I have no idea how to reply to people who do sign in... but I so love it when you do!!... So thank you so much!... if you ever have any questions you can email me @ winacard@gmail.com. I will be happy to answer any questions you might have.

Thank you again for signing my Guestbook~
Jeannie

Please Sign In