Thank Your For Stopping By

Thank you so much for stopping by to visit my blog... it is changing as I change and learn more things... I hope after Christmas to get an opportunity to make some more CARDS. I am loving Loom Knitting now... and have lots to do before Christmas....I don't mind sharing how I do things and if you have questions you can E-MAIL me @ winacard@gmail.com and I will be happy to answer any questions that I have.


Showing posts with label Home Decor. Show all posts

Monday, July 12, 2010

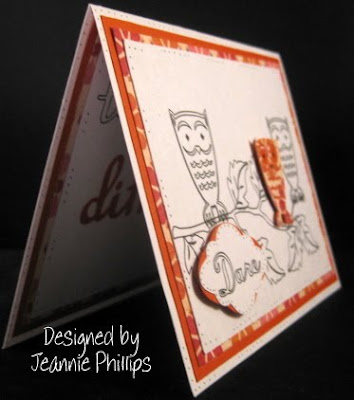
Dare to be Different ... BBTB2 Design Team Challenge

Designed by Jeannie Phillips ~ Southside, Al
Click on any picture to enlarge.
The Gypsy File is available for this card by email. Just copy and paste this email to your personal email account winacard@gmail.com and let me know which Gypsy file that you are wanting.

This is my BBTB2 DT card for this week… we were to use the owl on Storybook… and I have been playing with my Cri-Kits pens A LOT lately…this is what I came up with… it was one of those cards that I wasn’t sure I liked when I first finished it…and looked at it the next morning and went “wow! I think I really like this one!”… I hope that you like it too… its going to the CHA Show with the folks at Cri-Kits… they liked it… thank goodness!!… I didn’t have time to do a video on this card… If you watch the video on Café Anniversary (see right side of my blog) it will explain how to do the pens on layers. I hope everybody has a wonderful day!… be sure and check out all the other wonderful cards over at BBTB2. Hugs!


CRICUT, GYPSY & CRI-KITS PENS
(There are no Cricut instructions for this card…I didn’t know how to get the drawn objects in the right place without a Gypsy.)
Layer 1 (the ink layer) Cut/draw this layer first.
You will need your Cri-Kits pen housing and a black Cri-Kits pen for this layer.
Songbird
“to be” cut/drawn @ h 0.91 set the height and the width will right.
“Dare” cut/drawn @ h 0.63 set the height and the width will be right.
You will have to overlap and weld and group these words together.
Storybook
Owls cut/drawn @ w 0.93 x h 1.35.…I put the regular cut on top of the shadow cut to cut /draw the Shadow is cut/drawn @ w 0.99 x h 1.36
Dreams Come True
Leaves cut/drawn @ w 0.74 x h 0.75 and w 0.57 x h 0.58 and w 0.63 x h 0.65...I just eyed these sizes and changed them with the button that make objects smaller or larger.
Home Décor
Branch cut/drawn @ w 3.87 c h 2.41

After you draw this layer … choose add to design.. Do NOT choose unload mat…. Slip a scrap piece of paper under your pen housing when you remove it… put in your blade housing… choose Layer 2 on your mat then cut Layer 2.

Layer 2 (cut layer)
George rectangles for background pieces cut @ w 4.75 x h 3.50 .. You will have to unlink the width and height and set real dial size to get the right dimensions for this cut… be sure and re-link your width and height and deselect your real dial size for the rest of the cut pieces.
Once Upon a Princess (tag feature)
Rectangle top tag piece and the scalloped rectangle tag piece cut @ h 1.12..set the height and the width will be right…. Place your word “Dare” over the rectangle piece.
Storybook
Owl cut @ w 0.93 x h 1.35... I added circles from George around its eyes… they are cut @ 2 0.28 x h 0.26..do NOT weld these in so they will cut out.
Owl’s shadow cut @ w 0.96 x h 1.31.
Songbird
Different cut @ h 1.10...set the height on the letters and the width will be right…you will have to overlap these and weld and group them together.
Card base is 4 ¼ x 5 ½, Frame Piece 4 x 5 ¼ , Background piece 3 ½ x 4 ¾… these cuts are on the inside and outsides of my cards.

There is now a link at the bottom of each post where you can show off your recreation of my cards… with a link back to your card on your blog, or the Cricut Message Board or a photo storage place like Photo Bucket…. I would love it if you share your recreations with me! It just makes me happy!! Thank you so, so much! Hugs


I love sharing the instructions and files for my cards but I do ask that if you use my instructions or files to recreate my card and place it on your blog or somebody else’s blog that you give me the credit for the original design. I also ask that you do not submit my designs for publication, profit or for any contest. Thank you!

Monday, April 19, 2010

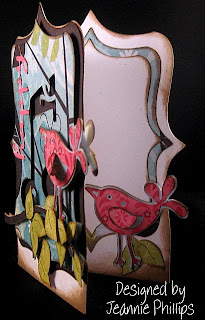
Happy Birthday Birdie

Designed by Jeannie Phillips ~ Southside, AL
Click on any picture to enlarge.
I am happy to share my Gypsy file by email...just copy and paste this email address into your own email account... winacard@gmail.com

I realized that I needed a couple of b'day cards that I need to make and send...they may be late...this is one of them... I saw this cut from Gypsy Wanderings with the music notes in it and the card grew from there...I just loved this cut!!... this was not one of those cards where I felt I knew just what it was going to look like when I finished....I was so excited when I finished and was so tickled with the outcome.... thank you so much for looking... I thrive on your comments!!... have a wonderful day... Hugs, Jeannie
CRICUT & GYPSY
*No Cricut cuts included on the card because of all the welding.*
Gypsy Wanderings
Bookplate cut with notes in it cut @ w 3.48 x h 4.45
Bookplate shadow blackout cuts for the shaped card (in red welded to the rectangles) cut @ w 3.95 x h 4.45... I placed one on the mat and welded a square from George @ w 3.42 x h 1.0..you have to unlink the width and height to get this size...
weld and group these two shapes
Bookplate background cut...that goes behind the Bookplate note cut cut @ w 3.95 x h 4.45.
Frame Bookplate for inside of card cut @ w 3.37 x h 3.80.
Top Bookplate cut for inside of card cut @ w 2.97 x h 3.35.
Zooballoos
Branch and its layer cut @ w 3.79 x h 1.37.
I cut two extra layers in green so I would have the extra leaves... I welded one of  regular branch cuts  onto the Bookplate Note cut to have a good place to pop dot the branch from.
Home Decor
Bird and its shadow cut @ h 1.63 ...set the height and the width will be right...I placed an extra shadow from the bird on the Bookplate Note cut and welded it there so have a good place to pop dot the assembled bird and its shadow to...the other bird is on the inside of the card.
Songbird
All letters cut @ h 0.77 set the height and the width will be right...overlap the letters for each word and weld together.
There are two mat shots because I had to lay this out on two mats ...I did this best by  putting all the cuts on one mat...then I named the file and saved it... then I deleted the items I wanted on the second page...and saved it with a -1 added to the end of the file name... then I opend the file with all the cuts... removed the cuts alread on page one...and saved this file with a -2 at the end of the file name.


Sunday, April 4, 2010

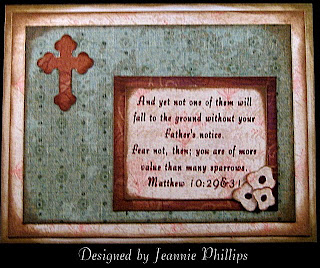
Two Little Sparrows

Designed by Jeannie Phillips - Southside,AL
Click on any picture to enlarge.

I was doing my daily Bible reading this morning and this card came to me... this was not one of my scriptures today... but this card all the sudden was in my head... I couldn't wait to make it!!... I think it will make a wonderful card of encouragement for somebody... what do you think??... thank you so much for looking and being an inspiration to me each and every day!... Hugs, Jeannie

Gypsy File available by e-mail @ winacard@gmail.com
Just copy and paste the e-mail address into the "to" of your own
 e-mail account.

CRICUT & GYPSY
Give A Hoot
Branch and it layers cut @ w 2.86 x h 2.0... I flipped one of the branches from top to bottom and welded them together... so be sure and flip a set of your layer... you need two layers per branch cut...one in the color of your leaves and one in the color of your flowers....I glued the end of the branch to the background paper and popped the branch where the flowers and leaves are.....on the Cricut I would cut these at 2 inches.
Create A Critter
Nest (2) cut @ 2.55 x h 1.14 inches...I cut two and popped one from the other...I popped the first one from the background at the top and adhered the bottom to the background paper... on the Cricut I would cut these @ 1 1/4 inches and overlap the end of the branches when I put them on the paper.
Home Decor
Bird and its layers (2) cut @ w 1.93 x h 1.21... on the Cricut I would cut these @ 1 1/4 inches.
Easter 2010
Cross cut @ w 1.07 x h 1.32... on the Cricut I would cut this @ 1 1/2 inches.


Tuesday, March 23, 2010

Welcome to the Neighborhood

Designed by Jeannie Phillips ~ Southside AL
Click on any picture to enlarge.
I am so excited about this card...I am going to make one with a dear friend of mine Kara who I haven't got to see in a really long time... and I so love her and her company... and I am also going to make one with an old friend from high school, Deena... it will be fun to get-to-gather with her!!! I so hope that they both like the card!!... this card was totally inspired by the paper...when you scroll down and see the inside you will know that without a doubt... Thank you so much for looking.... and I so love your comments!!!... Hugs, Jeannie

*I was unable to include Cricut instructions with this card...I am so sorry.

CRICUT & GYPSY
George
Square for base of house cut @ w 2.05 x h 1.71... you will have to unlink your width and height to get these measurements.
Triangle for roof cut @ w 2.86 x h 1.49... unlink your width and height... duplicate this...and cut one separate... see mat shot.
I welded these two shape together... and I cut them in white then I duplicated this.
Rectangle for smoke stack cut @ w 0.41 x h 1.00 and rotated sideways... unlink your width and height.
Rectangle for top of smoke stack cut @ w 0.28 x h 0.69... unlink your width and height.
I welded these to the duplicated house.
Square for windows cut @ w 0.50 x h 0.44....cut one of these without the panes for the yellow in the windows.
Square for window panes cut @ w 0.17 x h 0.16... unlink width and height...do not weld to window so you will get the holes in the window.
Rectangle for door cut @ w 0.74 x h 0.90... cut one extra without panes for the yellow in the windows.
Squares for panes in door cut @ w 0.18 x h 0.19.. unlink the width and height.
Circle for tree cut @ w 2.45 x h 2.49.. unlink width and height.
Gypsy Wandering
Tree trunk cut @ w 1.82 x h 3.32... unlink the width and height.
Flower Stems cut @ w 0.55 x h 0.92.
A Child's Year
Tulips..made with teardrops cut @ w 0.41 x h 0.82... I cut one for the center for each flower...and then two ..the two I put one on the mat...rotated it out just a little..then duplicated this...and flipped from side to side.. overlapped with the one I duplicated this cut from and welded them together...then glue the single teardrop to the back.
Home Decor
Flourish cut @ w 1.10 x h 0.78...unlink width and height.
Serenade
Birds cut @ w 0.73 x h 0.58.


Friday, November 6, 2009

Snow Much Fun

Designed by Jeannie Phillips - Southside, AL
Click on any picture to enlarge.
Everyone was making penguin cards on the Cricut Message Boards for this weeks BBTB Challenge and I so love penguins so I had to jump in and make one myself!!... I had this idea...thought the paper choice would look like a long winters night... not sure if I like how it turned out...then when I look again I like it... maybe tomorrow I will make up my mind... let me know what you think... I used my Gypsy to weld circles and rectangles to make the background border for the SNOW... if you are still sitting on the fence about getting a Gypsy I can tell you I just love my Gypsy... love it!! Hugs, Jeannie

I was unable to make Cricut cut sizes because of stretching some items by height only and the use of the Gypsy Wanderings cartridge.
CRICUT & GYPSY
Gypsy Wanderings
*SNOW* cut @ w 5.10 x h 1.55
George
I used the following shapes to create the Shadow Border for the snowflakes and the word snow I welded the shape together.
First circle cut @ w 1.54 x h 1/44.
Oval cut @ w 1.1o x h 1.79.
Rounded rectangle cut @ w 1.14 x h 1.78.
Rounded Square cut @ w 0.89 x h 0.83.
Last circle cut @ w 1.82 x h 1.70.
I grouped all of these shape together to duplicate them for the second shadow. I popped the first shadow from the second shadow for depth.
Joys of the Season
Shadow penguin cuts cut @ w 1.90 x h 2.24.. I cut 2 in black and one in white.
Layer penguin cut cut @ 1.96 x h 2.31.
Home Decor
Flourishes cut @ w 5.12 x h 1.74.
Gypsy Font
"f" in fun cut @ w 0.68 x h 2.07... I used a circle and rectangle to alter my f...which I could have just done with scissors (laughing at myself).
"un" in fun cut at h 1.37 the width will change with the height.
Welded the letters together in fun.
"much" welded and grouped cut @ w 3.01 x h 1.31.
This is the screen shot of my Gypsy just before I cut... I grouped the cuts by color.. be sure and save your files before you do anything.

Monday, October 12, 2009

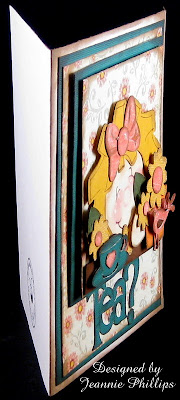
Tea With Me?

Designed by Jeannie Phillips Southside, AL
Click on any picture to enlarge.
I woke up from my nap...love those... and wanted to make a card...searched picture on the Internet to get inspired... and this is what I made...I am way excited about this one...hope that you love it!!....I am really really excited!!...there are lots of cuts... listing them all... Thank you so much for looking and for the comments! Hugs, Jeannie
CRICUT & GYPSY
Walk in My Garden
Flowers cut @ w 0.98 x h 0.90 and h 0.73 x h 0.67.
Leaves cut @ w 0.93 x h 0.50.
Flower Pot w 1.08 x 0.90.
Paper Doll Dress Up
Tea Cup cut @ w 1.26 x 0.69.
Hair cut @ 3.0 x 2.62.
Home Decor
Bird cut @ w 1.06 x h 0.88.
Mickey and Friends
Bow cut @ w 1.25 x 1.0.
George
Circle for face cut @ w 1.93 x h 1.92.
Oval for hand cut @ w 0.67 x h 1.0.
Circle for bow cut @ w 0.46 x h 0.46.
Heart for tea cup cut @ w 0.35 x 0.29.
Rectangle for table cut @ w 3.0 x h 0.50.
Alphalicious
"T" cut @ w 0.70 x h 1.14.
"e" & "a" cut @ w 0.59 x h 0.79.
"?" cut @ w 0.69 x h 1.22.

This is a picture of my mat for my design of my card.
This a picture of my cuts spread out and how it looked when I went to cut it..I now save the two files one as Tea With Me and Tea With Me-cut

Sunday, October 11, 2009

Love in the Winter

Designed by Jeannie Phillips Southside, AL
Click on any picture to enlarge.
I went and looked at some tole painting pictures on line and was inspired by a snowman that had this look... it not the same at all... but the inspiration... I made the snowman with George ovals on my Gypsy... I was so tickled when it all came together!!...the background paper inspired all the color choices... Hope that you like it!!... love your comments! Hugs, Jeannie
CRICUT & GYPSY
George
Ovals cut at w 5.30 x h 1.84 (small circle cut 1x) h 2.14 x w 2.89 (med circle cut 2 time's) w 4.01 x h 3.95 (large circle cut 3 times)... for the back layer I welded one of each size together...for the middle layer I welded a large and medium circle together...and a single large circle for the front circle...
Rectangle cut @ w 4.01 x h 0.11 I did this to make a cut line in the ovals...it worked great.
Eye circles cut @ w 0.21 x h 0.19.
Nose circle cut @ w 0.17 x 0.16.
Button circles cut @ w 0.37 x h 0.35.
Flowers cut @ w 0.71 x h 0.65 and w 0.67 x w 0.61.
Hearts cut @ w 1.39 x h 1.67..cut 2 and pop-dotted one from the other.
The third heart is a part of the scarf grouping.
Paper Doll Dress Up
Hat cut @ w 1.27 x 2.08.. cut twice so that I could cut the hat band out of the orange/red paper.
Winter Woodland
Scarf (grouping) is a snowman layer feature cut @ w 2.67 x 7.78...used the scarf on the snowman and the heart on the inside.
Home Decor
Branches cut @ w 2.27 x h 1.41.
These are really thin but cut out really really well.

This is the cut file just before I printed it...I did delete the notes before I printed...I am still at the point having to delete everything that isn't grouped..then going back to cut the grouped items.

This is the cut file saved so I will recognize how it should look when finished.
If you open your rectangle card base as a template it does not cut...but the picture stays on the mat so you can lay your card out and get everything the right size.

Monday, September 14, 2009

Welcome Back (From the Swine Flu)

Designed by Jeannie Phillips
Click on any picture to enlarge.
We spent the weekend with Madison (DD) and Cory (DSIL) this weekend... Madison needed a welcome back card for a friend of hers at work who is out with the Swine Flu... so this is what I came up with... hope they like it!!!..the pig is clip art.
We spent Sunday at The Germantown Craft Festival and this wonderful lady, Sarah Mullins made these beautiful Angles... I thought they were crosses.... so you can see mine as you wish... I had to try my hand at one...but Sarah's are much more beautiful and she sells them...so check out her website here and tell her I sent you!.. because she is such a sweetheart!
CRICUT
Storybook
Scalloped Oval cut @ 3 inches and 3 1/4 inches.
Oval cut with my CREATIVE MEMORIES Oval Cutter
Home Decor
Swirls cut @ 1 1/4 inches,
Pig is clip art printed 3 times then cut apart to pop.
Lots of Brown ink and some Daisy Flowers.
Wire for the pigs tail..and in the button.

Monday, August 31, 2009

Believe in Yourself!

Designed by Jeannie Phillips - Southside, AL
Click on any picture to enlarge.

Oh I was so excited when I got my Cottage Cutz Bee in the mail today... I have had card makers block today... need need to make a couple of cards...and I am just thinking about them too much... then I opened my mailbox and had this bee!!!... well I went straight to work on a card I don't need... lol...how sad is that!!... I hope you like it... thank you so much for looking! ~~Hugs, Jeannie
CRICUT
George
Flowers cut 2 3 1/4 inches for the outside and 1 1/4 inches for the inside.
The outside flower I cut twice popped the bottom one from the background paper and the top one I popped from the bottom flower.
Circles for flowers cut at 1 3/4 inch and 3/4 inch.
All text computer generated!
Home Decor
Flourish cut @ 1 1/2 and 1 3/4 inch.
COTTAGE CUTZ
Bee
I absolutely love this bee!
Lots of ink and gel pen dots.

Wednesday, August 5, 2009

Pooh and Friends

Designed by Jeannie Phillips - Southside, AL
Click on any picture to enlarge.
This is another Vicki/Jeannie personal challenge card.... we wanted to use Pooh because August is Pooh Friendship Month ...something like that.... so we decided to each use a Pooh cut... any Pooh cut .... at first I was so at a loss.... just blank... the licensed carts do that to me somehow... I have trouble making the cuts "my own".... then I thought of this card...and found the little girls with the bears in their hands!!!.. how perfect was that... I asked my son to find me a Pooh quote on friendship... he said this one was his favorite so I had to use it!!!... and I agreed it was a wonderful quote.... I can't wait to see Vicki's card!!!....about to go and link it!!!... to see Vicki's card just click here! ... these challenges really make me think outside my little box... thank you Vicki!! Thank you for looking. Hugs, Jeannie

CRICUT
Pooh and Friends
Pooh Face cut @ 2 1/4 inches.
Inside Pooh Shadow cut @ 1 1/2 inches on shadow blackout.
A Child's Year
Girls cut @ 1 3/4 inches.
Storybook
Bookplate cut @ 4 inches in green and 3 3/4 inches in cream.
Home Decor
Flourish cut @ 1 1/2 inch and cut apart to use.
Flowers are a punch.
Blog Widget by LinkWithin
Thank you so much for signing my Guestbook... I have no idea how to reply to people who do sign in... but I so love it when you do!!... So thank you so much!... if you ever have any questions you can email me @ winacard@gmail.com. I will be happy to answer any questions you might have.

Thank you again for signing my Guestbook~
Jeannie

Please Sign In