Thank Your For Stopping By

Thank you so much for stopping by to visit my blog... it is changing as I change and learn more things... I hope after Christmas to get an opportunity to make some more CARDS. I am loving Loom Knitting now... and have lots to do before Christmas....I don't mind sharing how I do things and if you have questions you can E-MAIL me @ winacard@gmail.com and I will be happy to answer any questions that I have.


Friday, July 30, 2010

And the winner is... drumb roll please.......Chris Wooten!!!!...

Chris Wooten said...

oh my gosh i have heard of those pens but never used them. thanks for the chance to win
fun stuff going on. thanks so much. stop in my blog sometimes too http://turnedgypsy.blogspot.com. I have weekly giveaways also

Wednesday, July 28, 2010

Thanks (2)

Designed by Jeannie Phillips ~ Southside, Al
Click on any picture to enlarge.
The Gypsy File is available for this card by email. Just copy and paste this email to your personal email account winacard@gmail.com and let me know which Gypsy file that you are wanting.

I have several thank you card I need to make… this one was so inspired by the person it is going to … because of their love of their garden…. And inspired by a card on Bobby’s and Jill‘s blog… they do such beautiful works.. You need to visit their blog Cricut Couple … I promise you will be inspired too!! … I hope this is a hit for the special person in my life this is getting it… I hope that you like it too… thank you so much for looking! Hugs, Jeannie

CRICUT & GYPSY
Once Upon a Princess tag cut is the frame for the thanks… and it layer cut @ h 3.35...set the height and the width will be right…. … I put the oval layer over the tag cut to make the whole in the center, then I cut out an extra frame piece in cream… on the Cricut I would cut these @ 3 ¼ inches.… you can use your center point feature to get the whole in the tag cut.
Cindy Lou
Flower cut @ w 1.28 x h 2.56 and w 1.36 x h 2.70... They do not cut out that big…so don’t worry that you have these number wrong… I did use the hide contour feature to hide the flower centers and the holes that cut out in the center…I used chalk to add color to the flowers…and paint for the dots in the centers of the flowers….and ink around the edges…… on the Cricut I would cut these @ 2 ½ inches… they will cut out smaller… you will have a whole in the center of your flowers you might want to choose a flower from Walk in My Garden that does not have the center cut out.
“Thanks” cut @ w 2.68 x h 0.80... On the Cricut I would cut this @ 3/4 and inch.
Flourishes cut @ w 1.68 x h 1.30 … on the Cricut I would cut these @ 1 ¼ inches.
Martha Steware Butter Fly Punch for the Butterflies
Card base is 4 ¼ x 5 ½, Frame Piece 4 x 5 ¼ , Background piece 3 ½ x 4 ¾… these cuts are on the inside and outsides of my cards… Sentiment piece 2 ¾ x 4 I cut with my oval cutter.….. I cut all of these with my paper trimmer.


I love sharing the instructions and files for my cards but I do ask that if you use my instructions or files to recreate my card and place it on your blog or somebody else’s blog that you give me the credit for the original design. I also ask that you do not submit my designs for publication, profit or for any contest. Thank you!

Monday, July 26, 2010

Who Thanks You

Designed by Jeannie Phillips ~ Southside, Al
Click on any picture to enlarge.
The Gypsy File is available for this card by email. Just copy and paste this email to your personal email account winacard@gmail.com and let me know which Gypsy file that you are wanting.

I have several cards that I need to make… I had a really special birthday and I have some people to thank!… this is the first of my thank you cards…. I won’t mention who its for so maybe they will be a bit surprised when it arrives!… I got to try out my new Sugar and Spice cartridge on this card… and the tags feature on the Once Upon a Princess is priceless… that cartridge is now my go to when I need a place to put text!!… if you haven’t noticed it has a tag feature…then you hit sift and these two pieced work together to make a beautiful tag… I duplicated the circle that was the center of this cut and tapped the circle on my Gypsy, the one that makes images larger, a couple of times so I could add a little more color. I sure hope that you like this… I hope that my sweet friend… oops I almost said it… likes it too….

I have discovered when you have made over 500 cards that you are going to have to not worry any more if you start repeating some ideas...its just going to happen!! Thank you so much for looking. ~ Hugs, Jeannie

Sugar and Spice
Owl and its layers cut @ h 2.48.. Set the height and the width will be right on all the cuts… I didn’t use the shift cut… but I cut two of the owl so I could pop the owl twice from the background… on the Cricut I would cut this at 2 1 /2 inches.
Once Upon a Princess
Tag and its layer cut @ h 1.89... Set the height and the width will be right on both cuts… I duplicated the oval and cut the duplicated oval @ w 2.13 x h 2 12...on the Cricut I would cut the tag at its oval @ 1 ¾ inches and leave out the extra oval.
ZooBaloo
Branch and its layer cut @ h 1.81 set the height and the widths will be right…on the Cricut I would cut these @ 1 ¾ inches.
Give a Hoot
Extra leaves cut @ w 1.09 x h 0.69... On the Cricut I would cut these at 1 inch.
George
Circles cut @ 0.20... I cut these for the inside of the eyes on the owl… I would use a hole punch for these if I were cutting this using the Cricut.
Triangle for nose cut @ w 0.32 x h 0.25 inches… using the Cricut I would just hand cut this piece.

Card base is 4 ¼ x 5 ½, Frame Piece 4 x 5 ¼ , Background piece 3 ½ x 4 ¾… these cuts are on the inside and outsides of my cards… Sentiment piece 2 ¾ x 4 inside only….. I cut all of these with my paper trimmer.


I love sharing the instructions and files for my cards but I do ask that if you use my instructions or files to recreate my card and place it on your blog or somebody else’s blog that you give me the credit for the original design. I also ask that you do not submit my designs for publication, profit or for any contest. Thank you!

Katy Bug

Designed by Jeannie Phillips ~ Southside, Al
Click on any picture to enlarge.
The Gypsy File is available for this card by email. Just copy and paste this email to your personal email account winacard@gmail.com and let me know which Gypsy file that you are wanting.

This is my BBTB card for this week… I needed a card for my niece Katy… I call her Katy Bug… and we were to use the ice cream cone cut on the Stretch Your Imagination cartridge… so I was able to use that for Katy’s card. Katy was tickled over her card which made my day when she got it!!… I hope that you like it too.  Be sur and stop by BBTB2 and see what all the desigeners have come up with. ~ Hugs Jeannie

GYPSY & CRICUT
Because of all the stretching of the sizes of the frame and the name I did not include Cricut instructions on this card.
Freshly Picked
Frame Cut …. On the shift key… cut @ w 4.91 x h 3.50 you will have to unlink the width and height to get this size….I cut 2 of these and welded the shadow of “Katy: to one and the ice cream cone shadows and the ladybug shadow to the other.
Stretch Your Imagination
Ice Cream cones, its layers, and it’s shadow cut @ h 1.55 set the height and the widths will be right on all the cuts..… on the layer cut I used the hide contour feature to hide the cherries on one set and the ice cream on the other.. So I could have chocolate ice cream and then pink cherries.
Walk In My Garden
Ladybugs and their layer and shadow cut @ h 1.26.…set the height and the widths will be right on all cuts.
Alphalicious
“KATY” letters (you will have to unlink the width and heights to get these sizes… “K” cut @ w 0.84 x h 2.08 .. “A” cut @ w 0.84 x h 2.08... “T” cut @ w 0.75 x h 2.08... “Y” w 0.90 x h 2.08.
“KATY” shadow letters (you will have to unlink the width and heights to get these sizes… “K” cut @ w 1.06 x h 2.12 .. “A” cut @ w 1.01 x h 2.08... “T” cut @ w 0.84 x h 2.08... “Y” w 1.15 x h 2.08.
Card base is 4 ¼ x 5 ½, Frame Piece 4 x 5 ¼ , Background piece 3 ½ x 4 ¾… these cuts are on the inside and outsides of my cards… Sentiment piece 2 ¾ x 4 inside only….. I cut all of these with my paper trimmer.


I love sharing the instructions and files for my cards but I do ask that if you use my instructions or files to recreate my card and place it on your blog or somebody else’s blog that you give me the credit for the original design. I also ask that you do not submit my designs for publication, profit or for any contest. Thank you!

Wednesday, July 21, 2010

Birthday Gnome

Designed by Jeannie Phillips ~ Southside, Al
Click on any picture to enlarge.
The Gypsy File is available for this card by email. Just copy and paste this email to your personal email account winacard@gmail.com and let me know which Gypsy file that you are wanting.

This card is for my dear husband his birthday is Friday…. I got this one in under the wire…when I saw the garden gnomes I knew I would make him a card with one of them… he loves them… when we go to Hobby Lobby in the spring he always looks a them… so I think he will just love this card… I sure hope so!!

CRICUT & GYPSY
Freshly Picked
Frames (3) cut @ w 4.91 x h 3.50.. I cut two plain and one with the mushroom…the mushroom that cut out I used on the inside of the card… to fill the space I just hand cut a square and placed behind the mushroom…then added its little pieces.. I did the same thing to fill in the spaces on the mushroom on the inside of the card… on the Cricut I would cut these @ 3 ½ inches.
Gnome and it’s layers cut @ h 3.89.. Set the height and the width will be right… the shadow cut is welded to the hole in the one of the frame pieces so you will have a place to adhere the gnome to the square….. on the Cricut I would cute these @ 3 3/4 inches.
* I wanted to draw the face on so I use the hide contour feature to hid the face features on the layer with the hands and legs… and on the layer with the belt and pants I used the hide contour feature to hide the face.
Create A Critter
Happy Birthday cut @ w 1.99 x h 1.00... This cut out beautifully at that size!!.. On the Cricut I would cut this at 1 inch. (I am loving this cut!!)
Card base is 4 ¼ x 5 ½, Frame Piece 4 x 5... Sentiment piece 2 ¾ x 4 inside only….. I cut all of these with my paper trimmer.


I love sharing the instructions and files for my cards but I do ask that if you use my instructions or files to recreate my card and place it on your blog or somebody else’s blog that you give me the credit for the original design. I also ask that you do not submit my designs for publication, profit or for any contest. Thank you!

Monday, July 19, 2010

Happy Birthday Super Hero

Designed by Jeannie Phillips ~ Southside, Al
Click on any picture to enlarge.
The Gypsy File is available for this card by email. Just copy and paste this email to your personal email account winacard@gmail.com and let me know which Gypsy file that you are wanting.

I received B is for Boy for my birthday from my sweet friend, Alice! THANK YOU ALICE!  I just couldn't’t wait to use it… My son’s birthday is Wednesday the 23rd… just 10 days after mine… when I saw the little boy on this cart… I could so see my John-Robert when he was all little again running around in his super hero capes… he loved being a super hero… I knew if I could figure out how to add the cape exactly what this card was going to look like. John-Robert will be 23 and did grow up to be a super hero for God… he loves spending his time with kids and youth teaching them all about how much God loves them.. In the summer he is Camp Director at RA Camp ( a church camp). And he loves it!!.. Any time through out the year that he gets a chance to share God with a group of kids he is off and running… so this card is super fitting!!.

I read recently in a poll done that more people liked picture tutorials.. I will have to prefect that… that is what I am switching to for now… unless I get lots of request for the videos again or unless a card just needs a video to explain it!!… just let me know how you feel. Hugs, Jeannie

CRICUT & GYPSY
B is for Boy
Boy and its layers cut @ h 2.28.… set the height and the widths will be right…on the Cricut I would cut these @ 2 ¼ inches.
George
Circle (quarter of a circle at corner of card) cut @ h w 4.32 x 4.40... I put a but a rectangle on the mat the size of my background piece or paper, placed it in the bottom corner and then placed the circle on that.. I deleted the rectangle before I cut… you will have to use an exacto knife to finish cutting the circle to the edge of the paper…..using the Cricut I would cut this circle @ 4 1.2 inches… I would lay my background piece of paper over this and mark it and trim off the part that didn’t cut using the Gypsy.
Rounded off Triangle for the cape cut @ w 1.32 x h 1.06... I place a circle cut @ w 0.61 x h 0.57 on top of the triangle to make the neck of the cape… do not weld these two pieces together…. On the Cricut I would cut this at 1 ½ inches…and trim out the neck with scissors.
All Mixed Up
“Super Hero” cut @ h 0.85.. Set the height and the width will be right on all the letters… I did use the button with the circles to make the e’s smaller… then I scooted the letter together…and use the twisty button to turn the letter the way that I needed them to be welded…the easiest way to do this is to place them in the inside edge of the circle as you work then move them after you group and weld them just like you want them…. On the Cricut I would cut these at ¾ an inch.. You might cut the e’s at 1 /2 and inch.
Give A Hoot
Ties for the cape cut @ w 1.47 x h 0.39 …on the Cricut I would try ½ and inch.
There are several bows you could use on different carts.

I grouped all the things by color before I cut them out. The circle is moved to the edge so that it will cut the sides off...I did have to take an exacto knife to cut the circle to the edge just a pinch on the top and bottom.. to get the circle the right size I added a rectangle the size of my background piece to the bottom edge of the mat...then I placed the circle where I wanted it and deleted the rectangle.

Super Hero is welded and grouped together... the circles are placed on the rounded triangles so that there will be a scoop for the neck in the "cape".. do not weld these pieces you want the circle to cut into the triangle.

Here is what all the pieced look like cut out.

I made the Happy Birthday background paper on my computer... and created the sentiment on my computer.

I drew the face on the boy with a fine tip black marker (.005).. I added brown around the blacks of his eyes with brown sharpie... and added freckles... I used pink chalk for his cheeks...and added a white dot to the cheeks and eyes with a white gel pen....I used a brown sharpie to add to the hair...and a white gel pen to add stitches to the pants.


I love sharing the instructions and files for my cards but I do ask that if you use my instructions or files to recreate my card and place it on your blog or somebody else’s blog that you give me the credit for the original design. I also ask that you do not submit my designs for publication, profit or for any contest. Thank you!

Wednesday, July 14, 2010

Birthday Butterfly

Designed by Jeannie Phillips ~ Southside, Al
Click on any picture to enlarger

The Gypsy File is available for this card by email. Just copy and paste this email to your personal email account winacard@gmail.com and let me know which Gypsy file that you are wanting.

This is a second birthday card I made for my daughter... I sent her to my blog and she saw her other card before she opened it... she sent me an email that she needed another one so she would feel loved... I love her so much that I though she was teasing me... she wasn't.... when I truly got that she had felt so unloved I rushed to get her another one in the mail... I hope this makes up for my unintended mistake and that she can find it in her hear to forgive me.  This is a simple card to make... I didn't do it simple because I was in a hurry ... It ended up simple because I loved this butterfly so much and I thought this was the best way to accent it... the flowers came from my dear friend Sandy...she sent me a goodies box for my birthday yesterday!!..thank you so much Sandy... Madison if you read this... I love you very much!!.... 

CRICUT & GYPSY
Once Upon a Princess
Tag and its layer cut @ w 4.45 x h 3.0...on the Cricut I would cut these at 3 inches.
Butterfly and its layers cut @ w 1.80 x h 1.59... on the Cricut I would cut these @ 1 1/2.

Card base is 4 ¼ x 5 ½, Frame Piece 4 x 5 ¼ , Background piece 3 ½ x 4 ¾… these cuts are on the inside and outsides of my cards… Sentiment piece 2 ¾ x 4 inside only….. I cut all of these with my paper trimmer.

I used a sharpie for the brown dots...acrilic paint for the white dots and some of the doodling on the butterfly.
I used a water based brown ink and blue chalks.

There is now a link at the bottom of each post where you can show off your recreation of my cards… with a link back to your card on your blog, or the Cricut Message Board or a photo storage place like Photo Bucket…. I would love it if you share your recreations with me! It just makes me happy!! Thank you so, so much! Hugs


I love sharing the instructions and files for my cards but I do ask that if you use my instructions or files to recreate my card and place it on your blog or somebody else’s blog that you give me the credit for the original design. I also ask that you do not submit my designs for publication, profit or for any contest. Thank you!

Monday, July 12, 2010

Dare to be Different ... BBTB2 Design Team Challenge

Designed by Jeannie Phillips ~ Southside, Al
Click on any picture to enlarge.
The Gypsy File is available for this card by email. Just copy and paste this email to your personal email account winacard@gmail.com and let me know which Gypsy file that you are wanting.

This is my BBTB2 DT card for this week… we were to use the owl on Storybook… and I have been playing with my Cri-Kits pens A LOT lately…this is what I came up with… it was one of those cards that I wasn’t sure I liked when I first finished it…and looked at it the next morning and went “wow! I think I really like this one!”… I hope that you like it too… its going to the CHA Show with the folks at Cri-Kits… they liked it… thank goodness!!… I didn’t have time to do a video on this card… If you watch the video on Café Anniversary (see right side of my blog) it will explain how to do the pens on layers. I hope everybody has a wonderful day!… be sure and check out all the other wonderful cards over at BBTB2. Hugs!


CRICUT, GYPSY & CRI-KITS PENS
(There are no Cricut instructions for this card…I didn’t know how to get the drawn objects in the right place without a Gypsy.)
Layer 1 (the ink layer) Cut/draw this layer first.
You will need your Cri-Kits pen housing and a black Cri-Kits pen for this layer.
Songbird
“to be” cut/drawn @ h 0.91 set the height and the width will right.
“Dare” cut/drawn @ h 0.63 set the height and the width will be right.
You will have to overlap and weld and group these words together.
Storybook
Owls cut/drawn @ w 0.93 x h 1.35.…I put the regular cut on top of the shadow cut to cut /draw the Shadow is cut/drawn @ w 0.99 x h 1.36
Dreams Come True
Leaves cut/drawn @ w 0.74 x h 0.75 and w 0.57 x h 0.58 and w 0.63 x h 0.65...I just eyed these sizes and changed them with the button that make objects smaller or larger.
Home Décor
Branch cut/drawn @ w 3.87 c h 2.41

After you draw this layer … choose add to design.. Do NOT choose unload mat…. Slip a scrap piece of paper under your pen housing when you remove it… put in your blade housing… choose Layer 2 on your mat then cut Layer 2.

Layer 2 (cut layer)
George rectangles for background pieces cut @ w 4.75 x h 3.50 .. You will have to unlink the width and height and set real dial size to get the right dimensions for this cut… be sure and re-link your width and height and deselect your real dial size for the rest of the cut pieces.
Once Upon a Princess (tag feature)
Rectangle top tag piece and the scalloped rectangle tag piece cut @ h 1.12..set the height and the width will be right…. Place your word “Dare” over the rectangle piece.
Storybook
Owl cut @ w 0.93 x h 1.35... I added circles from George around its eyes… they are cut @ 2 0.28 x h 0.26..do NOT weld these in so they will cut out.
Owl’s shadow cut @ w 0.96 x h 1.31.
Songbird
Different cut @ h 1.10...set the height on the letters and the width will be right…you will have to overlap these and weld and group them together.
Card base is 4 ¼ x 5 ½, Frame Piece 4 x 5 ¼ , Background piece 3 ½ x 4 ¾… these cuts are on the inside and outsides of my cards.

There is now a link at the bottom of each post where you can show off your recreation of my cards… with a link back to your card on your blog, or the Cricut Message Board or a photo storage place like Photo Bucket…. I would love it if you share your recreations with me! It just makes me happy!! Thank you so, so much! Hugs


I love sharing the instructions and files for my cards but I do ask that if you use my instructions or files to recreate my card and place it on your blog or somebody else’s blog that you give me the credit for the original design. I also ask that you do not submit my designs for publication, profit or for any contest. Thank you!

Friday, July 9, 2010

SOS - Handmade Cards by Jeannie Phillips - How to Video

Designed by Jeannie Phillips ~ Southside, Al
Click on any picture to enlarge.
There is a instructional VIDEO at the bottom of this post.
The Gypsy File is available for this card by email. Just copy and paste this email to your personal email account winacard@gmail.com and let me know which Gypsy file that you are wanting.

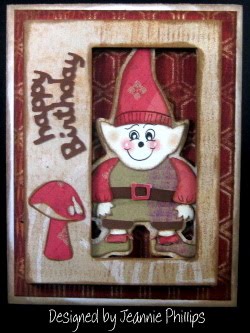
I am so, so, so excited about this card… I have played with my Cri-Kits enough to be able to incorporate them into my kind of designs… so this card was so fun to make… I use by Cri-Kits pens for the background and for the flag… I am so excited about how this turned out…and it gives the illusion of even more depth. I so hope that you like it too!!… I will be sending this to Dru at Cri-Kits to take with them to the CHA Show in Chicago… how fun is that… too bad I can’t fold myself up in the card… I cherish your comments and thank you so much for looking!

CRICUT, GYPSY & CRI-KITS Pens
(Sorry, There are no Cricut instructions for this card.)
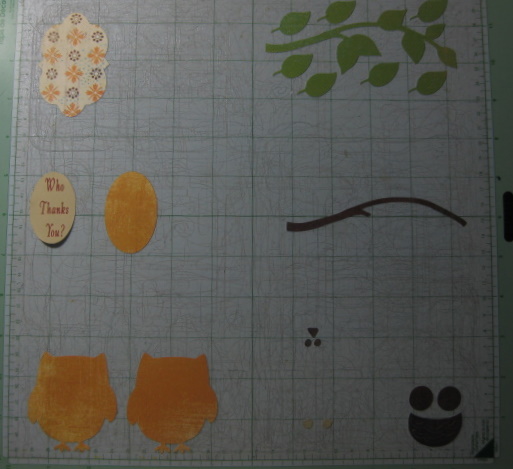
Layer 1 (all cut pieces) Cut this layer out last.
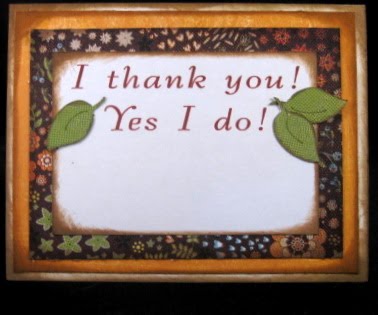
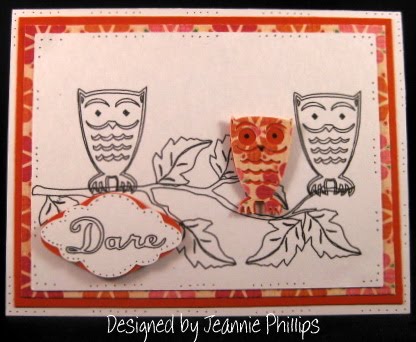
Give a Hoot
Boat and all it’s layers cut @ h 2.95.…set the height and the widths will be right.
Life is a Beach
Waves cut @ w 4.78 x h 1.25.. To get this size unlink the width and height…. Cut three of these…two you will weld to rectangles from George…
George
Rectangles for the waves.. Shorter one w 4.75 x h 1.20.. Unlink the width and height and set real dial size for these cuts …. Taller rectangle w 4.75 x h 1.23... You will weld these rectangles to two of the waves.

Rectangle for background piece cut @ w 4.75 x h 3.50... You will unlink the width and height for these cuts and set real dial size.
Layer 2 (using the black Cri-Kits pen) cut/draw this layer first. Be sure and re-link the width and height and turn the real dial size off.
Indy Art
Skull and Cross bones cut @ w 0.50 x h 0.38
All Mixed Up
“S” cut @ w 0.28 x h 0.50
“O” cut @ w 0.29 x h 0.50
“S” cut @ w 0.20 x h 0.36
* When this layer finishes cutting/drawing choose add to design …do NOT choose unload mat… change pens to blue.
Layer 3 (using blue Cri-Kits Pen)
Create a Critter
Layer 4  (Using Yellow Cri-Kits Pen)
Cloud cut @ w 1.98 x h 1.13
* When this layer finishes cutting/drawing choose add to design …do NOT choose unload mat… change pens to yellow.
Gypsy Wanderings
Sun cut @ w 2.08 x h 2.27

* When this layer finishes cutting/drawing choose add to design …do NOT choose unload mat… change pen housing to blade housing… cut layer one.

*Important put a piece of paper under the housing each time you change it… and before you put the pens in scribble on a scrap piece of paper to get ink flowing.

Card base is 4 ¼ x 5 ½, Frame Piece 4 x 5 ¼ , Background piece 3 ½ x 4 ¾… these cuts are on the inside and outsides of my cards… Sentiment piece 2 ¾ x 4 inside only….. I cut all of these with my paper trimmer.

There is now a link at the bottom of each post where you can show off your recreation of my cards… with a link back to your card on your blog, or the Cricut Message Board or a photo storage place like Photo Bucket…. I would love it if you share your recreations with me! It just makes me happy!! Thank you so, so much! Hugs


I love sharing the instructions and files for my cards but I do ask that if you use my instructions or files to recreate my card and place it on your blog or somebody else’s blog that you give me the credit for the original design. I also ask that you do not submit my designs for publication, profit or for any contest. Thank you.

Blog Widget by LinkWithin
Thank you so much for signing my Guestbook... I have no idea how to reply to people who do sign in... but I so love it when you do!!... So thank you so much!... if you ever have any questions you can email me @ winacard@gmail.com. I will be happy to answer any questions you might have.

Thank you again for signing my Guestbook~
Jeannie

Please Sign In