Thank Your For Stopping By

Thank you so much for stopping by to visit my blog... it is changing as I change and learn more things... I hope after Christmas to get an opportunity to make some more CARDS. I am loving Loom Knitting now... and have lots to do before Christmas....I don't mind sharing how I do things and if you have questions you can E-MAIL me @ winacard@gmail.com and I will be happy to answer any questions that I have.


Showing posts with label Graduation. Show all posts

Monday, April 26, 2010

Happy B Day ~ BBTB DT Challenge

Designed by Jeannie Phillips ~ Southside, AL
Click on any picture to enlarge.

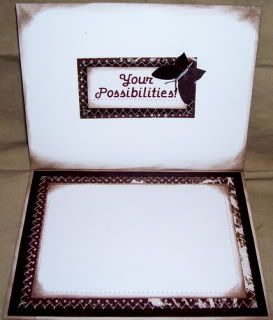
More pictures below the instructions..and a mat shot!

Gypsy file available by email...just copy and paste the email address into your persona email account... winacard@gmail.com.

I was so excited when Donna Mundinger picked this cut for the Bitten By the Bug 2  Design Team cut for this weeks challenge.....  I absoutly love it... then I drew a blank for a day or two ...and then there it was in my head the idea for this card...and I had so much fun making it... this is the first time I have added doodles to this bee and I was tickeld to death with how they turned out... I hope that you like my card!!... be sure to visit the Bitten By the Bug 2 and see what Bee-u-tiful things the other Design Teams members have created!...thank you for looking!... Hugs, Jeannie

CRICUT & GYPSY
Sentimentals
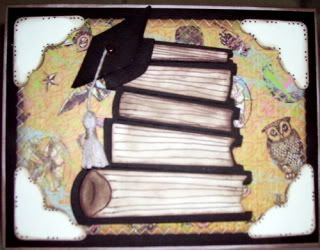
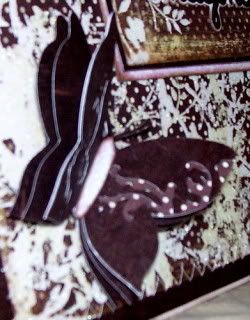
Bee (2) and its  shadow cuts... one in yellow two in velum cut @ h 2.48 set the height and the width will be right on all cuts...I was thinking that the stripes on the bees back were cut out... so I cut a yellow shadow to go behind this...instead you can cut yellow stripes on one of the layer features and leave out the yellow shadow cut... I trimmed the antennas off all the cuts but the black cuts.... on the Cricut I would cut these @ 2 1/2 inches.
Give A Hoot
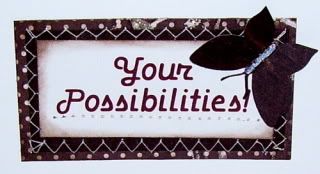
Tag and its solid shadow cut @ h 3.41...on the Cricut I would cut these at either 3 1/2 inches.
Flower cut to place on top of tag and its layers cut @ h 2.73 ...set the width and the height will be right... I cut an extra green and orange part of this cut for the inside..I am not sure at all what size to do this on the Cricut I am guessing  2 3/4 inches will work...this is totally a guess.
Graphically Speaking
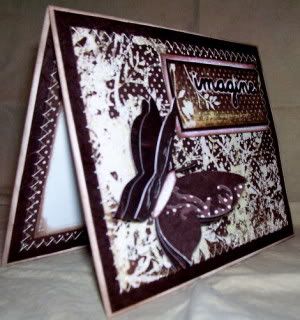
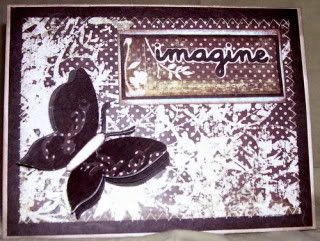
Swirls cut @ W 2.86 x h 0.80... you will need to unlink the width and height for this... one of these is welded to the shadow cut of the tag....on the Cricut I would cut this at 3/4 and inch.
Song Bird
(loving this cartridge for welded letters!)
"B-day" cut @ h 0.77 set the height and the width will be right...scoot these letters together and weld them...on the Cricut I would cut these at 3/4 and inch...and overlap them when I placed them on the card.
"happy" cut @ 0.77 set the height and the width will be right... scoot together and weld....I placed this on the tag where I wanted it... then I duplicated it so I could cut one in a different color to place on top of the welded "happy"..this duplicating it after I got it just right was the easy way to get everything exactly the same.... on the Cricut I would cut these @ 3/4 and inch..I would adhere the swirl directly to the paper..then place the happy on top of that...you will get almost the same effect.
I popped the tag from the background...then the layer is popped from the background tag cut...the bee is popped from the background paper too.


Tuesday, January 19, 2010

Graduation - The Gypsy Spot Design Team Card

Designed by Jeannie Phillips - Southside, AL
Click on any picture to enlarge.


This is my The Gypsy Spot Design Team card for this week.... our mission was to use black and gold... the paper I chose for this project dictated its simplicity... I was really happy with how it turned out... it is for a young man that I use to work with... a very sweet, good, kind young man that I just love to death... so it needed to be masculine... and those are hard to do!!... hope that you like it!!...I hope that he does too.
Be sure and check out The Gypsy Spot and see the wonderful things the other design team members have come up with!!  Thanks for looking... Hugs Jeannie

GYPSY HINT
When you are stacking shapes like I did in this card, behind the graduation cap, get the shape you want... make it the size you want for the largest piece... then duplicate that shape... click the button that makes, a shape smaller, 2 times... repeat this process for each piece until you have as many stacks as you want.
This will give you perfect intervals between shapes.
CRICUT & GYPSY
George
Squares cut @ sm. w 2.64 x h 2.46, md. w 3.06 x w 2.86 and lg. w 3.33 x 3.11 ...on the Cricut I would cut these at 2 1/2. 2 3/4 and 3 inches.
Locker Talk
Caps and the tassel layer cut @ w 3.15 x h 2.0...I cut two ..on the top layer I trimmed the bottom part of the cap off..and popped the square part from that piece...I trimmed the tassel  from the piece with the bottom left on... on the Cricut I would cut these at 2 inches.
Smaller Cap on inside of card  cut @ w 2.15 x h 1.37 I used a gold gel pen for the tassel  ... on the Cricut I would cut this @ 1 1/4 inches.
Wild Card
"Congratulations" cut @ w 3.12 x h 5.14... on the Cricut I would cut this @ 1 1/4 inches on real dial size.


Thursday, June 4, 2009

Congratulations Brittney

I needed to make a graduation card for Brittney, this wonderfully sweet girl that use to work for me when I managed a shoe store.... I have been putting it off.... then I discovered Dustin Pike Digi Stamps... and I got inspired!! ... I was just too excited... I am loving his work!!.. and I love that you can make the stamp the size you need it once you download it... how cool is that!!!!.... it make the possibilities unlimited!! ... I used the MCPT to color the stamp... I just couldn't get a picture that didn't make the colors look as bright as they are!!... I wish you could see it in person.... I made a 1/4 inch thick envie to protect it too... too fun!~~Hugs, Jeannie
Dustin Pike Digi Stamps
Grad Girl
Printed @ 1 1/2 inches.
Punched with a 2 inch circle punch.
CRICUT
Mini Monogram

Scallops cut @ 2 1/2 and 2 1/4 inches on real dial size.
Circle cut @ 2 1/4 inches on real dial size.
CUTTLE BUG
Swiss Dots Folder
Lots of Ink
Lots of Popdots
Every layer of the stamps and scallops are popped.

Wednesday, May 13, 2009

Todd's Graduation Card

Designed by Jeannie Phillips
Southside, Al A decade ago I made two really wonderful friends Lannie and Todd.... I needed a break from life and stayed with them for almost a week.... they were wonderful and will always be so special to me.... they are forever a part of my heart!!!... Todd went back to school to get yet another degree and Lannie asked me to make him a card for her.... it had to be special because they are both so special to me... I hope that they love it.... Thanks for looking... ~~Jeannie

CRICUT
Accent Essentials
Frame cut @ 2 1/2 inches on shadow twice.
Solid Frame cut from transparency @ 2 1/2 inches 1 time.
Locker Talk
Graduation Cap cut @ 1 1/2 inches (I think).
Opposites Attract
"Todd" cut @ 1 inch on the upright feature.
Square frame on the bottom hand-cut with cutter and I used a ticket punch on the corners.
Lots of brown waterbased dye ink.
I pop dotted the bottom frame 2 pop dots thick from the base of the card... then the frame with the transparency and graduation cap was pop dotted two pop dots thick from the bottom frame.

Wednesday, December 17, 2008

Congratulations Cory

This is a card I made for my soon to be Son-in-Law... he is graduating form Jacksonville State University Friday night with a degree in Criminal Justice... we are very proud for him... I made the card with the books because he loves books so much.... its so important to me that he loves this card... wish me luck... ~~Jeannie
CRICUT
Locker Talk
Books cut @ 3 3/4 inches,
once on shadow blackout.. once on regular feature and once on layer feature.
I pop dotted the adhered the top two layers together and pop dotted them form the shadow layer... and added the book lines with a sharpie...lots of ink for ageing.
Cap cut @ 1 1/2 inches
twice on shadow blackout feature.
I trimmed the tassel away on both layers and the bottom of the cap away from the top layer.
I pop dotted the top of the cap from the bottom layer.... added a handmade tassel with a brad.
Alphalicious
"Congrat ulations" cut at 3 inches.
Jasmine
Corners cut at 2 1/2 inches
on real dial size and with the shadow feature.
Stitching with off white thread...lots of inking and some doodling.
side
close up
Inside

Saturday, November 29, 2008

Imagine Your Possibilities

This card started with my new paper pack from My Minds Eye....and it had to have a butterfly... the white part of the paper sparkles with glitter which you can't see good in my terrible pictures... this is one of those cards that looks better in person... hope you like it..~~Jeannie
CRICUT
Home Accents
Butterfly cut @ 3 inches
...once in brown on regular cut...4 times on shadow blackout..once in dotted paper, twice in brown paper...and once in white paper so I could cut out the body in white and add glitter...i inked around the edges first in brown before added the glitter.
"imagine" cut @ 2 inches
once on regular cut once on shadow.
Stitching and lots of brown ink... "Your Possibilities" was computer generated.


Friday, May 16, 2008

Oh The Places You'll Go


I spent the day at Wanda's again... we had such a great time making cards...we both needed graduation cards and this is what we came up with.... the owl is out of circle punches and a larger scalloped punch...the corners are Jasmine and the branch is actually a butterfly body from Walk In My Garden..it is cut at 5.25 inches... the sentiment is computer generated.
Thanks for looking
Jeannie

Wednesday, May 7, 2008

Graduation Card..


This I made for someone who was in our life for 3 of his 5 college years... I hope he likes it... I used my Cricut E to cut the camera from Going Places at 2.5 inches... the tag is from George cut at 4 inches ...then with 4 inches w/ shadow....then at 3.75 inches and 3.75 inches with shadow... I used Liquid Glass on the lense part of the camera.....I was proud of this one because guy cards are so hard to do.

Thanks for looking
Jeannie
Blog Widget by LinkWithin
Thank you so much for signing my Guestbook... I have no idea how to reply to people who do sign in... but I so love it when you do!!... So thank you so much!... if you ever have any questions you can email me @ winacard@gmail.com. I will be happy to answer any questions you might have.

Thank you again for signing my Guestbook~
Jeannie

Please Sign In