Thank Your For Stopping By

Thank you so much for stopping by to visit my blog... it is changing as I change and learn more things... I hope after Christmas to get an opportunity to make some more CARDS. I am loving Loom Knitting now... and have lots to do before Christmas....I don't mind sharing how I do things and if you have questions you can E-MAIL me @ winacard@gmail.com and I will be happy to answer any questions that I have.


Showing posts with label Gypsy Wanderings. Show all posts

Monday, October 18, 2010

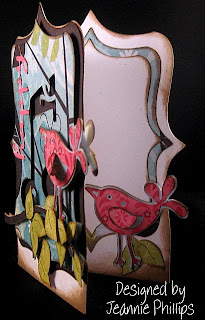
Fall Thank You Card... Yes a card, can you believe it!

Designed by Jeannie Phillips ~ Southside, Al
Click on any picture to enlarge.

The Gypsy File is available for this card by email. Just copy and paste this email to your personal email account winacard@gmail.com and let me know which Gypsy file that you are wanting.

I made this card as a thank you card for my pastor, who is wonderful… my Daddy is having surgery next tomorrow in B’ham about an hour and a half away… at six the morning… Pastor David is coming to pray with my dad before surgery!!… I wanted to thank him… there is not enough words… I hope this makes him know how much this means to us.

GYPSY & CRICUT
Gypsy Wanderings
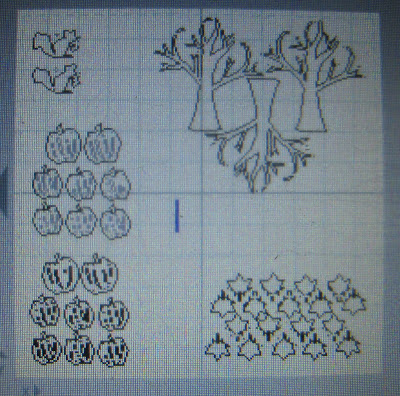
Pumpkins cut @ w 1.20 x h 1.30 and 3 1.0 x h 1.07... The second set of pumpkins I used the hide contour feature to remove the slits in the pumpkin… and cut those in a darker orange…. On the Cricut you would have to use different pumpkins.. I would cut them @ 1 ¼ and 1 inch.
Live Simply
Chipmunk cut @ w 1.56 x h 0.93... Since I cut him so small I didn’t cut the layers and just added accents with my pens and chalk… on the Cricut I would cut this at 1 inch.
Bloom
Trees cut @ w 3.64 x h 3.89... I cut this out three time.. On the bottom one I used the whole tree… on the next one that I popped from the bottom one I cut away the right limb... and on the top one that I popped from the middle one I cut away both limbs… on the Cricut I would cut this @ 4 inches.
Create a Critter
Leaves cut @ w 0.79 x h 0.88 …on the Cricut I would cut this @ ¾ and inch.

Card base 4 ¼ x 5 ½ inches… Frame piece 4 x 5 ¼ inches…. Background piece 3 ½ x 4 ¾ inches… Sentiment piece 2 ¾ x 4 inches… all these pieced I cut on my paper trimmer.

I love sharing the instructions and files for my cards but I do ask that if you use my instructions or files to recreate my card and place it on your blog or somebody else’s blog that you give me the credit for the original design. I also ask that you do not submit my designs for publication, profit or for any contest. Thank you!




Friday, October 1, 2010

Fall Scarf and Boggin with Needle Felted Leaf and Acrons

Designed by Jeannie Phillips ~ Southside, Al
I am so excited about this scarf and hat!!...it is my favorite yet...I am learning... I learned how to do the knit stitch on my !!looms for my patches... and I am so excited... now if I just get better at felting them before I put the design on them.... I used my Gyspy and Cricut for templates for my Needle Felting and am so excited about how it turned out!!... thank you so much for looking... now to find something to do with these hats and scarfs that I am making!

Gypsy and Cricut
Gypsy Wandering
Leaf cut @ w 2.20 x h 2 27.. with the hide contour feature used to hide the lines in the leaf....I cut this leaf  inside a square from George... (to create the template) ...the square is cut @ w 3.15 x h 3.15... on the Cricut I would cut the leaf @ 2 1/4 inches and the square @ 3 1/4 inches.
Winter Woodland
Acorn cut @ w 0.94 x h 4.52  (this is not too large I promise)... I cut this inside a square from George that was cut @ w 1.59 x h 1.40...on the Cricut I would cut the acorn @ 4 1/2 inchs and the square @ 1 1/2 inches.

I am really enjoying the Needle felting it is just so much fun... I used a light brown on the bottom of the acorn..and a dark brown for the top and the steam...... and a burn orange color for the leaf...and the same dark brown for the veins and steam on the leaf.. these are just super easy to do.


Friday, July 9, 2010

SOS - Handmade Cards by Jeannie Phillips - How to Video

Designed by Jeannie Phillips ~ Southside, Al
Click on any picture to enlarge.
There is a instructional VIDEO at the bottom of this post.
The Gypsy File is available for this card by email. Just copy and paste this email to your personal email account winacard@gmail.com and let me know which Gypsy file that you are wanting.

I am so, so, so excited about this card… I have played with my Cri-Kits enough to be able to incorporate them into my kind of designs… so this card was so fun to make… I use by Cri-Kits pens for the background and for the flag… I am so excited about how this turned out…and it gives the illusion of even more depth. I so hope that you like it too!!… I will be sending this to Dru at Cri-Kits to take with them to the CHA Show in Chicago… how fun is that… too bad I can’t fold myself up in the card… I cherish your comments and thank you so much for looking!

CRICUT, GYPSY & CRI-KITS Pens
(Sorry, There are no Cricut instructions for this card.)
Layer 1 (all cut pieces) Cut this layer out last.
Give a Hoot
Boat and all it’s layers cut @ h 2.95.…set the height and the widths will be right.
Life is a Beach
Waves cut @ w 4.78 x h 1.25.. To get this size unlink the width and height…. Cut three of these…two you will weld to rectangles from George…
George
Rectangles for the waves.. Shorter one w 4.75 x h 1.20.. Unlink the width and height and set real dial size for these cuts …. Taller rectangle w 4.75 x h 1.23... You will weld these rectangles to two of the waves.

Rectangle for background piece cut @ w 4.75 x h 3.50... You will unlink the width and height for these cuts and set real dial size.
Layer 2 (using the black Cri-Kits pen) cut/draw this layer first. Be sure and re-link the width and height and turn the real dial size off.
Indy Art
Skull and Cross bones cut @ w 0.50 x h 0.38
All Mixed Up
“S” cut @ w 0.28 x h 0.50
“O” cut @ w 0.29 x h 0.50
“S” cut @ w 0.20 x h 0.36
* When this layer finishes cutting/drawing choose add to design …do NOT choose unload mat… change pens to blue.
Layer 3 (using blue Cri-Kits Pen)
Create a Critter
Layer 4  (Using Yellow Cri-Kits Pen)
Cloud cut @ w 1.98 x h 1.13
* When this layer finishes cutting/drawing choose add to design …do NOT choose unload mat… change pens to yellow.
Gypsy Wanderings
Sun cut @ w 2.08 x h 2.27

* When this layer finishes cutting/drawing choose add to design …do NOT choose unload mat… change pen housing to blade housing… cut layer one.

*Important put a piece of paper under the housing each time you change it… and before you put the pens in scribble on a scrap piece of paper to get ink flowing.

Card base is 4 ¼ x 5 ½, Frame Piece 4 x 5 ¼ , Background piece 3 ½ x 4 ¾… these cuts are on the inside and outsides of my cards… Sentiment piece 2 ¾ x 4 inside only….. I cut all of these with my paper trimmer.

There is now a link at the bottom of each post where you can show off your recreation of my cards… with a link back to your card on your blog, or the Cricut Message Board or a photo storage place like Photo Bucket…. I would love it if you share your recreations with me! It just makes me happy!! Thank you so, so much! Hugs


I love sharing the instructions and files for my cards but I do ask that if you use my instructions or files to recreate my card and place it on your blog or somebody else’s blog that you give me the credit for the original design. I also ask that you do not submit my designs for publication, profit or for any contest. Thank you.

Sunday, July 4, 2010

Monogram/Butterfly ~ How to Video

Designed by Jeannie Phillips ~ Southside, Al
Click on any picture to enlarge.
There is a instructional VIDEO at the bottom of this post.
The Gypsy File is available for this card by email. Just copy and paste this email to your personal email account winacard@gmail.com and let me know which Gypsy file that you are wanting.

Oh I am still playing with my Cri-Kits pens… www.cir-kits.com … I am loving these… this is a card I made for my step-mom for her birthday… her name is Gail…thus the G… I hope that she loves it… I hope to play with my pens some more then start intergrading them into my card making style more naturally…but for now I am just having a blast!

Oh and some exciting news for me…I am so excited… Dru from Cri-Kits has asked me to send her some of my cards using the Cri-Kits pens for them to show off at the CHA Show in Chicago!… What an honor is that!!… if you are there please stop by and tell them I said hi!

CRICUT, GYPSY & CRI-KITS
Layer 1 (cut pieces)
George
Rectangles .. Large cut @ w 4.75 x 3.5 .. Small w 1.90 x h 2.47... These cuts are on real dial size and you have to unlink the width and height to get both of these sizes.
*be sure to re-link your width and heigh buttons and de-select the real dial size for the rest of this card.
Circles (for tag)Large w 0.89 x h 0.83 .. Small w 0.80 h 0.75
Once Upon a Princess
Butterfly layer (its body) cut @ h 2.23..set the height and the width will be right… this butterfly body came from a different butterfly cut than the one we use it on in the card.
Tag and its layer (shift key) cut @ h 1.34 .. Set the height and the width will be right for both cuts.
Layer 2 (drawn pieces with Cri-Kits)
Once Upon a Princess
Butterfly cut @ w 2.09 x h 4.03.
Cindy Lou
Swirlssmall for the tag cut/drawn @ w 0.74 x h 0.38 duplicate and flip up for the second small swirl .. Large for the inside of card cut/drawn @ w 1/35 x h 0.69.
Jasmine
“G” cut @ w o.45 x h 0.94.
Gypsy Wanderings
“Happy Birthday” cut @ w 2.51 x h 1.71.

Card base is 4 ¼ x 5 ½, Frame Piece 4 x 5 ¼ , Background piece 3 ½ x 4 ¾… these cuts are on the inside and outsides of my cards… Sentiment piece 3 1/2 x 4 3/4  inside only….. I cut all of these with my paper trimmer.

There is now a link at the bottom of each post where you can show off your recreation of my cards… with a link back to your card on your blog, or the Cricut Message Board or a photo storage place like Photo Bucket…. I would love it if you share your recreations with me! It just makes me happy!! Thank you so, so much! Hugs


I love sharing the instructions and files for my cards but I do ask that if you use my instructions or files to recreate my card and place it on your blog or somebody else’s blog that you give me the credit for the original design. I also ask that you do not submit my designs for publication, profit or for any contest. Thank you!


Sunday, May 2, 2010

A Perfect Summer Day w/videos Parts 1&2

Designed by Jeannie Phillips ~ Southside, Al
Click on any picture to enlarge.
There is a instructional VIDEO at the bottom of this post.

The Gypsy File is available for this card by email. Just copy and paste this email to your personal email account winacard@gmail.com.

I have been thinking all day on a Mother’s Day card for my mom… I keep being nudged to go look at my papers…. Did I listen… not at first… I kept going through my Gypsy looking at my cuts…nothing was coming to me…. God kept nudging me to go look at my papers… when I did just that there it was the card I needed in my first stack of papers…when I saw the papers I knew exactly what I wanted to do!!… next time I will listen… I hope!… thank you so much for looking… I love your comments.. Be sure and check out the video… it’s a two part video…because my battery ran out of power in the middle. I am learning!!!.. Hugs, Jeanne

GYPSY & CRICUT
Stretch Your Imagination
Birdhouse, its shadow and its layer cut @ h 3.28 set the height and the width will be right… on the Cricut I would cut these @ 3 ¼ inches.
Happily Ever After - Disney
Birds and their layer cut @ h 1 inch .. Set the height and the width will be right… on the Cricut I would cut these @ 1 inch.
Zoobaloos
Branches and their layers cut @ h 1.32 ….set the h and the width will be right… I flipped two of the branches up…and welded two together… see mat shot below….on the Cricut I would cut these at 1 ½ inches.
Give a Hoot
Leafs cut @ w 0.84 x h 0.53 …I used the extra leaves to add to the branches and behind the birdhouse…see video …on the Cricut I would cut these @ ½ an inch.


Monday, April 19, 2010

Happy Birthday Birdie

Designed by Jeannie Phillips ~ Southside, AL
Click on any picture to enlarge.
I am happy to share my Gypsy file by email...just copy and paste this email address into your own email account... winacard@gmail.com

I realized that I needed a couple of b'day cards that I need to make and send...they may be late...this is one of them... I saw this cut from Gypsy Wanderings with the music notes in it and the card grew from there...I just loved this cut!!... this was not one of those cards where I felt I knew just what it was going to look like when I finished....I was so excited when I finished and was so tickled with the outcome.... thank you so much for looking... I thrive on your comments!!... have a wonderful day... Hugs, Jeannie
CRICUT & GYPSY
*No Cricut cuts included on the card because of all the welding.*
Gypsy Wanderings
Bookplate cut with notes in it cut @ w 3.48 x h 4.45
Bookplate shadow blackout cuts for the shaped card (in red welded to the rectangles) cut @ w 3.95 x h 4.45... I placed one on the mat and welded a square from George @ w 3.42 x h 1.0..you have to unlink the width and height to get this size...
weld and group these two shapes
Bookplate background cut...that goes behind the Bookplate note cut cut @ w 3.95 x h 4.45.
Frame Bookplate for inside of card cut @ w 3.37 x h 3.80.
Top Bookplate cut for inside of card cut @ w 2.97 x h 3.35.
Zooballoos
Branch and its layer cut @ w 3.79 x h 1.37.
I cut two extra layers in green so I would have the extra leaves... I welded one of  regular branch cuts  onto the Bookplate Note cut to have a good place to pop dot the branch from.
Home Decor
Bird and its shadow cut @ h 1.63 ...set the height and the width will be right...I placed an extra shadow from the bird on the Bookplate Note cut and welded it there so have a good place to pop dot the assembled bird and its shadow to...the other bird is on the inside of the card.
Songbird
All letters cut @ h 0.77 set the height and the width will be right...overlap the letters for each word and weld together.
There are two mat shots because I had to lay this out on two mats ...I did this best by  putting all the cuts on one mat...then I named the file and saved it... then I deleted the items I wanted on the second page...and saved it with a -1 added to the end of the file name... then I opend the file with all the cuts... removed the cuts alread on page one...and saved this file with a -2 at the end of the file name.


Saturday, April 10, 2010

Be Still

Designed by Jeannie Phillips ~ Southside, AL
Click on any picture to enlarge.

This card was inspired by a card DJ1952 on the Cricut Message Boards posted the other day... click here to see her card.... its really very different but the title made me see this chair in my head with flowers in it...but you see it evolved into something different.... but without DJs card I would have never in a million years thought up this card.... so I hope that she loves it!!...then the perfect Bible Verse came to me for the inside... Psalm 46:10... this very verse gave me so much peace today!!... so I needed this card... hope you like it!!... thank you so much for your comments!... Hugs, Jeannie

Gypsy file for this card avaliable by e-mail...just email me @ winacard@gmail.com .
Just copy and paste the e-mail address into your own email.
If you make this card please leave a comment so  I can check out your card... if you don't have a blog I would love it if you would e-mail me a picture of your card!
CRICUT & GYPSY
Life is a Beach
Chairs and its layer cut @ w 2.27 x h 2.05...I popped one chair from the other an then added the layers to the top chair...the first chair is popped from the background paper...on the Cricut I would cut these @ 2 inches.
Gypsy Wanderings
Trees and its layer cut @ h 4.19... set the height and the width will be right... I put both of the trees together and  adhered the first tree to the background paper and popped the second tree from the first....on the Cricut I would cut these @ 4 1/4 inches.
Animal Kingdom
Cat's cut @ w 0.97 x h 0.52 inches... on the Cricut I would cut these at 1/2 an inch.
Walk in My Garden
Flower's (I used the shadow blackout) cut @ w 0.65 x h 0.54... I cut 23 of these... 7 of which are welded to the grass.... the rest in pink...7 are glued on top of the welded ones in the grass and the rest are on the inside of the card.....on the Cricut I would cut these at 1/2 and inch.
Easter 2010
Shorter Grass cut @ w 1.98 x h 1.19 ... place two in the mat and weld them together....on the Cricut I would cut 2 or these at 1 1/4 inches...and overlap them on the card to get the length you need.
Taller Grass (2) ...duplicate the shorter grass then unlink the width and height and change the height to h 1.59...on the Cricut I would cut 4 of these @ 1 1/2 inches and overlap on the card to get the length you need.


Tuesday, March 23, 2010

Welcome to the Neighborhood

Designed by Jeannie Phillips ~ Southside AL
Click on any picture to enlarge.
I am so excited about this card...I am going to make one with a dear friend of mine Kara who I haven't got to see in a really long time... and I so love her and her company... and I am also going to make one with an old friend from high school, Deena... it will be fun to get-to-gather with her!!! I so hope that they both like the card!!... this card was totally inspired by the paper...when you scroll down and see the inside you will know that without a doubt... Thank you so much for looking.... and I so love your comments!!!... Hugs, Jeannie

*I was unable to include Cricut instructions with this card...I am so sorry.

CRICUT & GYPSY
George
Square for base of house cut @ w 2.05 x h 1.71... you will have to unlink your width and height to get these measurements.
Triangle for roof cut @ w 2.86 x h 1.49... unlink your width and height... duplicate this...and cut one separate... see mat shot.
I welded these two shape together... and I cut them in white then I duplicated this.
Rectangle for smoke stack cut @ w 0.41 x h 1.00 and rotated sideways... unlink your width and height.
Rectangle for top of smoke stack cut @ w 0.28 x h 0.69... unlink your width and height.
I welded these to the duplicated house.
Square for windows cut @ w 0.50 x h 0.44....cut one of these without the panes for the yellow in the windows.
Square for window panes cut @ w 0.17 x h 0.16... unlink width and height...do not weld to window so you will get the holes in the window.
Rectangle for door cut @ w 0.74 x h 0.90... cut one extra without panes for the yellow in the windows.
Squares for panes in door cut @ w 0.18 x h 0.19.. unlink the width and height.
Circle for tree cut @ w 2.45 x h 2.49.. unlink width and height.
Gypsy Wandering
Tree trunk cut @ w 1.82 x h 3.32... unlink the width and height.
Flower Stems cut @ w 0.55 x h 0.92.
A Child's Year
Tulips..made with teardrops cut @ w 0.41 x h 0.82... I cut one for the center for each flower...and then two ..the two I put one on the mat...rotated it out just a little..then duplicated this...and flipped from side to side.. overlapped with the one I duplicated this cut from and welded them together...then glue the single teardrop to the back.
Home Decor
Flourish cut @ w 1.10 x h 0.78...unlink width and height.
Serenade
Birds cut @ w 0.73 x h 0.58.


Wednesday, March 10, 2010

Hey Chick Happy Birthday!

Designed by Jeannie Phillips - Southside, AL
Click on any picture to enlarge.
When I gave my brother, Jamie his get well card... my sister-in-law, Stacy wanted a birthday card for a friend of hers... she said that there were four of them that hang out together and this card would be from three of them... after a few days.. of thinking... and praying about it...when I get a request my brain shuts completely down for some reason.... anyway after a few days of thinking and and praying about it and  a weekend away at my daughters I came up with this idea.... I so hope Stacy and her friends all like it!!!... thank you so much for looking... and I love love your comments!!... they so encourage me to create!... Hugs, Jeannie

CRICUT & GYPSY
My Community
Chicks.. these are cut from the cut with the mother hen and her chicks... the parts I didn't need I place off the mat...that is why the square are around the chicks on the mat shot...to show that some of the image is off the mat...on the large chick...two chicks and the mother hen are off the mat...and on the small chicks only the mother hen is off the mat.
Large Chick cut @ w 7.90 x h 8.55 ...on the Cricut I would cut this at 8 1/2 inches.
Small Chicks cut @ w 3.10 x h 2.35 ...on the Cricut I would cut these @ 2 1/4 inches.
To make the grass images I cut 4 grass squares from Easter 2010...flipping two of them from left to right and welded them together onto a square from George ... all of this is in red on the mat because it is all welded....on the Cricut  I would cut out the squares with a paper trimmer and adhere the grass square from behind.
Easter 2010
 Grass squares cut @ w 1.66 x h 1.14 ...on the Cricut I would cut these @ 1 1/4 inches.
George
Taller Square cut @ w 4.74 x h 1.20 on real dial size with the link feature unlinked.
Shorter Square cut @ w 4.74 x h 0.90.
Square for Signs cut @ w 0.86 x h 1.29 and w 0.67 x h 1.0 and w 0.53 x h 0.79.... using the Cricut I would cut these with a paper trimmer.
The stick for the signs I cut with a paper trimmer.
Gypsy Wandering
Hat cut @ w 1.18 x h 1.17...on the Cricut I would cut this @ 1 1/4 inches.
The flower on the hat is a punch.
Mickey and Friends
Purse cut @ w 0.72 x h 0.83... on the Cricut I would cut this @ 3/4 and inch or 1 inch.
The flower for the frame are cut with a paper punch.


Blog Widget by LinkWithin
Thank you so much for signing my Guestbook... I have no idea how to reply to people who do sign in... but I so love it when you do!!... So thank you so much!... if you ever have any questions you can email me @ winacard@gmail.com. I will be happy to answer any questions you might have.

Thank you again for signing my Guestbook~
Jeannie

Please Sign In