Thank Your For Stopping By

Thank you so much for stopping by to visit my blog... it is changing as I change and learn more things... I hope after Christmas to get an opportunity to make some more CARDS. I am loving Loom Knitting now... and have lots to do before Christmas....I don't mind sharing how I do things and if you have questions you can E-MAIL me @ winacard@gmail.com and I will be happy to answer any questions that I have.


Thursday, October 29, 2009

I'd Travel the World

Designed by Jeannie Phillips -Southside, AL
Click on any picture to enlarge.
Robby took me to Hobby Lobby Saturday and I fell in love with this paper... it screamed romantic!!! card...just screamed it!!... and if you have known me for only 5 minutes you could figure out I love romantic!!... I made this for Robby... hope that he loves it!... the "stamps" are printed all on a sheet of paper there are probably 100 of them... on one page... Thank you so much for looking!... Hugs, Jeannie
CRICUT & GYPSY
Going Places
Globe cut @ w 2.64 x h 2.54.
Globe Shadows cut @ 2.73 x h 2.54.
Gypsy Font
"I'd" cut @ w 1.30 x h 1.71... after welding.
"travel" cut @ 3.42 x h 1.47 ... after welding.
"love" cut @ 2.36 x h 1.55 after welding.
"the" cut @ 1.32 x h 0.89 after welding.
"for your" computer generated.
Lots of brown Ink.
K & COMPANY Life;s Journey paper pack.

This is my screen shot... just before I cut ... the welded Gypsy Font cut with the other cuts!!.. yippee... wish all my welded stuff would cut that way!!... I did add Cartridge notes and saved them after I finished cutting.


Tuesday, October 27, 2009

Brittney's Birthday Card

Designed by Jeannie Phillips
Click on any picture to enlarge.
Brittney a friend of mine who I met at work.... we have stayed really, really close. since she left work.. her birthday is November 1st... and we eat out the last week of the month each month... so tonight is our night to eat out and this is her birthday card... she loves butterflies... and I often call her "B" so this is what I came up with... my future DIL, Robin eats with us too so I left room for her to sign...Hope that she likes it... the busy paper called for a simple card... so there is no screen picture of this one...but I will give you the size.
CRICUT & GYPSY
Gypsy Fonts
Scalloped oval with "B" cut @ w 2.69 x h 3.50
Scalloped oval in dark pink cut @ w 3.05 x h 3.80
The rectangles behind the ovals were cut with my paper trimmer...
the back rectangle is 4 x 5.25
the center one is 3.75 x 5
and the top one is 3.5 x 4.75.
The butterflies are from a MARTHA STEWART punch.

Monday, October 26, 2009

Gypsy Challenge Miss-Entry

This is the card I was entering in the 24 hour Gypsy Design contest... to me 12 midnight on the 25th until 12 midnight on the 26th meant all day the 26th... Midnight to me meant night... to Provo Craft it mean all day the 25th...and I missed the contest of a lifetime!!!... one contest in my life that I felt I actually had a chance at winning.. slim thou it may have been with all the talent out there... but I still felt I at least had a chance... this is the card I designed at 12 AM this morning!!!... I hope that you like it! .. Hugs, Jeannie (I will give the details when I have calmed down and quit crying!!)

Friday, October 23, 2009

Mr. Scarecrow

Designed by Jeannie Phillips
Click on any picture to enlarge.
Finally a new card... I saw a scarecrow like this on a lady's shirt at the hospital and knew I had to try my hand at one... so here it is... My mom is home... I have had to quit work to take care of her... I go daily and make sure she has 3 meals within her reach and keep her house clean... do the laundry... its working out pretty good so far!!... say prayers that this works for the both of us!... thank you for all your prayers during this very difficult time in my life... say a prayer for my mom... she did miss her Mother's funeral and that has to be hard.. Hugs to everybody!
Jeannie
CRICUT & GYPSY
George
Pants
I made these with basic shapes then welded them together.
Long rectangle that makes both legs cut @ w 0.72 x h 3.99.
Circles that make his bottom in the center of the pants both cut @ w 0.68 x 0.63.
Square that makes the top of the pants cut @ w 1.o5 x h 0.98.
As you can see on the mat below I cut these twice and pop-dotted the top pair.
Body and Head
I made this with basic shapes.
Body Circle cut @ w 1.25 x h 1.16.
Head Circle cut @ w 0.94 x h 0.88.
Shoulder Circles cut @ w 0.45 x h 0.42.
Neck rectangle cut @ w 0.33 x h 0.88.
Arm rectangles cut @ w 0.36 x h 1.00
Paper Doll Dress Up
Hats cut @ 1.62 x h 2.50.
I cut 2 in brown 1 in black for the band on the hat...I only needed one of the brown hats after all.
Shirt cut @ 2.25 x h 4.70.
I cut 2 of these pop-dotted the top shirt.
Pumpkin cut @ w 2.09 x h 3.49.
I cut 2 in green and 2 in orange.
I cut the vines and the stem from the orange pumpkins and glued them to the green.. I needed two one for the inside of the card.
Animal Kingdom
Chicken cut @ w 1.02 x h 1.66.
I cut 2 in brown and one in red... these I cut apart and layered the colors.
Doodling with a brown Sharpie and lots of brown ink.
This is the picture of the mat when I cut ...the rectangle in the middle is the size of an A2 card and opened as a template and will not cut.

Monday, October 19, 2009

Friends are like....

Designed by Jeannie Phillips Southside, AL
Click on any picture to enlarge.
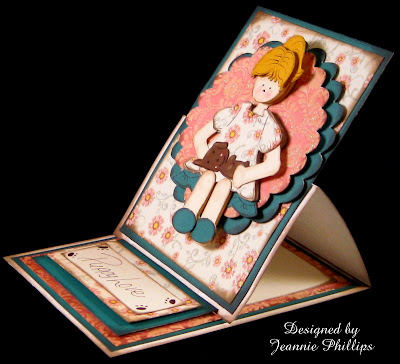
I really needed to create today.... it was a must... but I couldn't really concentrate... still have all the funeral things to do... but this doll reminded me of my MawMaw... so I decided even though this was a pretty simple card that I would do it in honor of her... Thank you for all the prayers...and for looking at my card. Hugs, Jeannie

CRICUT & GYPSY
Christmas Solutions
Doll cut @ w 2.42 x 2.50.
I cut her 6 times so I could paper piece her..and she doesn't come in layers... there are two cuts in yellow for the layers of hair... 2 cuts in red for the dress and bow.... one in off white for the skin...and once in brown for the belt and the shoes... some of her peices are pop-dotted and some are just layered one on top of the other.
Storybook
Frames cut @ w 3.0 x h 2.0 and 3.25 x h 2.26.
I just duplicated the smaller one and tapped the enlarge button 3 times.
All other cuts are made with my paper trimmer.
Lots of brown in and chalk.Below is how my Gypsy screen looked just before I printed...I did delete my notes at the bottom left.... the square in the middles is saved and opened as a template so I can lay my images out in it for sizing... it is the size of an A2 card and does not print when opened as a template.

I have had lots of positive feedback from these shots...but a negative one or two comments also... so if they are helpful to you please let me know and I will keep posting them.

Please say prayers for my family.

My 96 year old grandmother died this weekend.... it has been really sad.... I have an out of state aunt ... and cousins... so the funeral isn't until later in the week... I think that is making all this much harder... life is in limbo ... waiting to even feel like all of this is even real...


When I was a little girl she would let me help her make home made biscuits...that is when I learned to love biscuit dough.... and she would tell me the most wonderful stories... and she told me Bible stories about all the pictures in her huge Bible .... and she always sang me those sad old story songs.... I loved those songs...I think they are why that today I still love a sad song.


Please keep us in your prayers .... my mother and aunt are really sick and I am worried about both of them getting through the next few days.


Hugs

Jeannie

Wednesday, October 14, 2009

Angel Earning Her Halo

Designed by Jeannie Phillips Southside, AL
Click on any picture to enlarge.
I am home from work today... a bad Lupus attack... I tried to get dressed and just couldn't... so I have rested all morning... trying unsuccessfully to sleep.... this little angel has been on my mind all morning!!...she was inspired by a frig magnet at work... I worked on her on my Gypsy last night...and finally decided to finish her up... so maybe I could sleep... I am taking her a sign from God that he is taking care of me and in the morning I will feel better enough to work...usually a day in bed will do it... so back to bed after this post!! Thank you so much for looking... hugs, Jeannie
CRICUT W/GYPSY
Paper Doll Dress Up
Dress cut @ w 3.50 x h 4.96.
I used an oval from George to alter the shape of the dress...I wanted it to be a dress from the side..the dress on PDDU was from the front and too wide...I also added circles in the scalloped bottom to dress up the dress.
Hair cut @ w 2.21 x h 4.41.
If I make this again I would cut two more hair pieces to add to the layers like I did the face circles.
Indy Art
Wings cut @ w 2.30 x h 1.82.
I did cut two of these..accidently deleted one from the mat before the picture.
George
Face
Circle cut @ w 1.40 x h 1.31
Circle that adds nose cut @ h0.16 x w 0.15.
You need to weld these together.
Arm
Circles on each end cut @ w 0.32 x h 0.30
Rectangle cut @ w 0.36 x h 1.04
These items are welded together.
Dress
Oval for altering the dress cut @ w 1.13 x h 3.02.
Circles to dress up scallops on dress cut @ w 1.13 x h 3.04.
Do NOT weld these items to the dress so they will cut through the dress.
Puffy Sleeve
Larger circle cut @ w 0.70 x h 0.65.
3 Smaller circles cut @ w 0.17 x h 0.16.
Weld all four of these together to create the sleeve.
Beyond Birthdays
Dove cut @ w 1.34 x h 1.04...with twig trimmed away.
Joys of the Season
"joy" cut @ w 1.78 x h 0.98.
Picture of the screen I used to cut from...another wing needs to be added I accidently deleted one off before the picture... delete the notes at top of screen before cutting.

Tuesday, October 13, 2009

Georgie Girl

Designed by Jeannie Phillips Southside, AL
Click on any picture to enlarge.
I am really proud of this one... has a few mistakes... but I am still learning... "Georgie" is made with circles and rectangles from the George and Basic Shapes cartridge... thus the name Georgie.. I am really proud of her...hope to improve upon her in the future... I hope that you like her too.... thank you so much for looking!! I love your comments... I actually thrive on them... so thank you in advance for any comment that you leave...and hugs to you for those! Jeannie
CRICUT & GYPSY
All cuts give with real dial size on.
George
Legs
Top circles cut @ w 0.42 x h 0.42.
Rectangle cut @ w o.42 x h 0.91.
Oval for the foot cut @ w 0.46 x h 0.69.
The oval cut was duplicated for the shoe.
Arms
Top rectangle cut @ w 0.35 x h 0.52.
Circle at elbow cut @ w o.32 x 0.32.
Bottom Rectangle cut @ w o.30 x h 0.89.
Oval for hands cut @ w 0.32 x h 0.48.
I cut out two sets of arms only needed one... but did use both sets of legs.
Head
Circles cut @ w 0.91 x h 0.91.
Bottom circle was go give George a body for the neck to come from.
Rectangle for neck cut @ w 0.27 x h 0.91.
Extra Circles for head cut @ w 0.91 x h 0.91.
Paper Doll Dress Up
Hair cut @ w 1.34 x h 1.13.
Dresses cut @ w 2.65 x h 1.95.
Paper Pups
Puppy cut @ w 1.7 x h 0.62.
Storybook
Scalloped circle was the scalloped oval just cut @ w 4.0 x h 4.04 and w 3.58 x h 3.62.
I got my smaller circle and duplicated it and the tapped the enlarge button 3 times.
The rectangles in the middle were opened as a template and didn't cut...I just used them as a guide... I do still have to cut the welded items (in red) separate from the un-welded items.

My first pedestal card!
This is what my file looked like when I cut it.This is the file where I created the look I wanted.

Monday, October 12, 2009

Tea With Me?

Designed by Jeannie Phillips Southside, AL
Click on any picture to enlarge.
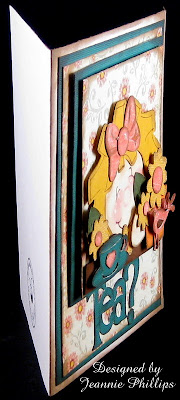
I woke up from my nap...love those... and wanted to make a card...searched picture on the Internet to get inspired... and this is what I made...I am way excited about this one...hope that you love it!!....I am really really excited!!...there are lots of cuts... listing them all... Thank you so much for looking and for the comments! Hugs, Jeannie
CRICUT & GYPSY
Walk in My Garden
Flowers cut @ w 0.98 x h 0.90 and h 0.73 x h 0.67.
Leaves cut @ w 0.93 x h 0.50.
Flower Pot w 1.08 x 0.90.
Paper Doll Dress Up
Tea Cup cut @ w 1.26 x 0.69.
Hair cut @ 3.0 x 2.62.
Home Decor
Bird cut @ w 1.06 x h 0.88.
Mickey and Friends
Bow cut @ w 1.25 x 1.0.
George
Circle for face cut @ w 1.93 x h 1.92.
Oval for hand cut @ w 0.67 x h 1.0.
Circle for bow cut @ w 0.46 x h 0.46.
Heart for tea cup cut @ w 0.35 x 0.29.
Rectangle for table cut @ w 3.0 x h 0.50.
Alphalicious
"T" cut @ w 0.70 x h 1.14.
"e" & "a" cut @ w 0.59 x h 0.79.
"?" cut @ w 0.69 x h 1.22.

This is a picture of my mat for my design of my card.
This a picture of my cuts spread out and how it looked when I went to cut it..I now save the two files one as Tea With Me and Tea With Me-cut

Halloween Candy Cone

Designed by Jeannie Phillips, Southside, AL
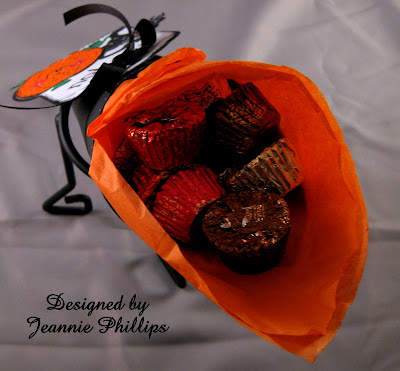
Click on any picture to enlarge. This week at The Cuttlebug Spot we were to make a candy container of some kind...I had to think on this one for a while...because as many of you know... cards are my thing!!...so this is outside my box for sure!!... but when I finished this I was just too excited... I used my Gypsy... and made the tag....I welded the cat and pumpkin to the tags to make a strong base and an outline when I added my other cuts... I am really proud of this one...really proud.... I am learning how to do new things every day with my Gypsy.... this is an amazing amazing tool!.... Hope you like my treat cone... love your comments!!!.... they make my day!! Be sure and check out what the other Design Team members at The Cuttle Bug Spot made this week!!.... Hugs, Jeannie

CRICUT & GYPSY
Tags cut @ w 2.75 x h 4.10 white tag and w 2.87 x 4.28 black tag both on shadow blackout.
Circles to make the holes for the tags cut @ h 0.27 x w 0.24.
Paper Doll Dress Up
Pumpkins cut @ w 2.68 x w 4.48..once in green once in orange...and welded once to the white tag.
Pumpkin welded to black tag is w 2.80 x 4.68.
Cat cut @ w 1.91 x h 3.28 this is the single cat and the cat welded to the white tag.
Cat welded to the black tag is w 2.0 x h 3.43.
The way I did the black tag was... I made the white tag..grouped all the items... click on the group and tapped on the enlarge button 3 times... if you do that you will not have to lay out the black tag...and all your sizes will be right. This is a picture of my Gypsy screen saved file...to cut all I did was delete my notes of the carts I used and the color I wanted one of the pumpkins.... I have found that my welded items are not cutting when my un-welded items cut...I delete the un-welded items then run my mat back through the Cricut and the welded items then cut fine...when the Gypsy prompts me to save changes I choose NO...then I still have my notes and all my cuts.

Sunday, October 11, 2009

Love in the Winter

Designed by Jeannie Phillips Southside, AL
Click on any picture to enlarge.
I went and looked at some tole painting pictures on line and was inspired by a snowman that had this look... it not the same at all... but the inspiration... I made the snowman with George ovals on my Gypsy... I was so tickled when it all came together!!...the background paper inspired all the color choices... Hope that you like it!!... love your comments! Hugs, Jeannie
CRICUT & GYPSY
George
Ovals cut at w 5.30 x h 1.84 (small circle cut 1x) h 2.14 x w 2.89 (med circle cut 2 time's) w 4.01 x h 3.95 (large circle cut 3 times)... for the back layer I welded one of each size together...for the middle layer I welded a large and medium circle together...and a single large circle for the front circle...
Rectangle cut @ w 4.01 x h 0.11 I did this to make a cut line in the ovals...it worked great.
Eye circles cut @ w 0.21 x h 0.19.
Nose circle cut @ w 0.17 x 0.16.
Button circles cut @ w 0.37 x h 0.35.
Flowers cut @ w 0.71 x h 0.65 and w 0.67 x w 0.61.
Hearts cut @ w 1.39 x h 1.67..cut 2 and pop-dotted one from the other.
The third heart is a part of the scarf grouping.
Paper Doll Dress Up
Hat cut @ w 1.27 x 2.08.. cut twice so that I could cut the hat band out of the orange/red paper.
Winter Woodland
Scarf (grouping) is a snowman layer feature cut @ w 2.67 x 7.78...used the scarf on the snowman and the heart on the inside.
Home Decor
Branches cut @ w 2.27 x h 1.41.
These are really thin but cut out really really well.

This is the cut file just before I printed it...I did delete the notes before I printed...I am still at the point having to delete everything that isn't grouped..then going back to cut the grouped items.

This is the cut file saved so I will recognize how it should look when finished.
If you open your rectangle card base as a template it does not cut...but the picture stays on the mat so you can lay your card out and get everything the right size.

Saturday, October 10, 2009

Mr Snowman

Designed by Jeannie Phillips - Southside, AL
Click on any picture to enlarge.
I saw this image painted on a piece of metal while we were in Gatlinburg....and I loved it.... so when we got back to the room I created it the best that I could on my Gypsy... I was so excited...then yesterday Jeannene gave me some paper from an old Christmas paper pack...and I knew what I was using the snowflake paper for...the background of this card... there are some differences from the painting...the Merry Christmas was all in an arch across the snowman instead of just the Christmas...but it worked out well for my card... then the other day someone posted a snowman card where she had used a snowflake in the belly of the snowman....I borrowed that idea for her...but can’t remember who...if you will let me know it was you I would love to give you credit!!...I hope that you can see it in the picture..I used axles to make Sickles highlights to the letters...this is a simple card...but effective I think...I hope you like it...thank you so much for looking!... Hugs, JeannieI saw this image painted on a piece of metal while we were in Gatlinburg....and I loved it.... so when we got back to the room I created it the best that I could on my Gypsy... I was so excited...then yesterday Jeannene gave me some paper from an old Christmas paper pack...and I knew what I was using the snowflake paper for...the background of this card... there are some differences from the painting...the Merry Christmas was all in an arch across the snowman instead of just the Christmas...but it worked out well for my card... then the other day someone posted a snowman card where she had used a snowflake in the belly of the snowman....I borrowed that idea for her...but can’t remember who...if you will let me know it was you I would love to give you credit!!...I hope that you can see it in the picture..I used axles to make Sickles highlights to the letters...this is a simple card...but effective I think...I hope you like it...thank you so much for looking!... Hugs, Jeannie
CRICUT & GYPSY
George
Ovals cut @ w 3.61 x h 4.88 and w 3.53 x h 4.78.the smaller one is in front...both are cut in half.
Eye Circles cut @ w 0.62 x w .58
Triangle for the nose (its a regular triangle to start with) cut @ w .075 x h 3.0 then twisted under the second option on the advanced feature page.
Alphapicious
"MERRY" each letter cut @ h 1.10 the w will fall into place.
"CHRISTMAS" each letter cut @ h 0.81 then moved to overlap and welded together.
Gypsy Wanderings
Snowflake cut @ w.3.26 x 4.88 on real dial size...on the Gypsy that is the "a" within the lines and arrow that points up and down.
This is a picture of how my file looked when I cut it.This is a picture of my saved screen with my notes... once I got it like I wanted it I saved it under Save As......I have to go back and add my cartridge notes..the inside if the square is how I wanted the card to look with all its pieces..the extra pieces are for the pieces that other items were pop-dotted from...when I got ready to cut I spread all the cuts on the mat after I had saved the file... then cut... when prompted to save changes put NO and you will save this screen I did delete the card base square...but you can make one and open it as a template and it won't cut...you will just have it as a guide.

Blog Widget by LinkWithin
Thank you so much for signing my Guestbook... I have no idea how to reply to people who do sign in... but I so love it when you do!!... So thank you so much!... if you ever have any questions you can email me @ winacard@gmail.com. I will be happy to answer any questions you might have.

Thank you again for signing my Guestbook~
Jeannie

Please Sign In