Thank Your For Stopping By

Thank you so much for stopping by to visit my blog... it is changing as I change and learn more things... I hope after Christmas to get an opportunity to make some more CARDS. I am loving Loom Knitting now... and have lots to do before Christmas....I don't mind sharing how I do things and if you have questions you can E-MAIL me @ winacard@gmail.com and I will be happy to answer any questions that I have.


Monday, April 19, 2010

Happy Birthday Birdie

Designed by Jeannie Phillips ~ Southside, AL
Click on any picture to enlarge.
I am happy to share my Gypsy file by email...just copy and paste this email address into your own email account... winacard@gmail.com

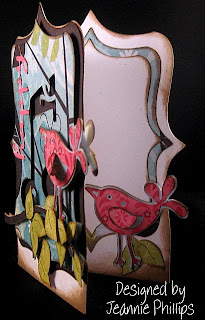
I realized that I needed a couple of b'day cards that I need to make and send...they may be late...this is one of them... I saw this cut from Gypsy Wanderings with the music notes in it and the card grew from there...I just loved this cut!!... this was not one of those cards where I felt I knew just what it was going to look like when I finished....I was so excited when I finished and was so tickled with the outcome.... thank you so much for looking... I thrive on your comments!!... have a wonderful day... Hugs, Jeannie
CRICUT & GYPSY
*No Cricut cuts included on the card because of all the welding.*
Gypsy Wanderings
Bookplate cut with notes in it cut @ w 3.48 x h 4.45
Bookplate shadow blackout cuts for the shaped card (in red welded to the rectangles) cut @ w 3.95 x h 4.45... I placed one on the mat and welded a square from George @ w 3.42 x h 1.0..you have to unlink the width and height to get this size...
weld and group these two shapes
Bookplate background cut...that goes behind the Bookplate note cut cut @ w 3.95 x h 4.45.
Frame Bookplate for inside of card cut @ w 3.37 x h 3.80.
Top Bookplate cut for inside of card cut @ w 2.97 x h 3.35.
Zooballoos
Branch and its layer cut @ w 3.79 x h 1.37.
I cut two extra layers in green so I would have the extra leaves... I welded one of  regular branch cuts  onto the Bookplate Note cut to have a good place to pop dot the branch from.
Home Decor
Bird and its shadow cut @ h 1.63 ...set the height and the width will be right...I placed an extra shadow from the bird on the Bookplate Note cut and welded it there so have a good place to pop dot the assembled bird and its shadow to...the other bird is on the inside of the card.
Songbird
All letters cut @ h 0.77 set the height and the width will be right...overlap the letters for each word and weld together.
There are two mat shots because I had to lay this out on two mats ...I did this best by  putting all the cuts on one mat...then I named the file and saved it... then I deleted the items I wanted on the second page...and saved it with a -1 added to the end of the file name... then I opend the file with all the cuts... removed the cuts alread on page one...and saved this file with a -2 at the end of the file name.


Sunday, April 18, 2010

Take it SLOW and get well soon! BBTB2 DT Challenge

Designed by Jeannie Phillips ~ Southside, AL
Click on any picture to enlarge.
More picture including Gypsy screen shots below the instructions!

I am so excite to be a member of the BBTB2 Design Team.... It has long been a dream of mine to be on the BBTB design team.... and here I am!!.... this weeks challenge was to use the the Card Cut on From My Kitchen... to find it use the shift key and function key 3rd down on second row ... its the card feature and then shift... then its on the forth row down and the second row over...that is the cut in the challenge...I must admit that I thought oh my goodness what in the world am I going to do with this cut!!... and then it came to me... I altered the cut on my Gypsy... screen shots and instructions below... Be sure and stop by the BBTB2 and see what the other Design Team members created!!

Gypsy files for this card are available by e-mail... just copy and paste the following e-mail address into your own e-mail ... winacard@gmail.com ... and I will be glad to send you the file.

*Because of all the welding I wasn't able to include Cricut cuts for this card.*

CRICUT & GYPSY
From My Kitchen
Card cut (choose the shift button and the coffee cup feature key) cut @ w 3.65 x h 2.38...
Larger card cut for the inside cut @ w 3.65 x h 2.38... for this cut you will need to unlink the w & h.
George
Rectangle for behind card cut @ w 2.36 x h 3.57... for this cut you will need to unlink the w & h.
Larger sentiment rectangle cut @ w 2.19 x h 0.88 for this cut you will need to unlink the w & h.
Smaller sentiment rectangle cut @ w3.97 x h 0.63 for this cut you will need to unlink the w & h.
The sentiment is computer generated.
Triangle that creates the corners inside the card cut  cut @ w 0.90 x h 0.40 for this cut you will need to unlink the w & h.
Circle that creates the corners inside the card cut cut @ w 0.42 x h 0.32 for this cut you will need to unlink the w & h.
Weld these two shapes together...then duplicate and use the flip features for each corner...for the larger inside peace you will need to change the size of the grouped triangle and circle to w 1/17 x h 0.67 for this cut you will need to unlink the w & h.... you can duplicate this for each corner and flip each piece to  fit in the corners.
Walk in My Garden
Snail and its layer and shadow cut @ h 0.93 ...set the height on each and the width will be right...be sure to relink your w & h when you do this.
Easter 2010
Grass cut @ w 1.46 x h 1.0 ... place two on the mat and weld together for the length you need for inside your window.... before you weld these to the window duplicate and add a rectangle cut @ w 2.50 x h 0.21  from George to the bottom.. weld these three pieces together then duplicate.

The easiest way to get everything to line up on each layer is this....Place your card on the mat... then weld your grass to it...then weld the snail shadow to the grass...then weld 2 corners to the top.... group all of this together... duplicate... then delete the snail shadow... duplicate this and delete  your grass .... now for the tricky part... on the piece where you have deleted your grass and your snail click on this then click on your weld key.... click on the triangle to un-group just the triangle ...then click on the circle inside the triangle to un-group that... click on your group button again... now click on any clear space on your mat... then click your group button and click on your un-grouped triangle and your un-grouped circle... this will group just these two items together so you can duplicate them and make corners for the bottom of your top square...see mat.... after you get all your corners placed group everything together and make sure everything is welded.


Wednesday, April 14, 2010

Keep Your Lamp Burning

Designed by Jeannie Phillips ~ Southside, AL
Click on any picture to enlarge.

The file for this card is available by email... just copy and paste the following email into your own email account.

CRICUT & GYPSY
Sentimental
Lamp its shadows and all 4 or its layers cut @ h 3.56... set the height and the widths will be right... the lamp shadow that isn't in red isn't welded to that small rectangle...its there to cut the right shape out in the rectangle to make the lamp layers sit right...I also liked the effect better.... on the Cricut I would cut these @ 4 inches... I wouldn't worry about the un-welded shadow cut.
Stamp shaped cuts cut @ w 1.46 x h 1.74... on the Cricut I would cut these at 1 3/4 inches.
Give A Hoot
Flourishes cut @ w 2.01 x h 0.65 ... on the Cricut I would cut these at 1/2 an inch.
Forever Young
Lady Silhouettes cut @ w 0.66 c h 1.40.. do not weld this cut to the rectangle behind it...so it will be cut out of the center.... on the Cricut I would cut these @ 1 1/4 inch in black and glue on top of the square.
George
All the rectangles are actually squares cuts with the height and width off to get the sizes I needed.
Squares welded to the lamp shadows and grouped then cut @ w 0.66 x h 1.40...lay out one of these then duplicate so they will be exactly the same... pop the first one from the background... then pop the other from that... using the Cricut I would cut these on my paper trimmer at width 3.5 x h 1 3/4 an inch and then glue the shadow into place.
Smaller Square for the sentiment cut @ w 3.41 x h 1.52...place the lamp shadow over this... in the right place... but do not weld so you get the round cut in the corner...see picture.... to line this up right I placed it over the welded pieced... the grouped and moved...using the Cricut I would cut this on the paper cutter at a little little more than 3 inches x 1 1/2 inches.
Square with the silhouette cut out cut @ w 1.19 x 1.46 ...using the Cricut would cut these with the paper cutter 1/4 inch wider and taller than your stamp cut.

*The lamp shadow that is not welded is placed off the paper some because you don't need that  lamp except for what it does to the square.


Monday, April 12, 2010

Love Thy Neighbor ~ A Thank You Card

Designed by Jeannie Phillips ~ Southside, AL
Click on any picture to enlarge.
More pictures below the instructions.
Gypsy file for this card available by e-mail... just copy and paste this e-mail address to your own e-mail account... winacard@gmail.com.

I am so excited about this card!!..I have been waiting to use this cartridge...but was so blank about what to do... then I was looking through the cartridge and this idea popped into my head... I did think well what would you send this card for... but took a leap of faith and figured it would come to me... and it did... this would be a wonderful Thank You card for somebody that had done something extra special for you ... like cook for you when you got out of the hospital.... took care of your animal... when that came to me in the middle of making the card I just got all excited!... thank you for you comments...and thank you so so much for looking.. Hugs, Jeannie

CRICUT & GYPSY
Create A Critter
Tree and its layers cut @ h 3.98 set the height and the width will be right on all cuts... I cut a trunk for each layer... I have two green layers...then the layer with the leaves cut out... I the first layer is adhered to the background... the next is popped from there...then the leaf layer is popped from there... on the Cricut I would cut these @ 4 inches.
Owl and its layers cut ! h 1.86...set the height and the width will be right...on the Cricut I would cut these at 1 3/4 inches.
Squirrel and its layers cut @ h 1 inch...set the height and the width will be right...on the Cricut I would cut these at 1 inch.
A Child's Year
"Love" cut @ w 1.80 x h 1.00.. one is welded to the top layer of the tree... the other is adhered to that... on the Cricut I would cut this @ 1 inch... twice and glue them together then glue them to the tree.
Easter 2010
 Taller Grass cut @ w 1.46 x h 1.0 inches...there are three of these welded and grouped together...on the Cricut I would cut these at 1 inch.
Shorter grass is the taller grass duplicated... just change the height on the grouped piece to 0.75 inches...on the Cricut  I would cut 3 or 4 of these at 3/4 and inch.
George
Circle welded to grass cut @ w 1.05 x h 1.42 inches...on the Cricut I would cut this at 1 1/2 inches.
Circle with text cut @ w 0.91 x h 1.23 inches...on the Cricut I would cut this at 1 inch.
Text is computer generated.


Saturday, April 10, 2010

Be Still

Designed by Jeannie Phillips ~ Southside, AL
Click on any picture to enlarge.

This card was inspired by a card DJ1952 on the Cricut Message Boards posted the other day... click here to see her card.... its really very different but the title made me see this chair in my head with flowers in it...but you see it evolved into something different.... but without DJs card I would have never in a million years thought up this card.... so I hope that she loves it!!...then the perfect Bible Verse came to me for the inside... Psalm 46:10... this very verse gave me so much peace today!!... so I needed this card... hope you like it!!... thank you so much for your comments!... Hugs, Jeannie

Gypsy file for this card avaliable by e-mail...just email me @ winacard@gmail.com .
Just copy and paste the e-mail address into your own email.
If you make this card please leave a comment so  I can check out your card... if you don't have a blog I would love it if you would e-mail me a picture of your card!
CRICUT & GYPSY
Life is a Beach
Chairs and its layer cut @ w 2.27 x h 2.05...I popped one chair from the other an then added the layers to the top chair...the first chair is popped from the background paper...on the Cricut I would cut these @ 2 inches.
Gypsy Wanderings
Trees and its layer cut @ h 4.19... set the height and the width will be right... I put both of the trees together and  adhered the first tree to the background paper and popped the second tree from the first....on the Cricut I would cut these @ 4 1/4 inches.
Animal Kingdom
Cat's cut @ w 0.97 x h 0.52 inches... on the Cricut I would cut these at 1/2 an inch.
Walk in My Garden
Flower's (I used the shadow blackout) cut @ w 0.65 x h 0.54... I cut 23 of these... 7 of which are welded to the grass.... the rest in pink...7 are glued on top of the welded ones in the grass and the rest are on the inside of the card.....on the Cricut I would cut these at 1/2 and inch.
Easter 2010
Shorter Grass cut @ w 1.98 x h 1.19 ... place two in the mat and weld them together....on the Cricut I would cut 2 or these at 1 1/4 inches...and overlap them on the card to get the length you need.
Taller Grass (2) ...duplicate the shorter grass then unlink the width and height and change the height to h 1.59...on the Cricut I would cut 4 of these @ 1 1/2 inches and overlap on the card to get the length you need.


Wednesday, April 7, 2010

So Don't Be Afraid, Little Flock

Designed by Jeannie Phillips - Southside, AL
Click on any picture to enlarge.

As many of you know I often pray for my cards...and I prayed for one last night...and this morning I was reading my daily Bible reading and this verse stood out (see inside of card below for the verse)!!.... I read this verse and thought "that is a card!!..I was so so excited... then I took a nap...and it all had come together in my head... I was so excited about it when I started ... and then even more excited when I finished!!... I hope that this card touches your heart, because it was truly a gift from God... Hugs, Jeannie

CRICUT & GYPSY
Pooh and Friends

Butterflies cut @ w 0.80 x h 0.88.. I welded a George rectangle cut @ w 0.20 x h 0.27 to the bottom of the butter fly..group them ...then duplicate...flip the second one from top to bottom and rotate it... move into place and group all of these together....you are going to trim off the tail and the nose and antennas and fold this in half...and glue it in between two of the angle cuts....on the Cricut I would cut 2 butterflies @ 1 inch.. glue the bodies together.. trim off the tail and the nose and antennas and glue that little part together... then glue this between two of the baby bodies.
New Arrival
Baby cut @ w 1.20 x h 1.42...on the Cricut I would cut this at 1 1/2 inches.
Paper Doll Dress Up
Angel's Hair is Raggedy Andy's hair cut @ w 1.29 x h 2.42...weld three of these onto the babies heads cut the fourth one in yellow..... on the Cricut I would cut this @ 1 inch...I think that will work... you can glue these to the baby's heads if using your Cricut.
Lamb cut ! w 2.35 x h 3.42...I cut two in white and one in black on the white ones I trimmed off the face and legs..on on the top white one I trimmed off the tail...I use the Swirls Cuttlebug Folder for the embossing... I put the white layer with the tail directly on the black cut...and popped the other layer from that...the sheep is also popped from the background...on the Cricut I would cut these @ 3 1/2 inches.

Easter 2010

Short Grass cut @ w 1.59 x h 1.09 x h there are four of these pieces to make a grass layer... I flipped two and welded and grouped them together to get the length I wanted.. which was 4.75 inches...

Tall Grass is the complete piece of short grass duplicated.. flipped side to side and change the height to....h 1.59...
 on the Cricut I would cut 4 for each row of grass.. and overlap them to create the grass..cutting one set a 1 inch and the other two sets @ 1 1/2 inches.
Walk in My Garden
Flowers (shadow blackout cut) cut @ w o.48 x h 0.39 ...I cut placed a total of 24 of these on the mat... twelve of them are welded to the grass to give a good place to glue the actual flowers and 12 I cut out in blue to match the flowers on my paper....on the Cricut I would cut these at 1/4 and inch and cut only 12 in the color of your choice and glue directly to the grass layers.
Ladybug and its layer cut @ 2 1.32 x h 0.89...on the Cricut I would cut this at 3/4 an inch.


Tuesday, April 6, 2010

Guard-in Angel (Story behind title)

Designed by Jeannie Phillips - Southside, AL
Click on any picture to enlarge.

The story is important to the title of this card... it gives me a warm fuzzy feeling!!.. first I connect with a childhood friend on Facebook recently....and through our conversation we found out that we had shared so much more in childhood than we knew... it no wonder we were drawn to each other...so I wanted to make her a card and asked what she liked...she said Guardian Angels..so I thought how am I going to make this card without it being all formal.... I wanted something sweet and cute...then I remembered that once when my son was little he saw a snake in his Big Papaw's garden...we told him no to worry it was just a garden snake... he was delighted...being into superheroes as he was and said "oh a guard-in sake... they guard the garden!!!"...and that is how this card came to be... I remembered a stamp that I was thinking was a Cricut cut and imagine my dismay when I remembered it was a stamp...one that I didn't have!!... so when Joyce told me oh Jeannie you can make anything...I couldn't disappoint her!!...THANK YOU JOYCE... to make the angel I used the crawling baby from New Arrival... and butterfly wings from Pooh and Friends!!... and Raggedy Andy's hair from Paper Doll Dress Up..turned sideways a bit... so the left ear of the baby ended up being its nose!..I am so excited about my little angel!!...beyond excited...I hope that you like it!!... thank you so much for looking and for you comments!!... Hugs, Jeannie

Gypsy file available by e-mail @ winacard@gmail.com.
Copy and paste this e-mail address into your personal email.
CRICUT & GYPSY
New Arrival
Baby cut @ w 1.20 x h 1.42...on the Cricut I would cut this at 1 1/2 inches.
Paper Doll Dress Up
Angel's Hair is Raggedy Andy's hair cut @ w 1.29 x h 2.42...weld three of these onto the babies heads cut the fourth one in yellow..... on the Cricut I would cut this @ 1 inch...I think that will work... you can glue these to the baby's heads if using your Cricut.
Pooh and Friends
Butterflies cut @ w 0.80 x h 0.88.. I welded a George rectangle cut @ w 0.20 x h 0.27 to the bottom of the butter fly..group them ...then duplicate...flip the second one from top to bottom and rotate it... move into place and group all of these together....you are going to trim off the tail and the nose and antennas and fold this in half...and glue it in between two of the angle cuts....on the Cricut I would cut 2 butterflies @ 1 inch.. glue the bodies together.. trim off the tail and the nose and antennas and glue that little part together... then glue this between two of the baby bodies.
Walk in My Garden
Tulips and its flower layers cut @ w 0.92 x h 2.58....on the Cricut I would cut these @ 2 inches.
Ladybug and its layer cut @ 2 1.32 x h 0.89...on the Cricut I would cut this at 3/4 an inch.
Worm cut @ w 2.55 x h 1.0....I forgot it had a layer for its feet... and I was lazy and just drew them in... on the Cricut I would cut this @ 1 inch.
Easter 2010
Short Grass cut @ w 1.59 x h 1.09 x h there are four of these pieces to make a grass layer... I flipped two and welded  and grouped them together to get the length I wanted.. which was 4.75 inches...
Tall Grass is the complete piece of short grass duplicated.. flipped side to side and change the height to....h 1.59... on the Cricut I would cut 4 for each row of grass.. and overlap them to create the grass..cutting one set a 1 inch and the other two sets @ 1 1/2 inches.
I popped the first layer of tall grass from the background paper...then glued the yellow tulips onto that... then popped the second row of tall grass from that and added the pink tulips ..cutting one of the pink tupips into two pieces ...so that I would have a tulip for the inside...then I glued the row of shorter grass directly on top of that.


Monday, April 5, 2010

A Light in My World

Designed by Jeannie Phillips - Southside, AL
Click on any picture to enlarge.
This card came to me today when I was reading my daily Bible reading... the verse was Luke 11:34 "Your eye is a lamp that provides light for you body. When your eye is good, your whole body is filled with light. But when it is bad, your body is filled with darkness..."... I had the world and the lantern in my head but just couldn't figure out how to lay it out on my card... then I took a nap...and as many or you know a nap is when cards come together in my head... and when I say the background cuts in my head I woke up!!... and couldn't wait to get my card on paper... this is a very easy quick card!... I so hope that you like it!!.. I love your comments they mean the world to me!!... more than you could imagine... Hugs, Jeannie

Gypsy file available by e-mail at winacard@gmail.com
Just copy and paste the e-mail address into your own e-mail account.

CRICUT & GYPSY
Give A Hoot
Heart shaped globe and its layer cut @ w 2.75 x h 2.36... I welded the lantern shadow blackout to the globe cut and to both cuts of the globe..... on the Cricut I would cut these @ 2 1/4 inches...On the Circut I would cut two extra shadow blackout globes in the color of each piece and glue them onto the globe.
Campin Out
Lanterns and lantern layers cut @ w 0.83 x h 1.64... I went back and cut an extra for the inside... you could add these before you cut with the duplicate feature... on the Cricut I would cut these @ 1 1/2 inches.
Songbird
Frame behind the globe large one cut @ w 3.36 x h 3.18, smaller one cut @ w 3.08 x h 2.19...on the Cricut I would cut these at 2 1/4 inches and 3 1/4 inches... you will turn it sideways to put on your page.
"T" cut @ w 0.40 x h 0.70... you will have to unlink the width and height for this cut...on the Cricut I would cut this at 3/4 an inch.
Fabulous Finds
Bookplate found on the first row third purple button down and its shadow found on the second row and the third purple button down cut @ w 2.46 x h 1.0 ....on the Cricut I would cut this at
1 inch.


Sunday, April 4, 2010

Two Little Sparrows

Designed by Jeannie Phillips - Southside,AL
Click on any picture to enlarge.

I was doing my daily Bible reading this morning and this card came to me... this was not one of my scriptures today... but this card all the sudden was in my head... I couldn't wait to make it!!... I think it will make a wonderful card of encouragement for somebody... what do you think??... thank you so much for looking and being an inspiration to me each and every day!... Hugs, Jeannie

Gypsy File available by e-mail @ winacard@gmail.com
Just copy and paste the e-mail address into the "to" of your own
 e-mail account.

CRICUT & GYPSY
Give A Hoot
Branch and it layers cut @ w 2.86 x h 2.0... I flipped one of the branches from top to bottom and welded them together... so be sure and flip a set of your layer... you need two layers per branch cut...one in the color of your leaves and one in the color of your flowers....I glued the end of the branch to the background paper and popped the branch where the flowers and leaves are.....on the Cricut I would cut these at 2 inches.
Create A Critter
Nest (2) cut @ 2.55 x h 1.14 inches...I cut two and popped one from the other...I popped the first one from the background at the top and adhered the bottom to the background paper... on the Cricut I would cut these @ 1 1/4 inches and overlap the end of the branches when I put them on the paper.
Home Decor
Bird and its layers (2) cut @ w 1.93 x h 1.21... on the Cricut I would cut these @ 1 1/4 inches.
Easter 2010
Cross cut @ w 1.07 x h 1.32... on the Cricut I would cut this @ 1 1/2 inches.


Thursday, April 1, 2010

Walking God's Highway

Designed by Jeannie Phillips ~ Southside AL
Click on any picture to enlarge.

I found this paper ... its paper... so I had a bit of trouble... (remember to buy card-stock Jeannie...remember to buy card-stock!)...but it was so perfect for my son, John-Robert... it just screamed his name... let me tell you a bit about John-Robert... he started RA camp in the summer... a church camp... when he was 8... became a counselor a year before he was suppose to be eligible at 15...and now he is On-Site Director this is his 3rd year...and he is 22... he is so close to God... he has taught me so much about how to be close to God... if I have a God question I ask John-Robert... he has even preached...and I got to hear him...and it blew me away!!.... he loves sharing the fact that God loves us... and for Christmas he gave me a One Year Bible... I have not missed a day reading it...and it has changed my life... made me a much better Christian and a much better person... and I am so excited about the changes!!!... so this card is for John-Robert who walks God's Highway!!!

CRICUT & GYPSY
I am not including Cricut instructions on this card because of the welding...and the stretching of several of the objects.
New Arrival
Feet cut @ w 0.85 x h 1.0.. you will have to unlink the width and length for this....I stretched the length of the feet to make them look like adult feet.
Graphically Speaking
Arrow cut @ w 5.48 x h 2.53... you will also have to unlink the width and length for this cut... the bottom of the arrow is glued to the background the top is pop-dotted from the background.
Going Places
Highway Sign cut @ w 1.68 x h 1.64... I cut two in black and one in white...the white one I trimmed the center pieces out and adhered to one of the black pieced...the other black piece is popped from the background ...then the one with the white is popped for that.
George
letter I for the sign post cut @ w 0.39 x h 2.10
Learning Curve
"walking" cut @ h 1.0.. set the height and the width will be right... I welded these together....I cut two of these in black card-stock and one in paper and glued them all together to give a chipboard look.
"GOD'S" cut @ I put these on the mat at h 1.0... then I welded the letter together...and then I changed the group of letters to w 1.14 x h 0.96.


Blog Widget by LinkWithin
Thank you so much for signing my Guestbook... I have no idea how to reply to people who do sign in... but I so love it when you do!!... So thank you so much!... if you ever have any questions you can email me @ winacard@gmail.com. I will be happy to answer any questions you might have.

Thank you again for signing my Guestbook~
Jeannie

Please Sign In