Thank Your For Stopping By

Thank you so much for stopping by to visit my blog... it is changing as I change and learn more things... I hope after Christmas to get an opportunity to make some more CARDS. I am loving Loom Knitting now... and have lots to do before Christmas....I don't mind sharing how I do things and if you have questions you can E-MAIL me @ winacard@gmail.com and I will be happy to answer any questions that I have.


Showing posts with label Video. Show all posts

Wednesday, October 19, 2011

Fall Infinity Scarf with How to Video for a Loose Cast Off

Handmade Design by
Jeannie Phillips ~ Southside AL

 This is an Infinity Scarf or Cowl that I did on my CinDWood round afghan loom... it is knitted in the round.  I didn't know I would like it until I got it off the loom... now I am really excited at how it turned out!  The exciting part is the loose cast off stitch!  I think I invented it.. I have not seen it before and it is wonderful... it ends up the same "size" as the e-wrap cast on so you don't have to do anything extra once you take this off the loom!!!.. But block your work of course. I am including a video at the end of this post.  Please let me know how you like it!!  Hugs Jeannie


Loose Cast Off Stitch ~ How to Video by Jeannie Phillips


Friday, July 9, 2010

SOS - Handmade Cards by Jeannie Phillips - How to Video

Designed by Jeannie Phillips ~ Southside, Al
Click on any picture to enlarge.
There is a instructional VIDEO at the bottom of this post.
The Gypsy File is available for this card by email. Just copy and paste this email to your personal email account winacard@gmail.com and let me know which Gypsy file that you are wanting.

I am so, so, so excited about this card… I have played with my Cri-Kits enough to be able to incorporate them into my kind of designs… so this card was so fun to make… I use by Cri-Kits pens for the background and for the flag… I am so excited about how this turned out…and it gives the illusion of even more depth. I so hope that you like it too!!… I will be sending this to Dru at Cri-Kits to take with them to the CHA Show in Chicago… how fun is that… too bad I can’t fold myself up in the card… I cherish your comments and thank you so much for looking!

CRICUT, GYPSY & CRI-KITS Pens
(Sorry, There are no Cricut instructions for this card.)
Layer 1 (all cut pieces) Cut this layer out last.
Give a Hoot
Boat and all it’s layers cut @ h 2.95.…set the height and the widths will be right.
Life is a Beach
Waves cut @ w 4.78 x h 1.25.. To get this size unlink the width and height…. Cut three of these…two you will weld to rectangles from George…
George
Rectangles for the waves.. Shorter one w 4.75 x h 1.20.. Unlink the width and height and set real dial size for these cuts …. Taller rectangle w 4.75 x h 1.23... You will weld these rectangles to two of the waves.

Rectangle for background piece cut @ w 4.75 x h 3.50... You will unlink the width and height for these cuts and set real dial size.
Layer 2 (using the black Cri-Kits pen) cut/draw this layer first. Be sure and re-link the width and height and turn the real dial size off.
Indy Art
Skull and Cross bones cut @ w 0.50 x h 0.38
All Mixed Up
“S” cut @ w 0.28 x h 0.50
“O” cut @ w 0.29 x h 0.50
“S” cut @ w 0.20 x h 0.36
* When this layer finishes cutting/drawing choose add to design …do NOT choose unload mat… change pens to blue.
Layer 3 (using blue Cri-Kits Pen)
Create a Critter
Layer 4  (Using Yellow Cri-Kits Pen)
Cloud cut @ w 1.98 x h 1.13
* When this layer finishes cutting/drawing choose add to design …do NOT choose unload mat… change pens to yellow.
Gypsy Wanderings
Sun cut @ w 2.08 x h 2.27

* When this layer finishes cutting/drawing choose add to design …do NOT choose unload mat… change pen housing to blade housing… cut layer one.

*Important put a piece of paper under the housing each time you change it… and before you put the pens in scribble on a scrap piece of paper to get ink flowing.

Card base is 4 ¼ x 5 ½, Frame Piece 4 x 5 ¼ , Background piece 3 ½ x 4 ¾… these cuts are on the inside and outsides of my cards… Sentiment piece 2 ¾ x 4 inside only….. I cut all of these with my paper trimmer.

There is now a link at the bottom of each post where you can show off your recreation of my cards… with a link back to your card on your blog, or the Cricut Message Board or a photo storage place like Photo Bucket…. I would love it if you share your recreations with me! It just makes me happy!! Thank you so, so much! Hugs


I love sharing the instructions and files for my cards but I do ask that if you use my instructions or files to recreate my card and place it on your blog or somebody else’s blog that you give me the credit for the original design. I also ask that you do not submit my designs for publication, profit or for any contest. Thank you.

Sunday, July 4, 2010

Monogram/Butterfly ~ How to Video

Designed by Jeannie Phillips ~ Southside, Al
Click on any picture to enlarge.
There is a instructional VIDEO at the bottom of this post.
The Gypsy File is available for this card by email. Just copy and paste this email to your personal email account winacard@gmail.com and let me know which Gypsy file that you are wanting.

Oh I am still playing with my Cri-Kits pens… www.cir-kits.com … I am loving these… this is a card I made for my step-mom for her birthday… her name is Gail…thus the G… I hope that she loves it… I hope to play with my pens some more then start intergrading them into my card making style more naturally…but for now I am just having a blast!

Oh and some exciting news for me…I am so excited… Dru from Cri-Kits has asked me to send her some of my cards using the Cri-Kits pens for them to show off at the CHA Show in Chicago!… What an honor is that!!… if you are there please stop by and tell them I said hi!

CRICUT, GYPSY & CRI-KITS
Layer 1 (cut pieces)
George
Rectangles .. Large cut @ w 4.75 x 3.5 .. Small w 1.90 x h 2.47... These cuts are on real dial size and you have to unlink the width and height to get both of these sizes.
*be sure to re-link your width and heigh buttons and de-select the real dial size for the rest of this card.
Circles (for tag)Large w 0.89 x h 0.83 .. Small w 0.80 h 0.75
Once Upon a Princess
Butterfly layer (its body) cut @ h 2.23..set the height and the width will be right… this butterfly body came from a different butterfly cut than the one we use it on in the card.
Tag and its layer (shift key) cut @ h 1.34 .. Set the height and the width will be right for both cuts.
Layer 2 (drawn pieces with Cri-Kits)
Once Upon a Princess
Butterfly cut @ w 2.09 x h 4.03.
Cindy Lou
Swirlssmall for the tag cut/drawn @ w 0.74 x h 0.38 duplicate and flip up for the second small swirl .. Large for the inside of card cut/drawn @ w 1/35 x h 0.69.
Jasmine
“G” cut @ w o.45 x h 0.94.
Gypsy Wanderings
“Happy Birthday” cut @ w 2.51 x h 1.71.

Card base is 4 ¼ x 5 ½, Frame Piece 4 x 5 ¼ , Background piece 3 ½ x 4 ¾… these cuts are on the inside and outsides of my cards… Sentiment piece 3 1/2 x 4 3/4  inside only….. I cut all of these with my paper trimmer.

There is now a link at the bottom of each post where you can show off your recreation of my cards… with a link back to your card on your blog, or the Cricut Message Board or a photo storage place like Photo Bucket…. I would love it if you share your recreations with me! It just makes me happy!! Thank you so, so much! Hugs


I love sharing the instructions and files for my cards but I do ask that if you use my instructions or files to recreate my card and place it on your blog or somebody else’s blog that you give me the credit for the original design. I also ask that you do not submit my designs for publication, profit or for any contest. Thank you!


Thursday, July 1, 2010

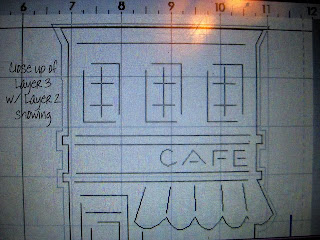
Cafe Anniversary ~ How to Video Part 1

Designed by Jeannie Phillips ~ Southside, Al
Click on any picture to enlarge.

There is a instructional VIDEO PART 1.. at the bottom of this post… VIDEO PART 2 IN NEXT POST.
The Gypsy File is available for this card by email. Just copy and paste this email to your personal email account winacard@gmail.com and let me know which Gypsy file that you are wanting.

This is an anniversary card that I made for my daughter, Madison and her husband, Cory for their 1st anniversary…I used one of my Cri-Kits pens from http://www.cri-kits.com/ . I am having so much fun with these pens!… If you are interested in how to use the pens to make them line up just right be sure and watch both videos.. There is a part 1 and a part 2. I hope that you love this card…it is simple but I thought that the simplicity of it is what added to its charm. Thank you so much for looking!!

CRICUT, GYPSY & CRI-KITS
(There are no Cricut instructions for this card.)
Layer 1 (on Gypsy)
Sweethearts
Couple at table cut @ w 1.91 x h 1.94.
Heart and it couple layer cut @ w 1.55 x h 139.
Shadow Heart cut @ w 1.69 x h 1.47
My Community
Café Shadow cut @ w 4.83 x h 5.50... Duplicate this and flip it side to side over lap a little and weld pieced together to make the shaped card.
Layer 2 (on Gypsy)
Café Shadow drawn @ w 4.83 x h 5.50
Layer 3 (on Gypys)
Café cut (regular cut) cut @ h 5.50...set the height and the width will be right.
Layer 4 (on Gypsy)
Sweethearts
Happy Anniversary" drawn @ w 2.72 x h 1.20
Jasmine
“1” cut @ w 0.20 x h 1.50
“s” cut @ w 0.15 x h 0.66
“t” cut @ w 0.26 x h 0.57


There is now a link at the bottom of each post where you can show off your recreation of my cards… the link to this card is below the Part2 Video... this will link back to your card on your blog, or the Cricut Message Board or a photo storage place like Photo Bucket…. I would love it if you share your recreations with me! It just makes me happy!! Thank you so, so much! Hugs

I love sharing the instructions and files for my cards but I do ask that if you use my instructions or files to recreate my card and place it on your blog or somebody else’s blog that you give me the credit for the original design. I also ask that you do not submit my designs for publication, profit or for any contest. Thank you!

Video Part 2  next post or click HERE

Cafe Anniversary ~ How to Video Part 2


Part 1 video in previous post or click HERE

Saturday, June 19, 2010

Our Monsters ~ With Video

Designed by Jeannie Phillips ~ Southside, Al
Click on any picture to enlarge.
There is a instructional VIDEO at the bottom of this post.
The Gypsy File is available for this card by email. Just copy and paste this email to your personal email account winacard@gmail.com and let me know which Gypsy file that you are wanting.

I just have to tell you this card stumped me all week long… all week!!… I have been frozen about making this card and it has kept me from making a card all week long!!… it is the first time that I used mini monsters.. Which I love!! And I just let these little fellows get the best of me…. I do suggest that you cut a couple of these out in larger sizes to practice on, it will get it all clear in your head and be less intimidating!.. They really aren’t hard… once you make one for the first time.

This card is for my dear husband for Father’s Day…I hand did the inside to remind him of when our grown up kids were just little kids…I so hope that he loves it.

*There is now a link at the bottom of each post where you can show off your recreation of my cards… I would love it if you share your recreations with me! You can add your picture from your blog, the Cricut Message Board, or a photo storage place like Photo Bucket….Thank you so, so much for looking!  Don’t forget to add your pictures!!!… that just makes me happy!!
Hugs, Jeannie
CRICUT & GYPSY
*Cricut cuts or this card are not included because of all the welding and other changes on this card.
Mini Monsters
The word “Monsters.” its shadow cut and its layer cut  cut @ w 4.59 x h 1.99...to get this measurement you will have to unlink the width and height… weld the shadow cut of the Monsters to the shadow cut of the word monster… see mat shot below.
Monster with wings and all it’s layers cut @ h 1.52..set the height and the width will be right…be sure and re-link your width and height first.
The other Monster and its layers  cut @ h 1.52...set the height and the width will be right.
Gypsy Font
“our” and its shadow cut @ h 1.49 set the height and the width will be right… I welded the u and r together on the shadow first then on the letters … I welded the shadow cut of our to the phrase cut of Monsters.
Card base is 4 ¼ x 5 ½, Frame piece 4 x 5 ¼ , Background piece 3 ½ x 4 ¾… these cuts are on the inside and outsides of my cards… Sentiment piece 2 ¾ x 4 inside only….. I cut all of these with my paper trimmer.

On the Video for this card (at bottom of this post) I try to explain the layering really good…I hope it helps you!

I love sharing the instructions and files for my cards but I do ask that if you use my instructions or files to recreate my card and place it on your blog or somebody else’s blog that you give me the credit for the original design. I also ask that you do not submit my designs for publication, profit or for any contest. Thank you!


Monday, June 14, 2010

Fish Tales ~ Handmade Cards by Jeannie Phillips ~ How To Video

Designed by Jeannie Phillips ~ Southside, Al
Click on any picture to enlarge.
There is a instructional VIDEO at the bottom of this post.
The Gypsy File is available for this card by email. Just copy and paste this email to your personal email account winacard@gmail.com and let me know which Gypsy file that you are wanting.

This is my BBTB2 Design Team card for this week… we were to use the fish cut from Campin Out. All I could think of was my niece, Katy fishing with her daddy one day a few years back and stopped by where I worked at the time to tell me about the fish she caught. Her hands were spread out wide, really wide. Her daddy stood behind her with his fish much, much closer together. It so made me smile! So this card was inspired by Katy! Love you Katy… be sure and stop by The Bug and see what all the designers have come up with this week!  Thanks for looking! Hugs, Jeannie
*There is now a link at the bottom of each post where you can show off your recreation of my cards… I would love it if you share your recreations with me! Thank you so, so much! Hugs

CRICUT & GYPSY
Campin Out
Fish and their layers cut @ sm h 1.0, med h 1.25, lg h 1.50 …set the height and the widths will be right… on the Cricut I would cut these at 1, 1 ¼ and 1 ½ inches.
Stamped
“fish tales” letters cut @ h 1.0 ..set the height and the widths will be right… lay your letter out, dulpicate and weld to the I cut from George that is turned sideways…. on the Cricut I would cut these letter @ 1 inch.. I would only cut one set of letter using the Cricut and I would glue then to your line.
George
The letter “I” used for the strip under each word cut @ w 0.39 x h 4.71 .. You will have to unlink the with and height to get this size… using the Cricut I would hand cut these strips (see picture) just between 1/3 inches wide and just shy of 4 4/3 inches long.
Rectangle cut @ w 4.75 x h 1.55...you will need to unlink the width and height to get this cut and select real dial size…. Using the Cricut I would cut this at width 4 ¾ inche and height 1 ½ plus 2/16 on my paper cutter.
Squares cut @ h 1.30 inches be sure you are not on real dial size and that your width and height are relined… Using the Cricut I would cut these square with my paper trimmer at 1 ¼ plus 2/16 for the width and height.

Card base is 4 ¼ x 5 ½, Frame Piece 4 x 5 ¼ , Background piece 3 ½ x 4 ¾… these cuts are on the inside and outsides of my cards… Sentiment piece 2 ¾ x 4 inside only….. I cut all of these with my paper trimmer.

I love sharing the instructions and files for my cards but I do ask that if you use my instructions or files to recreate my card and place it on your blog or somebody else’s blog that you give me the credit for the original design. I also ask that you do not submit my designs for publication, profit or for any contest. Thank you!


Friday, June 4, 2010

Worlds Best Dad

Designed by Jeannie Phillips ~ Southside, Al
Click on any picture to enlarge.
There is a instructional VIDEO at the bottom of this post.
The Gypsy File is available for this card by email. Just copy and paste this email to your personal email account winacard@gmail.com.
I was asked to make a Father’s Day card for someone yesterday and realized how behind I actually am!… I have been busy, my son has been home from Auburn, my daughter has visited from Memphis a couple of times lately, and my mom has had several doctor’s appointments… not to mention I am hooked on Grey’s Anatomy reruns… How did I miss that show!?! Here is my first Father’s Day card… I made two of these and still have to make one for my dear husband. My video on this card has lots of info about welding…and a picture of the paper I used for this card… thank you so much for stopping by my blog!! I love your comments, they are dear to my heart. Hugs, Jeannie

CRICUT & GYPSY
I will not have Cricut instructions on this card because of all the welding it can’t be duplicated without a Gypsy or Design Studio.

Songbird
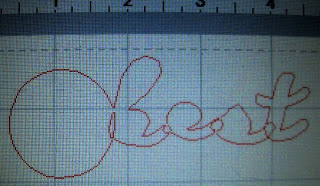
Letters for “best” and the shadow blackout letters cut @ h 1.28 set the height and the width will be right on all letters.
Globe and it’s shadow blackout cut @ h 1.41... Set the height and the width will be right on both cuts.
Beyond Birthdays
DAD and its shadow cut @ h 3.40 set the height and the width will be right.
George
Rectangle cut on real dial size @ w 4.75 x h 3.50

Sentiment piece is cut on my paper trimmer at 4 ½ x 3 inches.


There is lots of welding in this ... I explain this well in my video located at the bottom of this post.


the following code and paste it in your blog content while in HTML view


Blog Widget by LinkWithin
Thank you so much for signing my Guestbook... I have no idea how to reply to people who do sign in... but I so love it when you do!!... So thank you so much!... if you ever have any questions you can email me @ winacard@gmail.com. I will be happy to answer any questions you might have.

Thank you again for signing my Guestbook~
Jeannie

Please Sign In