


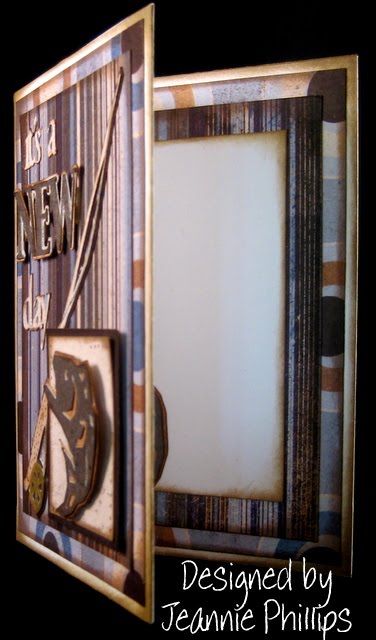
Designed by Jeannie Phillips ~ Southside, Al
Click on any picture to enlarge.

There is a instructional VIDEO at the bottom of this post.
The Gypsy File is available for this card by email. Just copy and paste this email to your personal email account winacard@gmail.com.
I HAVE BLOG CANDY THIS WEEK
We are having a blog hop over at the BBTB2 this week… if you hop through everybody’s blogs you will have a chance to win lots of prizes… from my blog you can hop to Teresa’s blog by clicking here! To win my blog candy (pictured at the bottom of this post) watch my video on how to make this card and leave comment… I will draw on Sunday afternoon for the winner! I will post the winners name on my blog…and if you have a blog I will leave you a comment on you blog if you win… you have 3 days to send me an email @ winacard@gmail.com.(copy and paste this email address to your own email account). When I get your address I will put your prize in the mail! Good Luck!!
Our cut for this week at BBTB2 was “Bless this Nest” from the Sweethearts cartridge… I always try to do my second idea because I think my first idea might just be everybody’s first thought… this is what I came up with this week…I hope that you like it…be sure and stop by the BBTB2 and see all the other wonderful projects the other Design Team member have come up with… they have done just a beautiful job… Thank you so much for looking at my project. Hugs, Jeannie
CRICUT & GYPSY
Sweethearts
“Bless Your Nest” cut @ w 2.18 x h 2.26 … on the Cricut I would cut this @ 2 1.4 inches.
Base Camp
“God” and its shadow cut @ h 0.70... Set the height and the width will be right....I welded the shadow “God” to the top of Bless from “Bless this Nest”…. . On the Cricut I would cut this @ ¾ and inch…. You can adhere this to the paper without welding it if you use your Cricut.
Stretch Your Imagination
Birdhouse its shadow blackout and its layers cut @ h 3.44...set the heights and the widths will be right… on the Cricut I would cut these @ 3 ½ inches.
Home Décor
Birds and their shadows cut @ h 0.93 set the height and the width will be right… on the Cricut I would cut these @ 1 inch.
Pooh and Friends
Branches cut @ w 3.65 x h 5.86 … I used the hide contour feature on the extra piece by the branch so that it wouldn’t cut… on the Cricut I would cut these @ 5 ¾ inches.
George
Hearts cut @ w 0.57 x h 0..45... You will only need 7 hearts… I cut out extras to put in the envelope with the card… on the Cricut I would cut these at ½ an inch.
Card base is 4 ¼ x 5 ½, Frame Piece 4 x 5 ¼ , Background piece 3 ½ x 4 ¾… this cuts are on the inside and outsides of my cards… Sentiment piece 2 ¾ x 4 inside only….. I cut all of these with my paper trimmer.


BLOG CANDY…DON’T FORGET TO WATCH THE VIDEO AND LEAVE A COMMENT!


.jpg)


